
What’s New – Oct 21, 2026
Release Highlights
A quick-glance summary of all features shipped in this release. Click any feature to jump to the full detail below.
| STRATEGY (Strategy Roadmaps, Balanced Scorecard, OKR Management, Hoshin Kanri) | ||
|---|---|---|
| S.No | Feature Name | Key Benefit |
| 1. | OKR deep dive view in OKR Progress Presentation | A new OKR Deep Dive View exports a department Objective List and a key result slide for each objective in one deck, built from live OKR data. |
| 2. | Sub-department hierarchy in the Department Fulfillment Score widget | The Department Fulfillment Score widget now nests sub-departments under their parent, each with its own independently calculated score. |
| Enhancements | ||
| 3. | Submission logging for OKR alignment requests | The Log now records when an alignment is submitted for approval, giving a full, attributed timeline from request to decision. |
| 4. | Configurable completion rule for OKRs | Administrators can require key results and objectives to be marked complete manually instead of auto-completing at 100%. |
| PROJECTS (Task Management, Portfolios and Projects, Timesheets, Notes, and Meetings) | ||
|---|---|---|
| S.No | Feature Name | Key Benefit |
| 1. | Combined stage and health field in PPM check-ins | Stage and health are now set together in one Stage & Health field, so a mismatched pair can no longer be saved. |
| 2. | Assign groups as owners in projects and tasks | Groups can now own portfolios, programs, projects, tasks and subtasks, with a full impact summary shown before any group change. |
| 3. | Co-owner editing for tasks in shared notes | Notes can be shared with Viewer or Editor access, and Editors become co-owners of the tasks created in the note. |
| 4. | Schedule conflict warnings for overlapping assignments | Tasks now flag overlapping assignments across projects and list the exact tasks causing each conflict. |
| 5. | Choose how resource allocation is calculated | Super users can calculate Capacity Workbench allocation from project commitments, so staffing is recorded before tasks are planned. |
| Enhancements | ||
| 6. | Descriptions, required fields and Athena for governance items | Governance statuses and types now carry descriptions, and decisions, assumptions, constraints and changes record their reasoning. |
| 7. | Task access and mentions follow project access | Users outside a project can no longer open its tasks or update its progress, and mentions are limited to project members. |
| PERFORMANCE (Performance, Goals, Development Plans, Recognition, Survey) | ||
|---|---|---|
| S.No | Feature Name | Key Benefit |
| 1. | Competency activities in performance reviews | Reviewers can see each competency's linked activities and their progress inside the review form while rating it. |
| 2. | Mandatory comments when reviewer ratings differ | Super users can require an Overall Rating comment only when a reviewer's rating differs from another reviewer's rating. |
STRATEGY (Strategy Roadmaps, Balanced Scorecard, OKR Management, Hoshin Kanri)
1. OKR deep dive view in OKR Progress Presentation
Overview
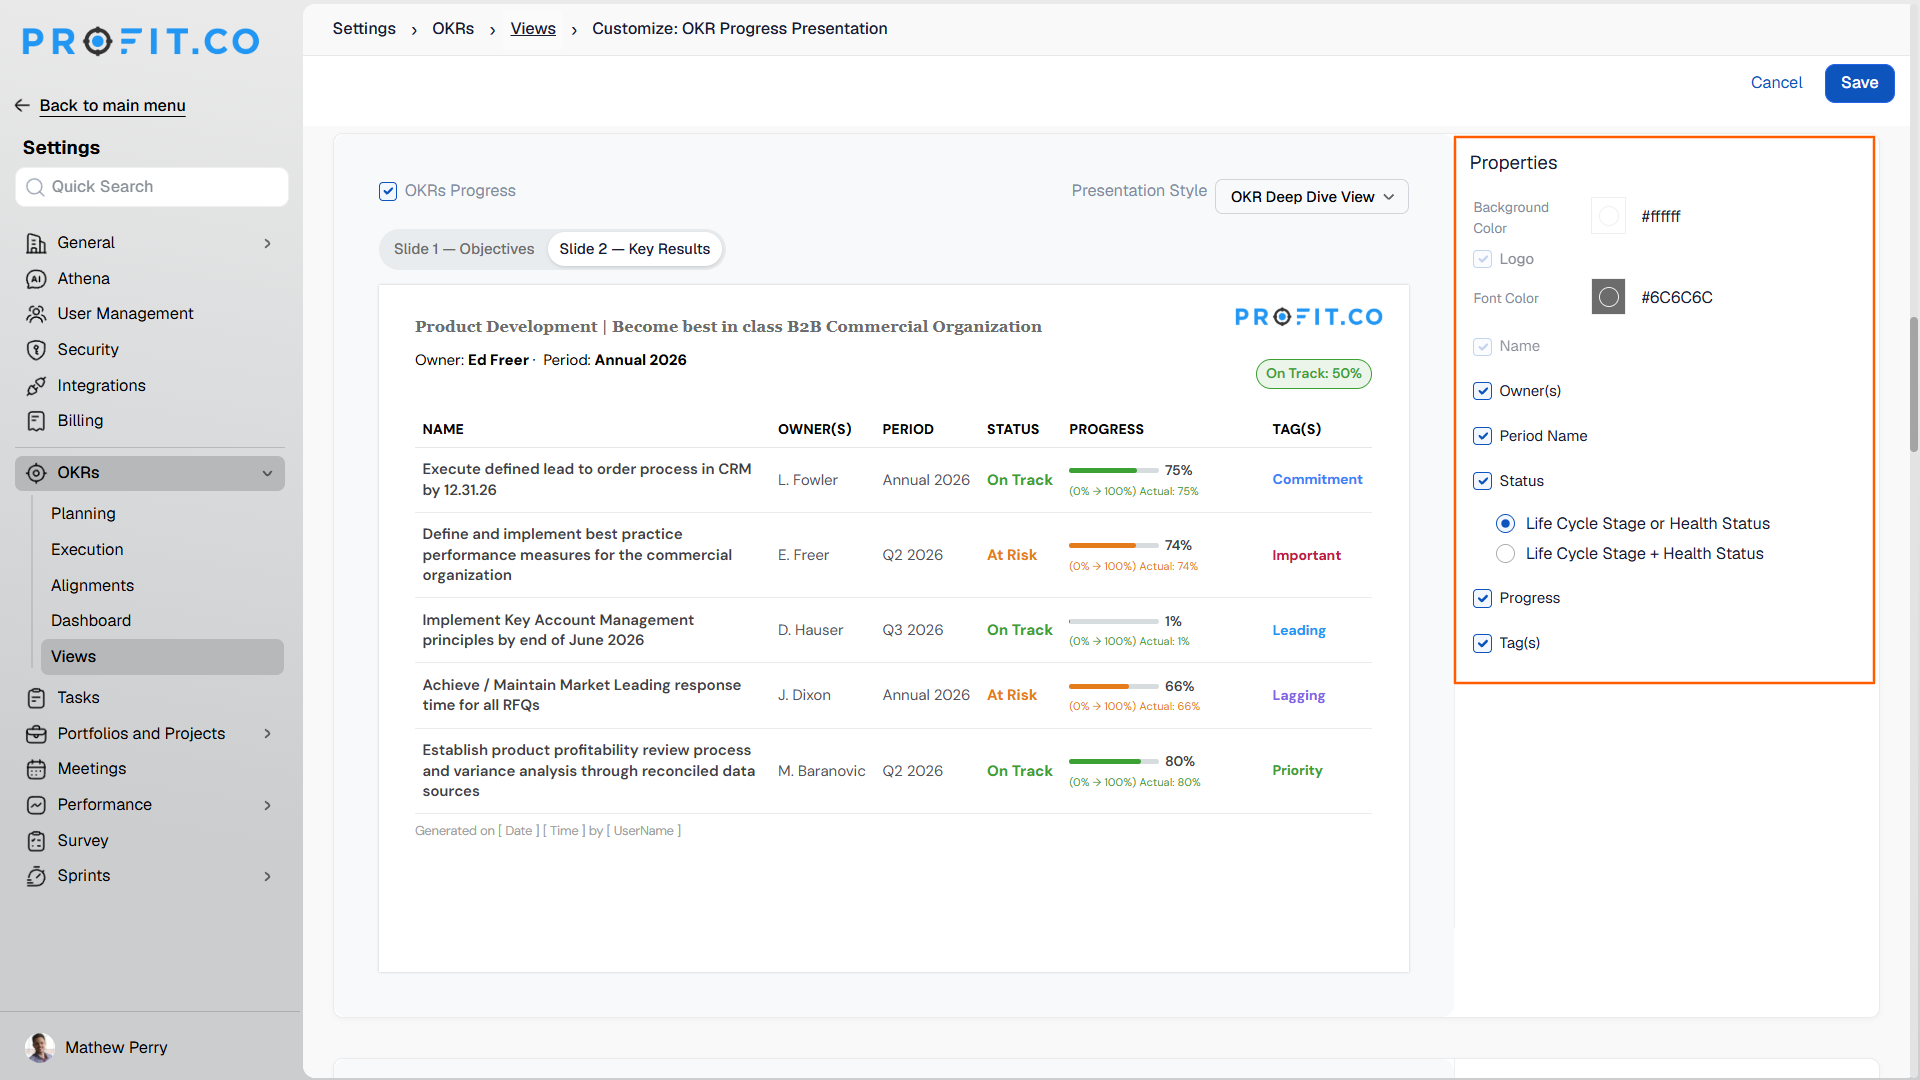
OKR Progress Presentation now includes a new presentation style, OKR Deep Dive View, that produces two slide types in a single export: a department-level Objective List and a per-Objective Key Result detail slide. Teams running structured executive OKR reviews previously had no way to export a view combining objective-level status and progress with each key result's own period and status, and had to rebuild this deck manually in a separate tool before every review cycle. Both slide types read from existing OKR fields, so the exported deck always reflects live data at the time of export.
How It Works
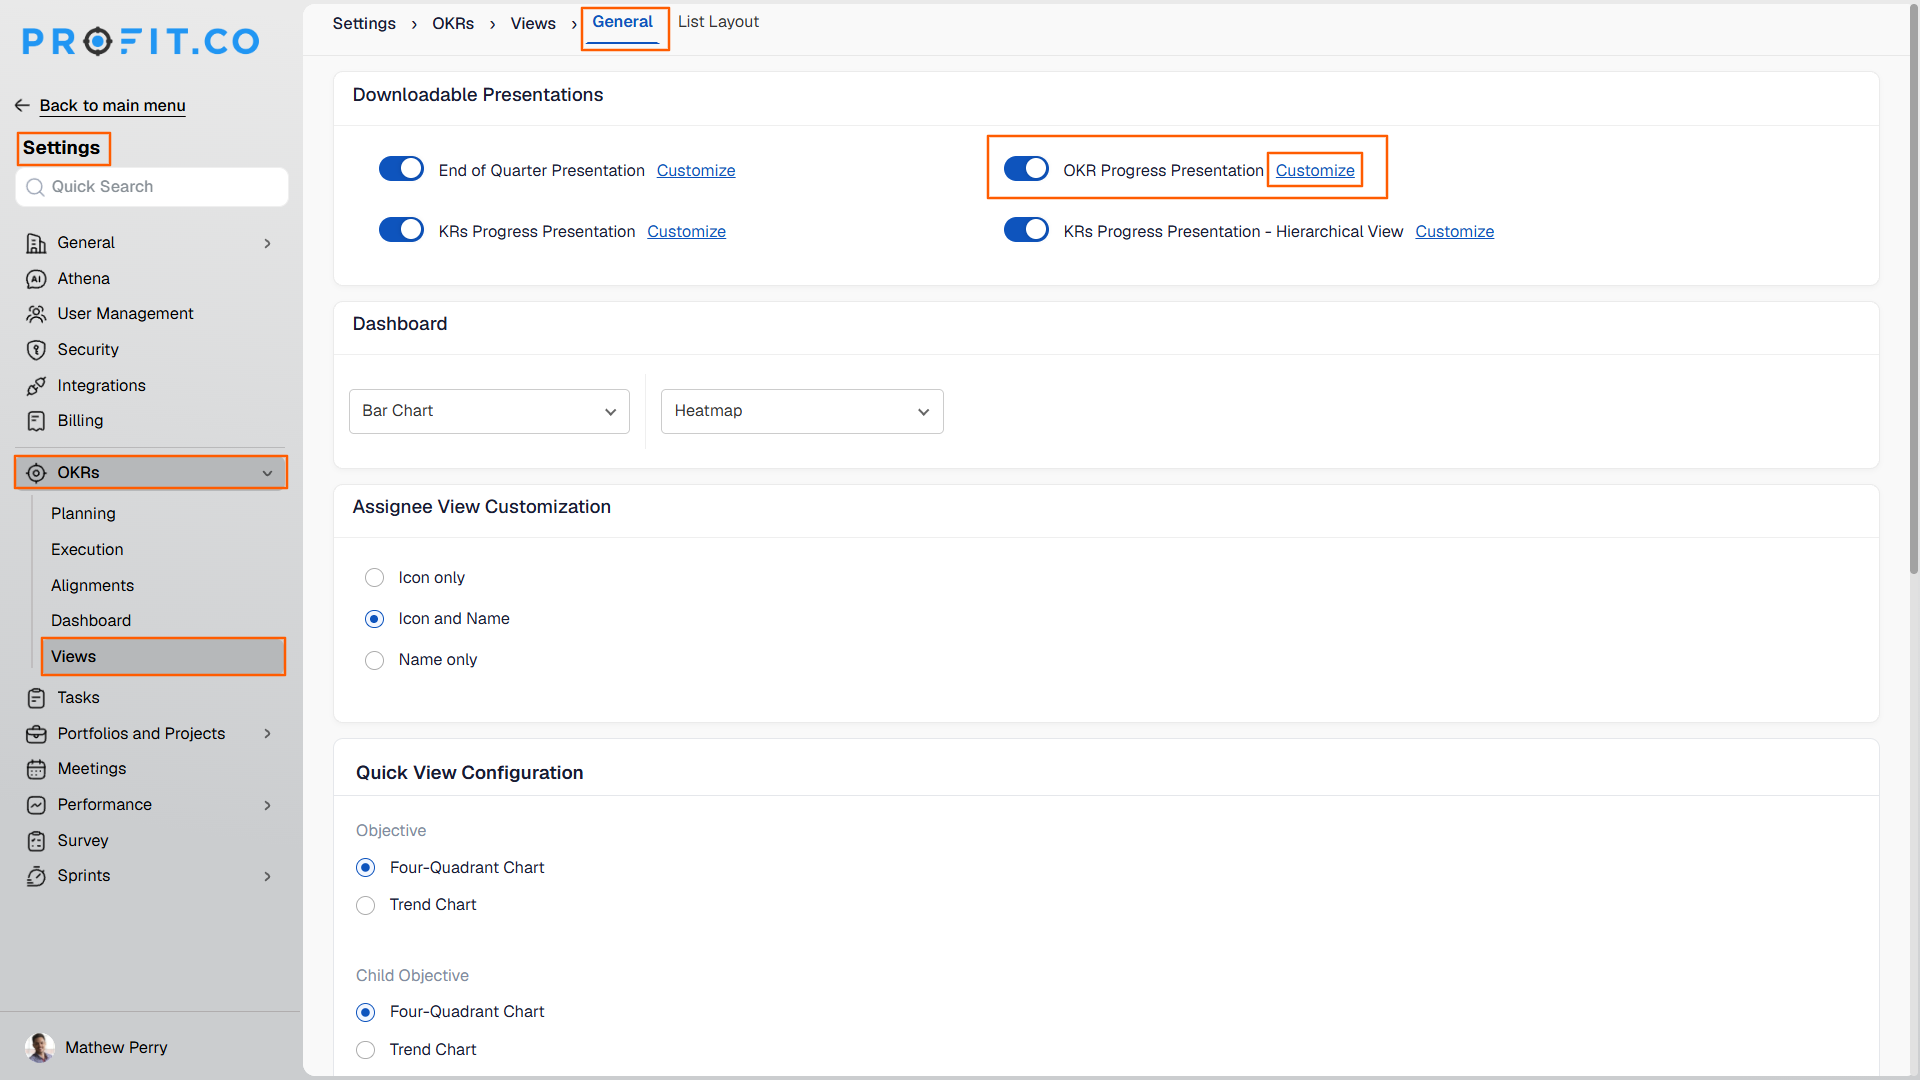
- Navigate to Settings → OKRs → Views from the left navigation panel.
- Choose the OKR Progress Presentation and click on the Customize button.
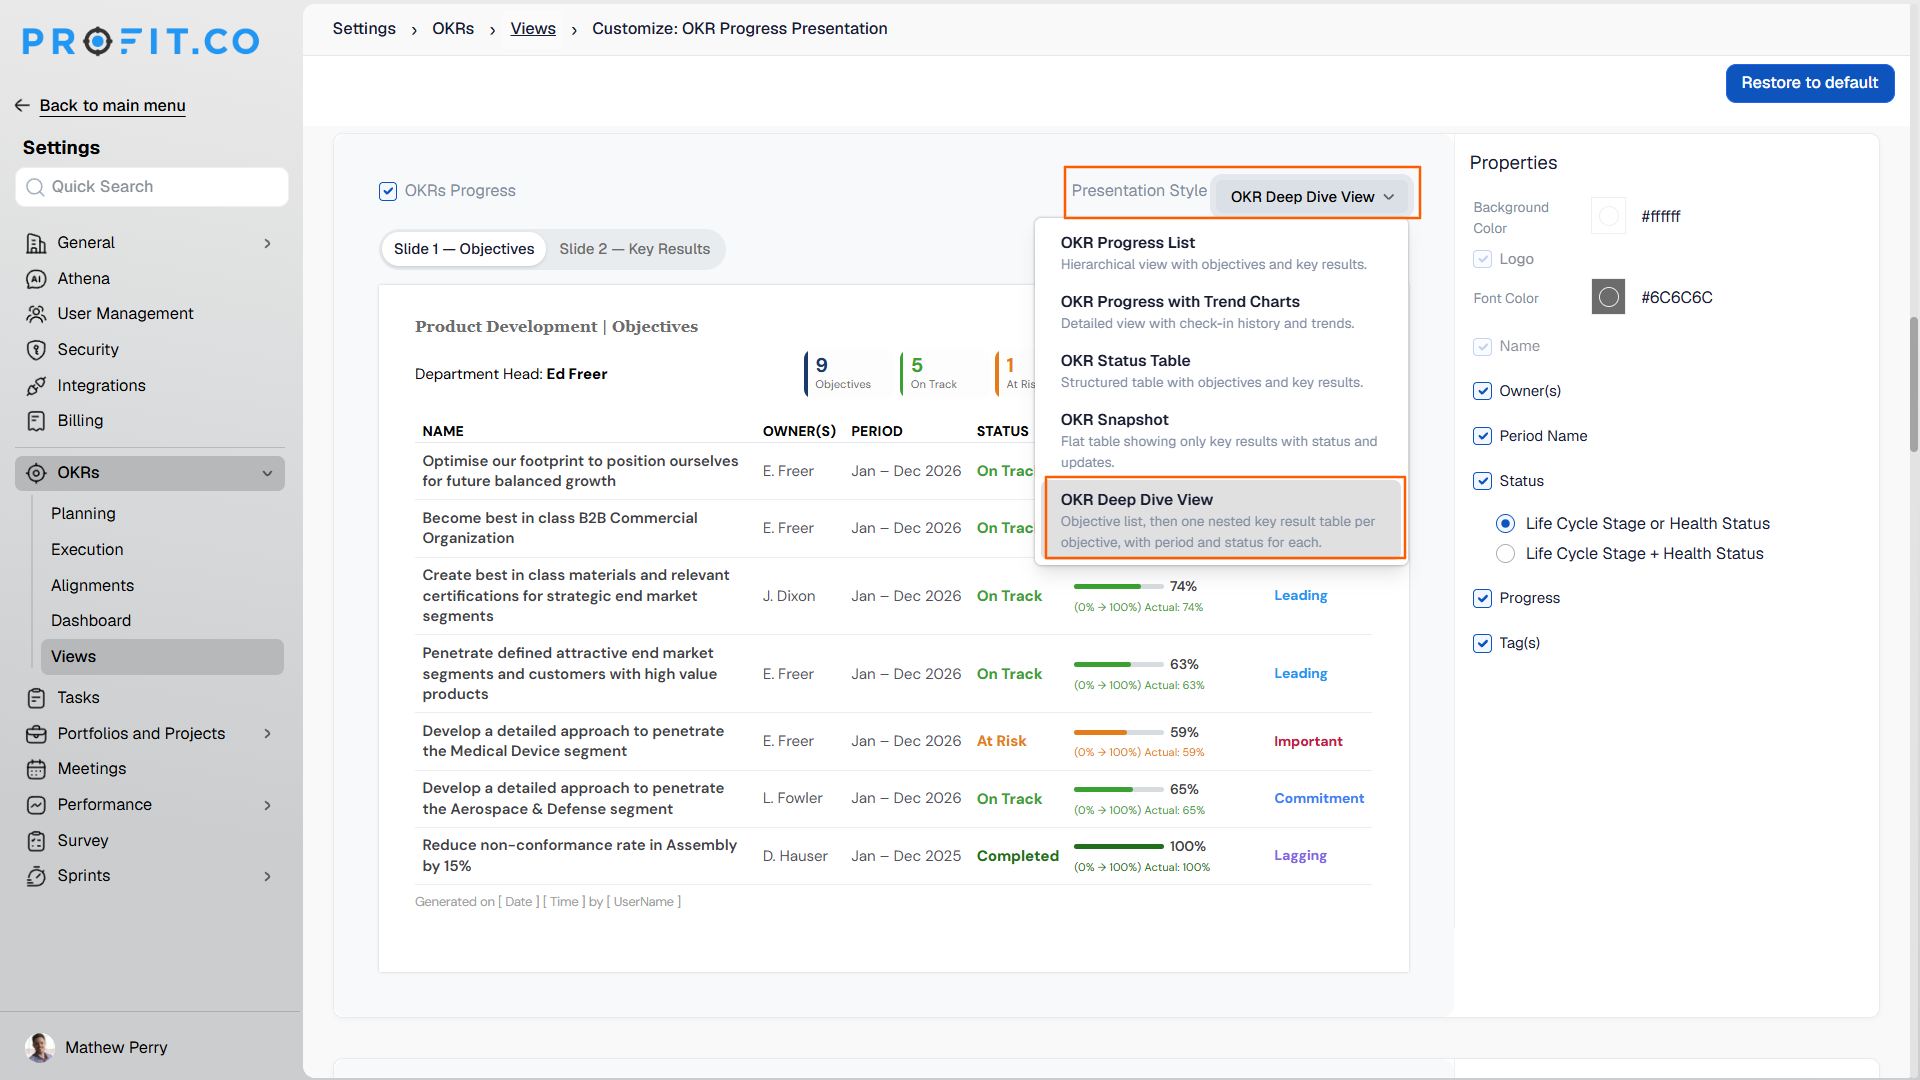
- Open the Presentation Style dropdown, select OKR Deep Dive View, the new option in the list
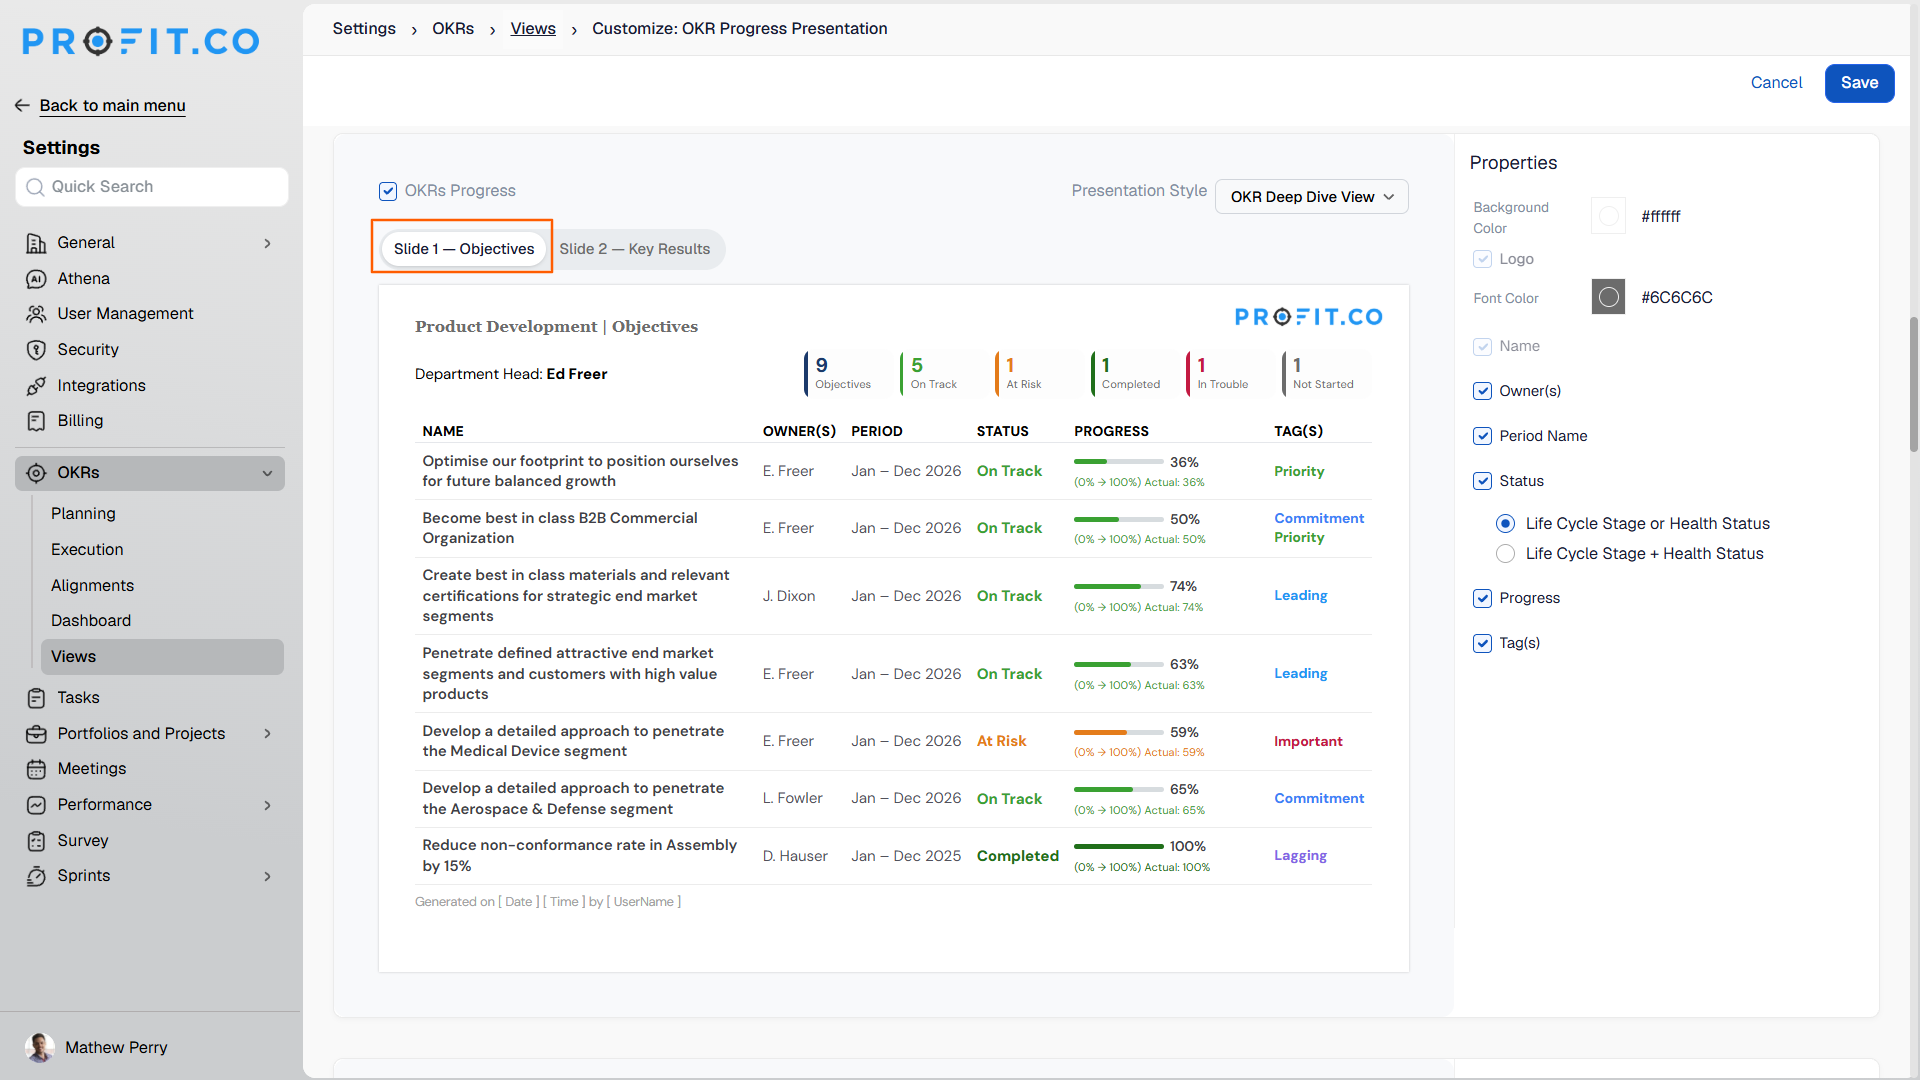
- The first slide (Objective List) renders your department’s full set of objectives, showing Department Name, Department Head, a summary count card (total objectives plus a badge for each non-zero status category), and one row per objective with its ID, Name, Period, Status, and Progress
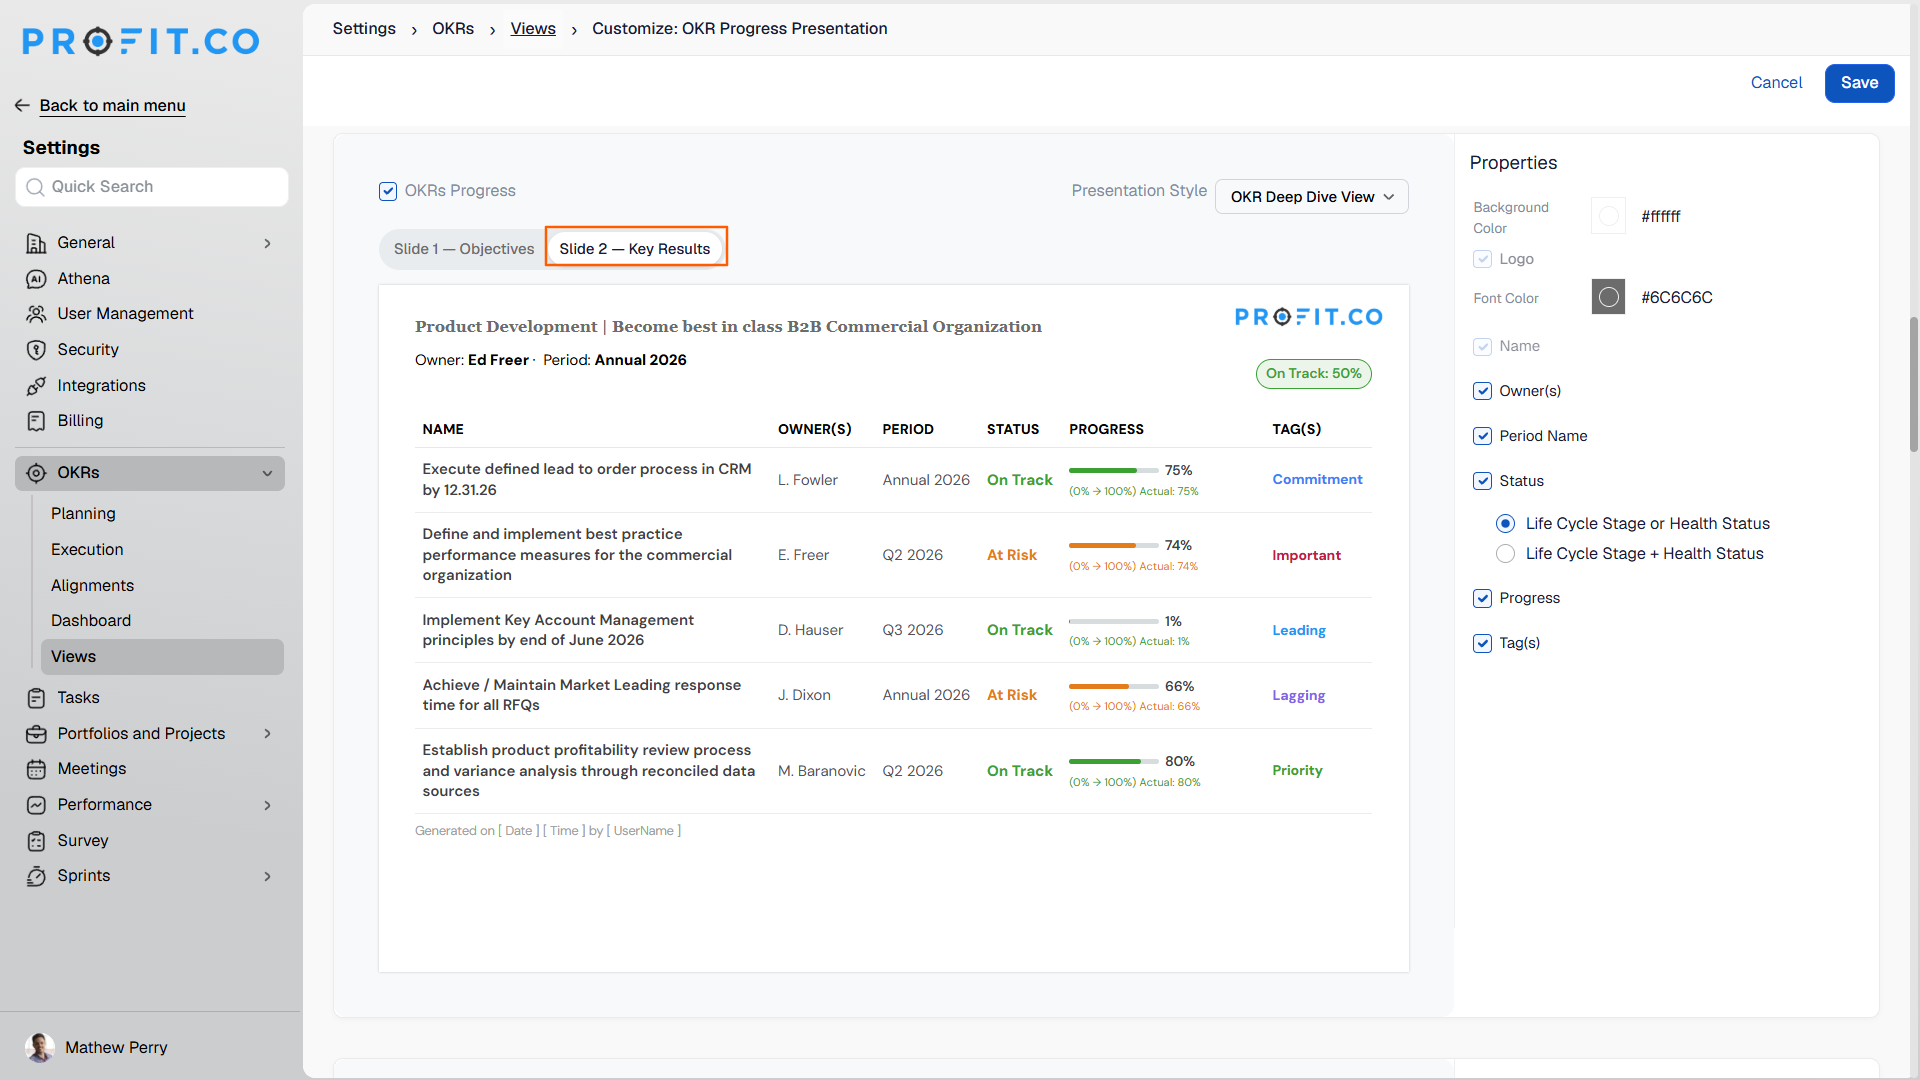
- Click the Slide 2 tab to preview the Key Result Deep Dive slides, one per selected objective, each showing the objective’s Owner, Period, and a combined Status + Progress badge, with a table beneath listing each key result’s own ID, Period, Status, and Progress
- Toggle individual fields (Period, Status, Progress) on or off from the Properties panel, which automatically switches its visible field set based on whether Slide 1 or Slide 2 is active
- Use the existing export mechanism to download the complete slide set; no new selection steps required
Why It Matters
- Executive review decks built inside Profit.co: Teams running recurring cross-department OKR reviews can now generate the complete slide set directly from the platform, eliminating the need to rebuild the deck manually in a separate tool before each review cycle.
- Always in sync with live progress: Both slide types read from existing OKR fields at the moment of export, so the presentation always reflects current data with no risk of the deck drifting out of sync between sessions.
- Key result context in a single view: The Key Result Deep Dive slide shows each key result’s own Period and Status alongside its parent objective’s progress, giving reviewers complete detail without switching between screens or pulling data from separate reports.
2. Configurable completion rule for OKRs
Overview
Administrators can now choose whether key results and objectives advance to the Completed stage automatically when progress reaches 100%, or only when someone explicitly marks them complete. Previously, hitting 100% on any key result or objective always triggered the Completed stage immediately — regardless of whether the team had formally reviewed and signed off on the work. The new setting lets organizations enforce a clear separation between achieving a metric target and officially closing an OKR, and can be configured differently for key results and objectives independently.
How It Works
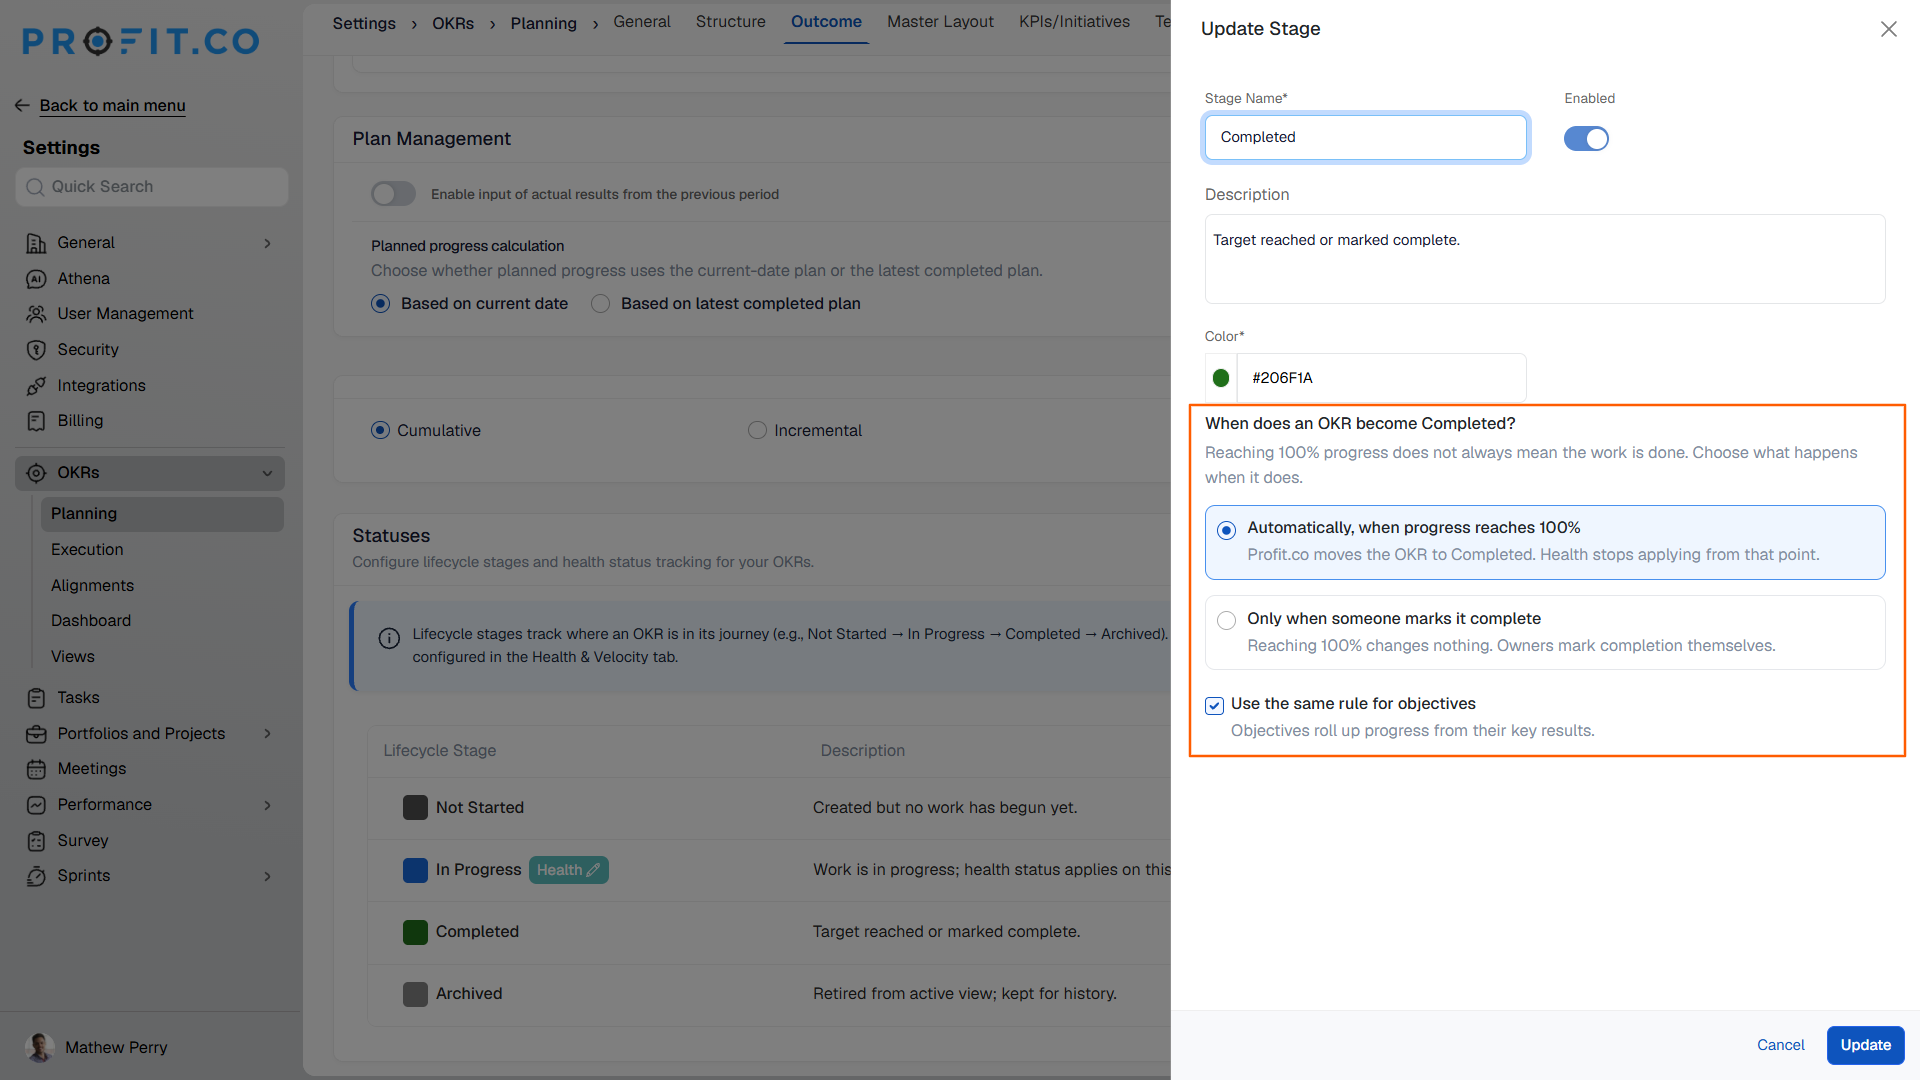
- Navigate to Settings → OKRs → Planning from the left navigation panel.
- Switch to the Outcome tab and click edit on the Completed stage, and locate the Completion Rule section
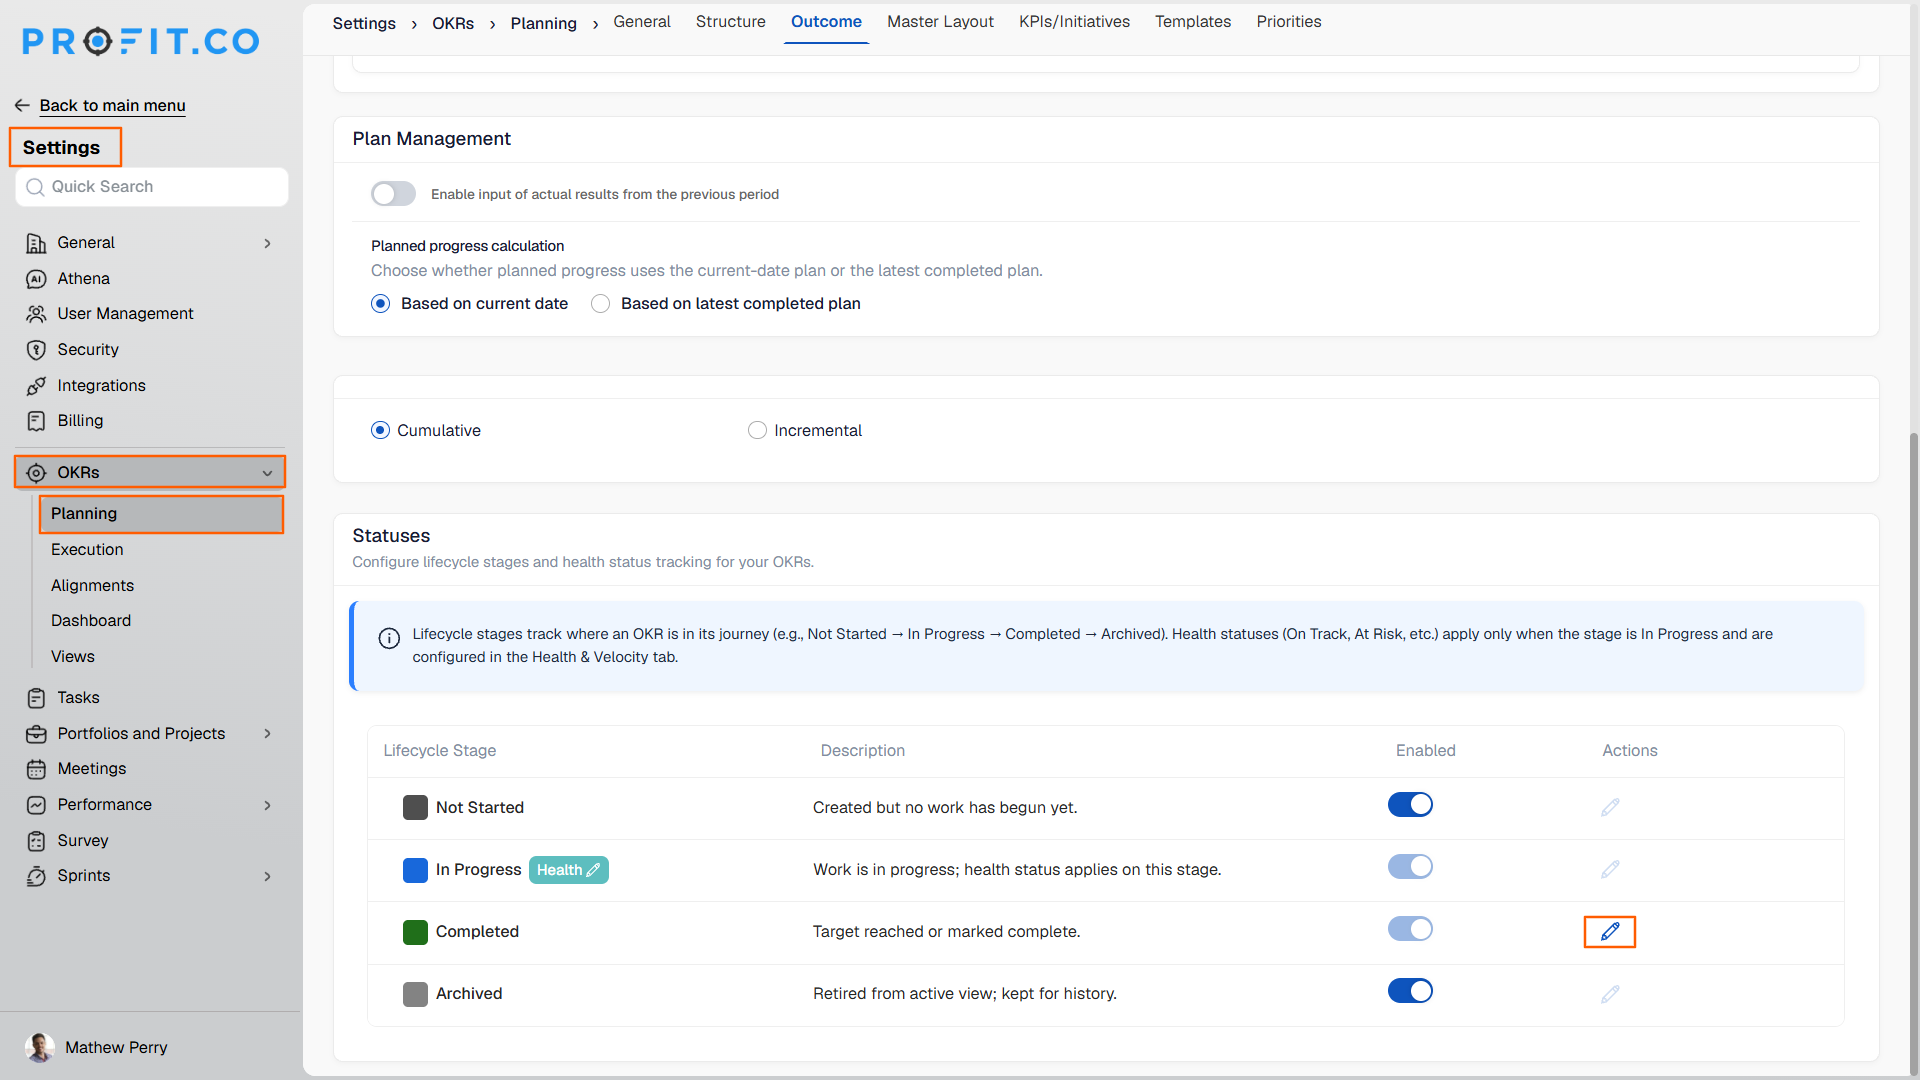
- Choose between Automatically, when progress reaches 100% (the default, existing behavior) or Only when someone marks it complete
- To apply the same rule to objectives, leave the Use the same rule for objectives checkbox checked — uncheck it to set a different completion rule for objectives independently of key results
- When set to manual: progress is still recorded at 100% and the key result or objective remains visible at full progress, but the stage stays at In Progress until a user explicitly selects Completed from the status dropdown
- Users can always manually select Completed from the dropdown at any time, regardless of which rule is active — the setting only controls automatic advancement, never blocks intentional user actions
- The rule applies consistently across all progress update sources — direct check-ins, parent rollups, and connected integrations such as Jira
- Existing completed OKRs are not affected when switching from automatic to manual — no records are reopened retroactively
Why It Matters
- Separation of achievement and formal closure: Organizations that treat hitting 100% and officially closing an OKR as two distinct events can now enforce that distinction inside the platform, rather than managing it through workarounds outside the product.
- Consistent governance across every progress source: The rule applies whether progress reaches 100% through a direct check-in, a parent rollup, or a third-party integration such as Jira, so no update path can bypass the configured setting.
- Flexibility for mixed workflows: The rule can be set differently for key results and objectives, so teams that auto-complete key results but require manual sign-off on objectives — or vice versa — can configure both independently without compromise.
Enhancements:
3. Sub-department hierarchy in the Department Fulfillment Score widget
Overview
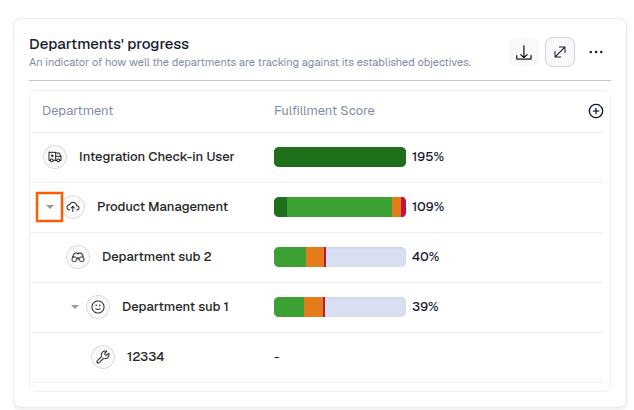
The Department Fulfillment Score widget on the OKR and BSC Cockpit now surfaces sub-departments alongside their parent departments, nested in a collapsible hierarchy. Previously, only top-level departments appeared in this widget — sub-departments were not shown at all, meaning any function organised into sub-teams had its sub-unit performance hidden inside a single parent score. Each department and sub-department now displays its own independently calculated score, so leadership can see exactly where performance stands at every level without leaving the Cockpit.
How It Works
- Navigate to the OKR and BSC Cockpit and open the Department Fulfillment Score widget
- Departments that have sub-departments now show a chevron icon to the left of the department name — departments with no sub-departments continue to render as plain rows with no change
- Sub-departments appear indented directly beneath their parent, expanded by default, each with its own fulfillment score, ranking (if the Ranking column is enabled), and hover tooltip showing the status breakdown
- Click the chevron to collapse or re-expand a department’s sub-departments — collapsing one department has no effect on any other
- If a sub-department has no check-in data recorded yet, its score and ranking render as – and the row still appears in position under its parent
- Sub-department scores are independent of the parent’s score — no rollup or aggregation occurs between levels; the parent’s number reflects only its own objectives
Why It Matters
- Full sub-team visibility without leaving the Cockpit: Leadership can now see every sub-department’s fulfillment score in one place, instead of cross-referencing the OKR module department filter one selection at a time.
- Performance gaps that were previously hidden: A parent department’s score may look healthy while a sub-team is meaningfully behind — the hierarchy makes that gap visible at a glance rather than burying it inside a single rolled-up number.
- Consistent with the department tree users already know: The chevron expand/collapse pattern matches the existing department hierarchy used elsewhere in the platform, so no new interaction needs to be learned.
4. Submission logging for OKR alignment requests
Overview
The activity Log on Objectives and Key Results now records a timestamped entry the moment a cross-department alignment is submitted for approval, in addition to the existing entry when it is accepted or rejected. Previously, the Log captured only the outcome of an alignment request — with no record of when the request was first raised or which departments were involved. The Log now shows the complete approval journey from submission through to decision, on both the source and destination records.
How It Works
- This feature applies when the Accept/Reject bottom-up alignment toggle is enabled under your OKR settings — alignments that do not require approval are unaffected
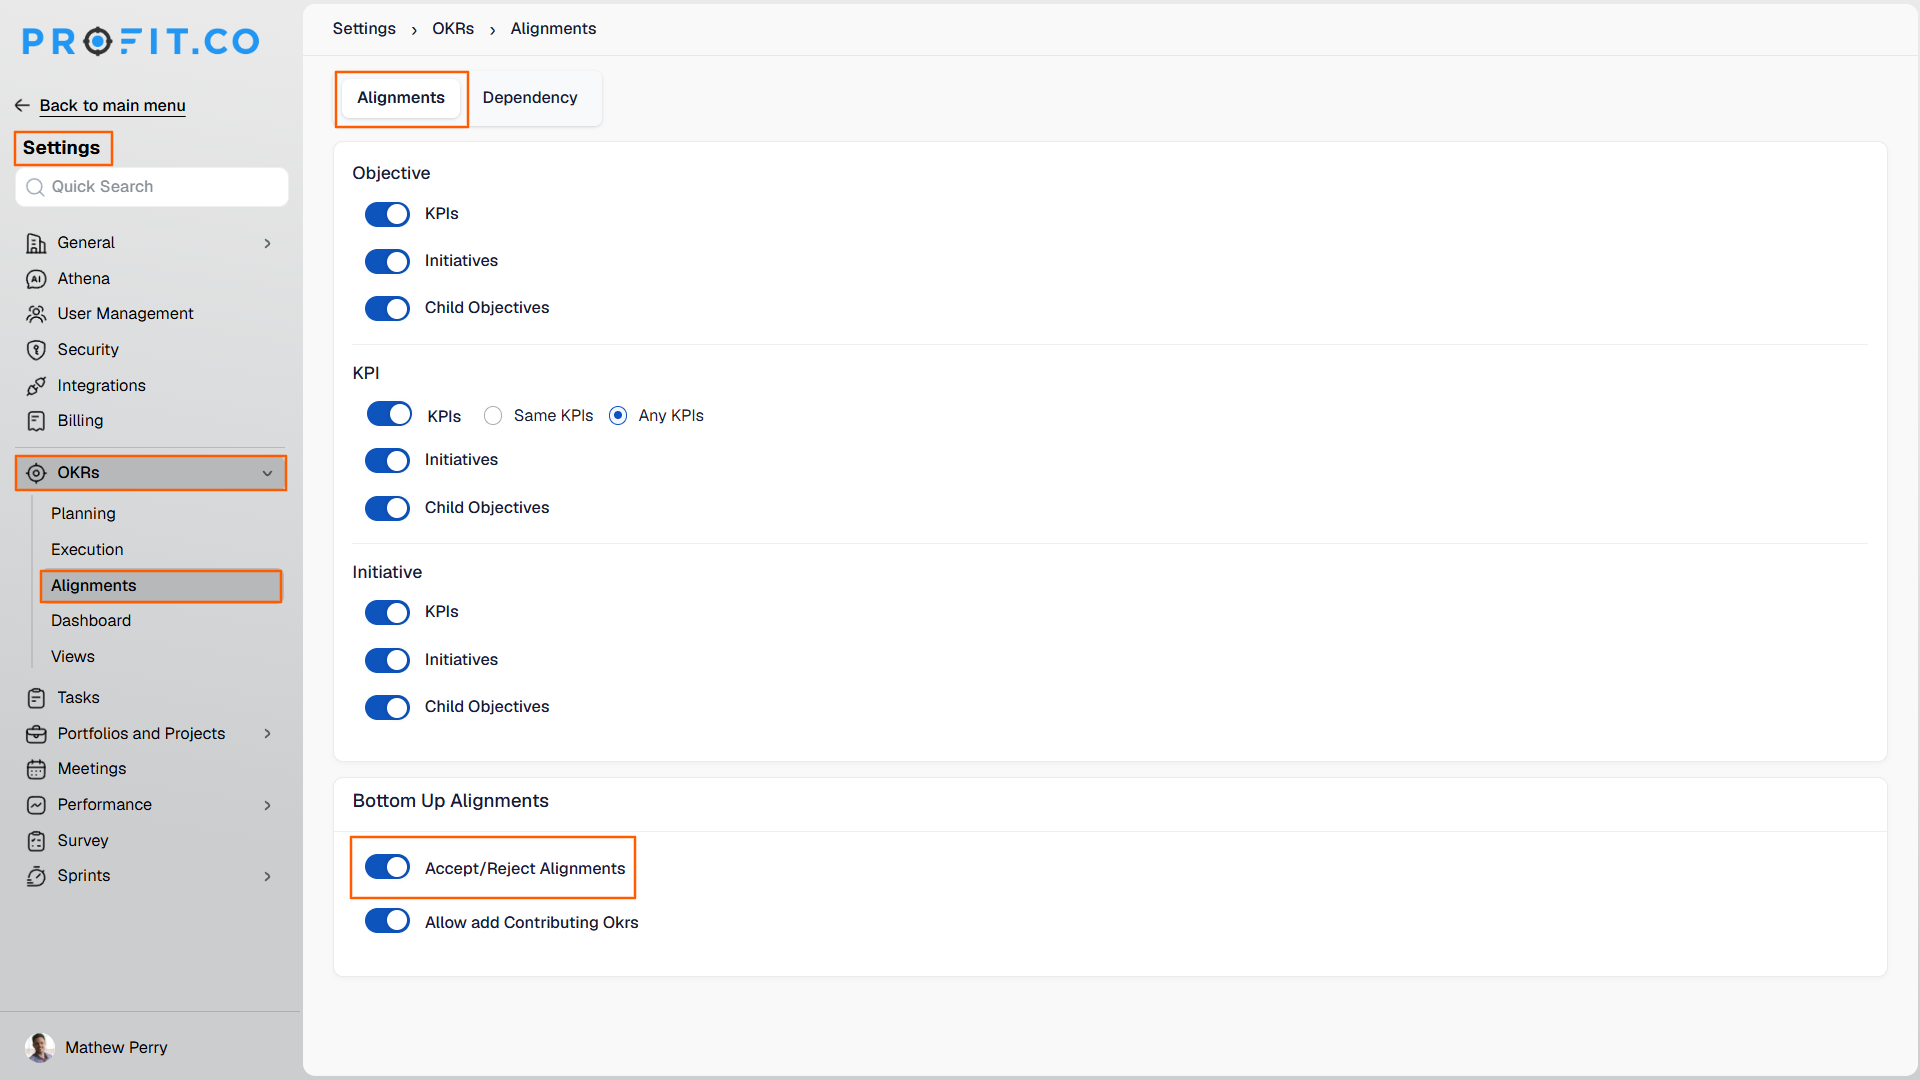
- Navigate to the Objective or Key Result you want to align and submit it for alignment with a destination department — no change to this action
- The system immediately writes a Submitted for Approval entry to the Log on both the source record and the destination record, capturing the submitter, the source department, the destination department, and the timestamp
- The request enters the destination department’s approval queue exactly as before
- When the destination owner accepts or rejects, the Log entry now names the approver directly and correctly identifies the item type — both refinements apply to all new decision entries from this release onwards
- Any user with Log-view access now sees the full timeline on either record: creation, then submission, then decision — each entry timestamped and attributed
Why It Matters
- A complete audit trail from request to decision: The Log no longer starts the story at the outcome — reviewers and administrators can now confirm exactly when an alignment was requested, who submitted it, and which departments were involved, without going outside the product.
- No gap between submission and approval in the record: Previously, the window between raising a request and receiving a decision left no trace. Teams running governance reviews can now reconstruct the full approval timeline, including how long a request sat in the queue before a decision was made.
- Cleaner, more accurate log entries throughout: The existing accepted and rejected entries now name the approver and correctly reflect the item type involved, so the entire Log reads consistently rather than mixing generic and precise language.
PROJECTS (Task Management, Portfolios and Projects, Timesheets, Notes, and Meetings)
1. Combined stage and health field in PPM check-ins
Overview
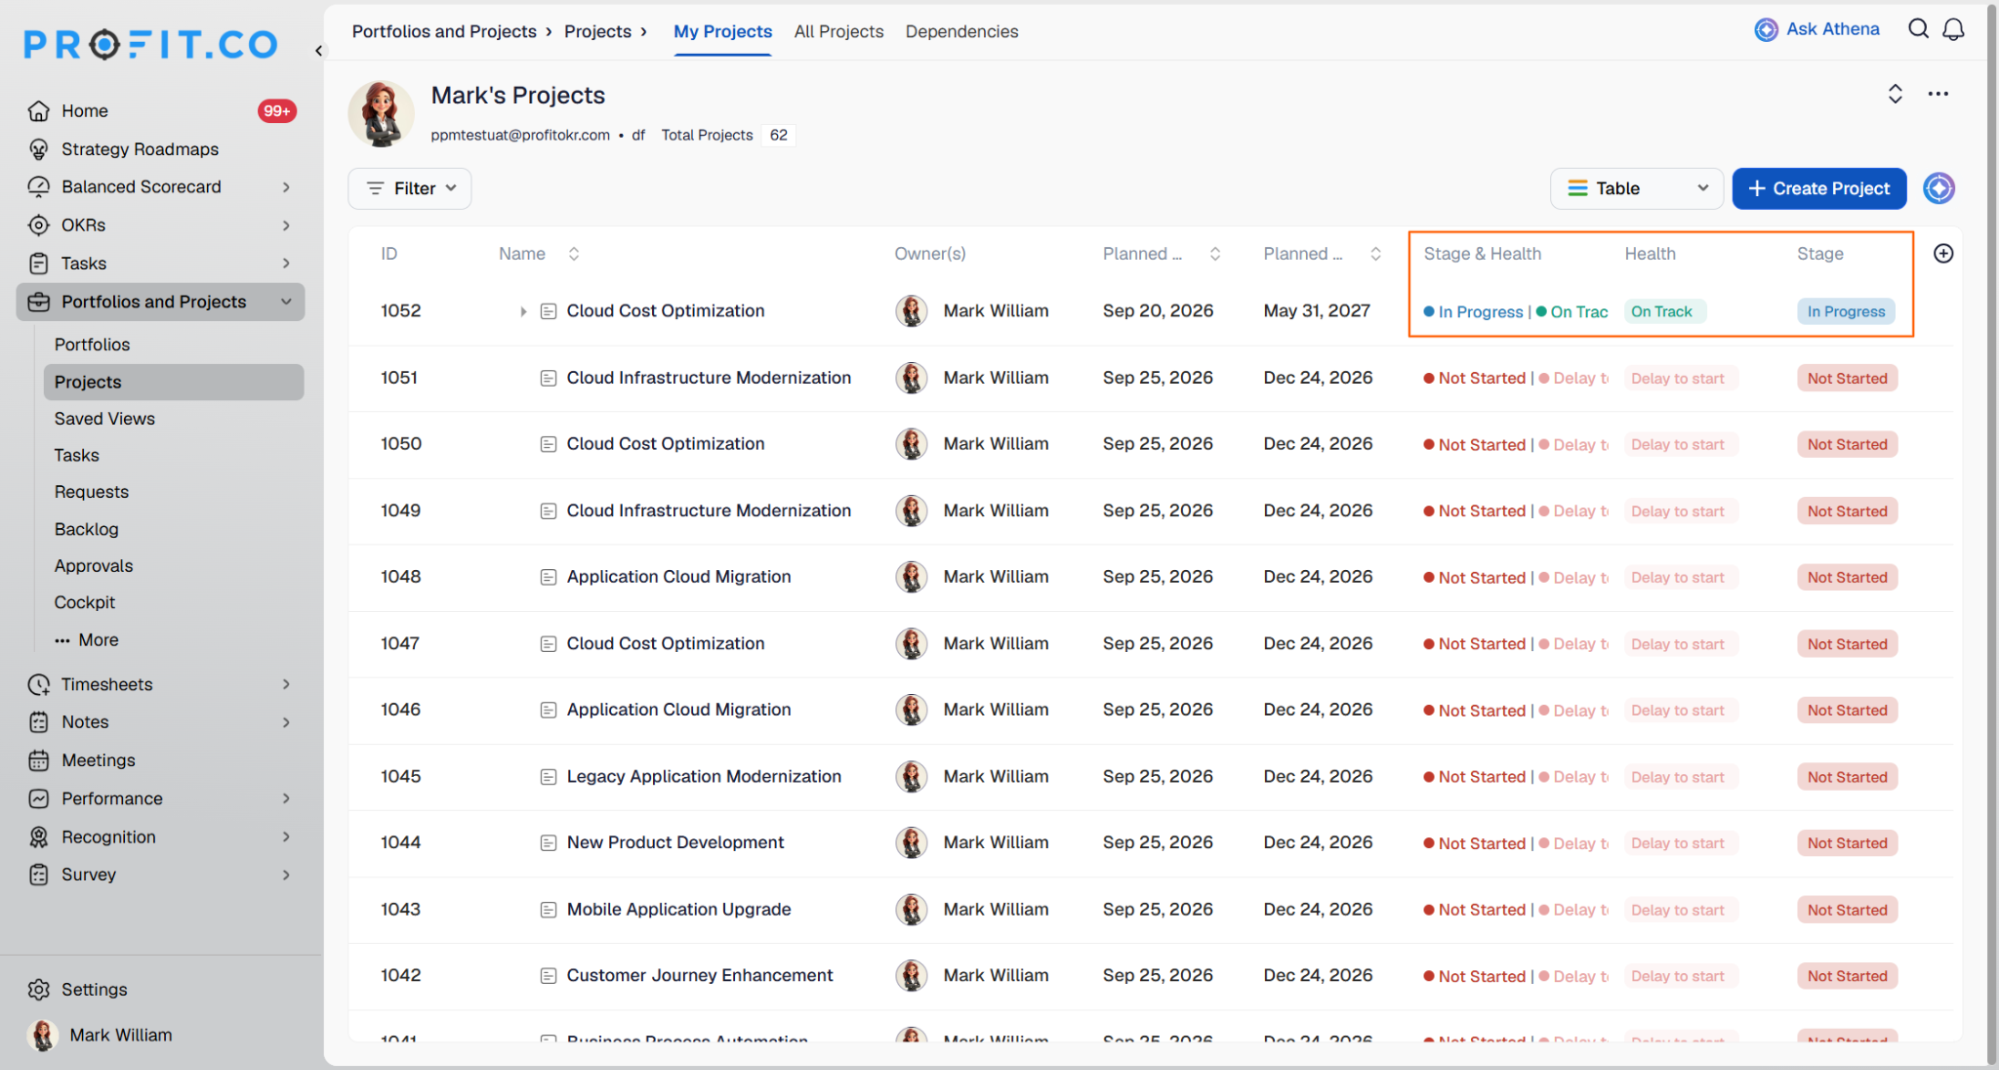
Portfolio, project, and milestone check-ins now record stage and health in a single Stage & Health field, matching the Lifecycle & Health field in OKR check-ins. Previously, users picked a stage from one dropdown and then a health from a second list that changed with the stage. Each health status is now listed under its own stage, so a mismatched pair cannot be saved, and list pages show both values side by side.
How It Works
- Open a check-in from Portfolios, My Projects, All Projects or a milestone. The Stage & Health field sits beside Progress in the first row.
- Click the field to open a single list showing every stage with its health statuses below it. The current value is marked with a tick, and a search box filters stages and health statuses.
- Clicking a health status sets the stage and health together in one click.
- Stages without health statuses, such as On Hold, Archived and Closed, show the stage alone. Portfolio health applies to In Progress only.
- When health is calculated automatically, choosing a stage applies the calculated health. If a different health is picked, a note under the field shows the calculated value, with a Revert to auto option. The Auto label is no longer shown.
Why It Matters
- One click instead of two: Users update stage and health in a single selection, with no risk of saving a health that belongs to a different stage.
- Health visible without opening records: Managers can scan project and portfolio lists for at-risk or in-trouble items at a glance.
- One pattern across modules: Users who check in on both OKRs and projects now work with the same control in both places.
2. Assign groups as owners in tasks
Overview
Groups, previously introduced for OKRs, can now be assigned as owners of tasks and subtasks. Previously, the owner field in PPM accepted individual users only, so a team had to be selected person by person on every record. Groups behave the same way as in OKRs, and any change to a group now shows its impact across OKRs, tasks and PPM before it is applied.
How It Works
- To create a group (Administrators)
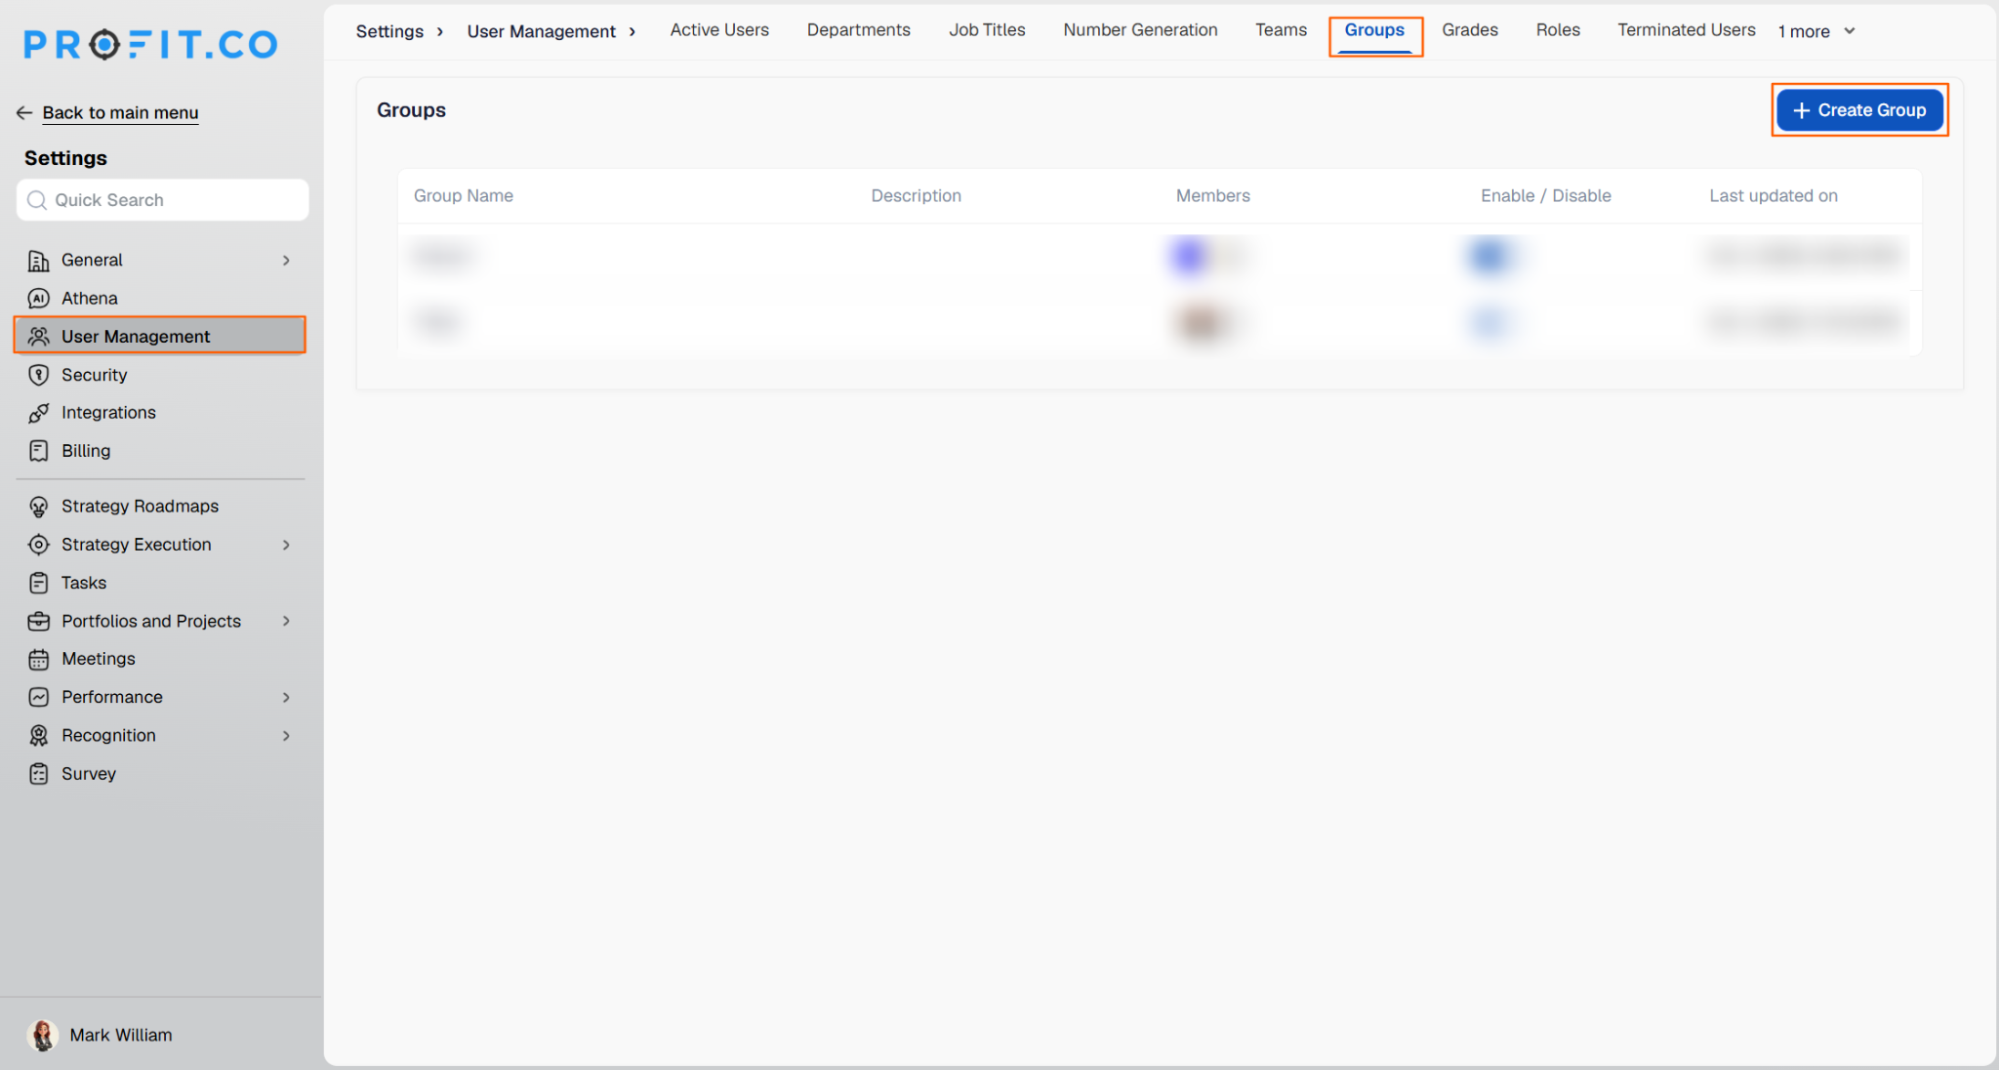
- Navigate to Settings → User Management → Groups.
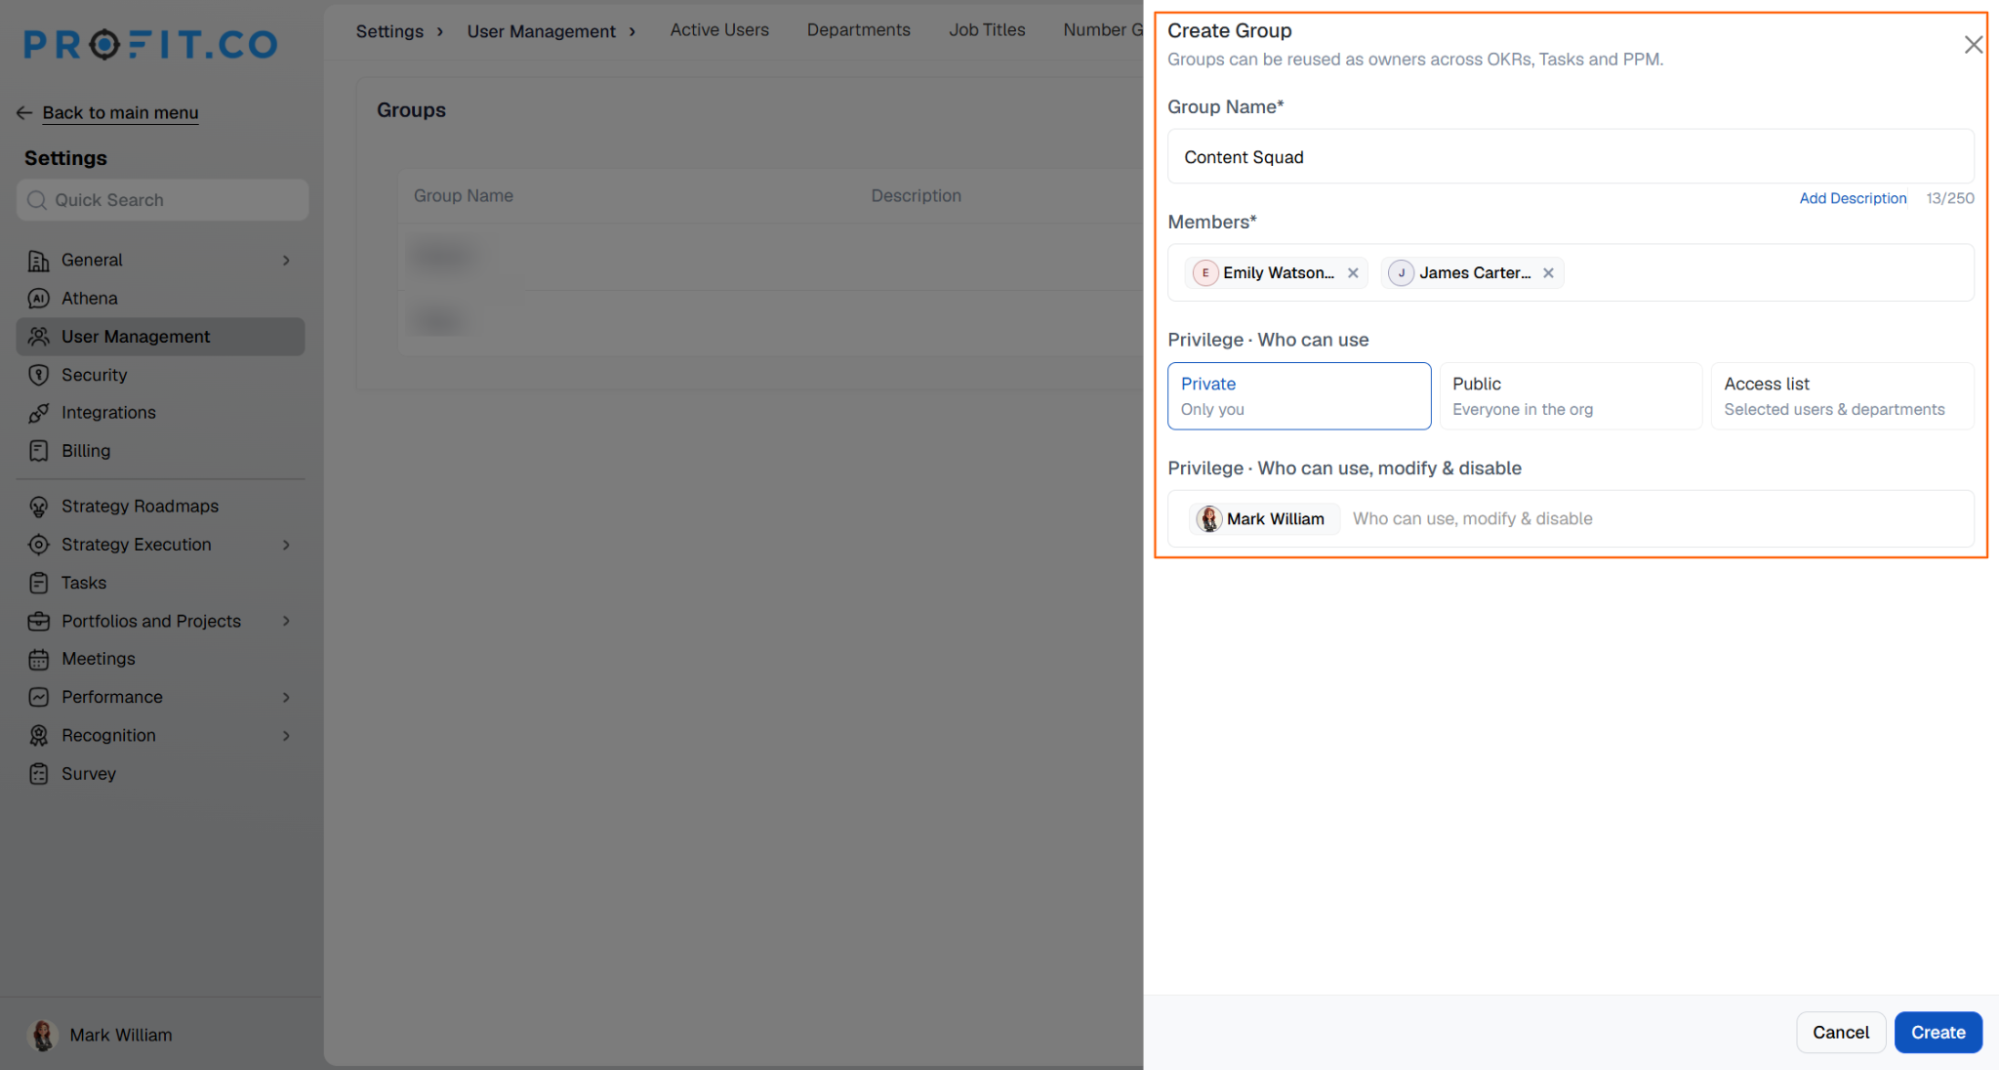
- Click Create Group and enter a group name – duplicate names are not allowed.
- Add members to the group.
- Set the privilege level:
- Private – only you can use the group.
- Public – everyone in the organisation can use the group.
- Access list – selected users and departments only.
- Define who can use, modify, and disable the group, then click Create.
- To create a group (End users)
- Navigate to Preferences → Groups.
- Click Create Group and follow the same steps as above to set the group name, members, and privilege level.
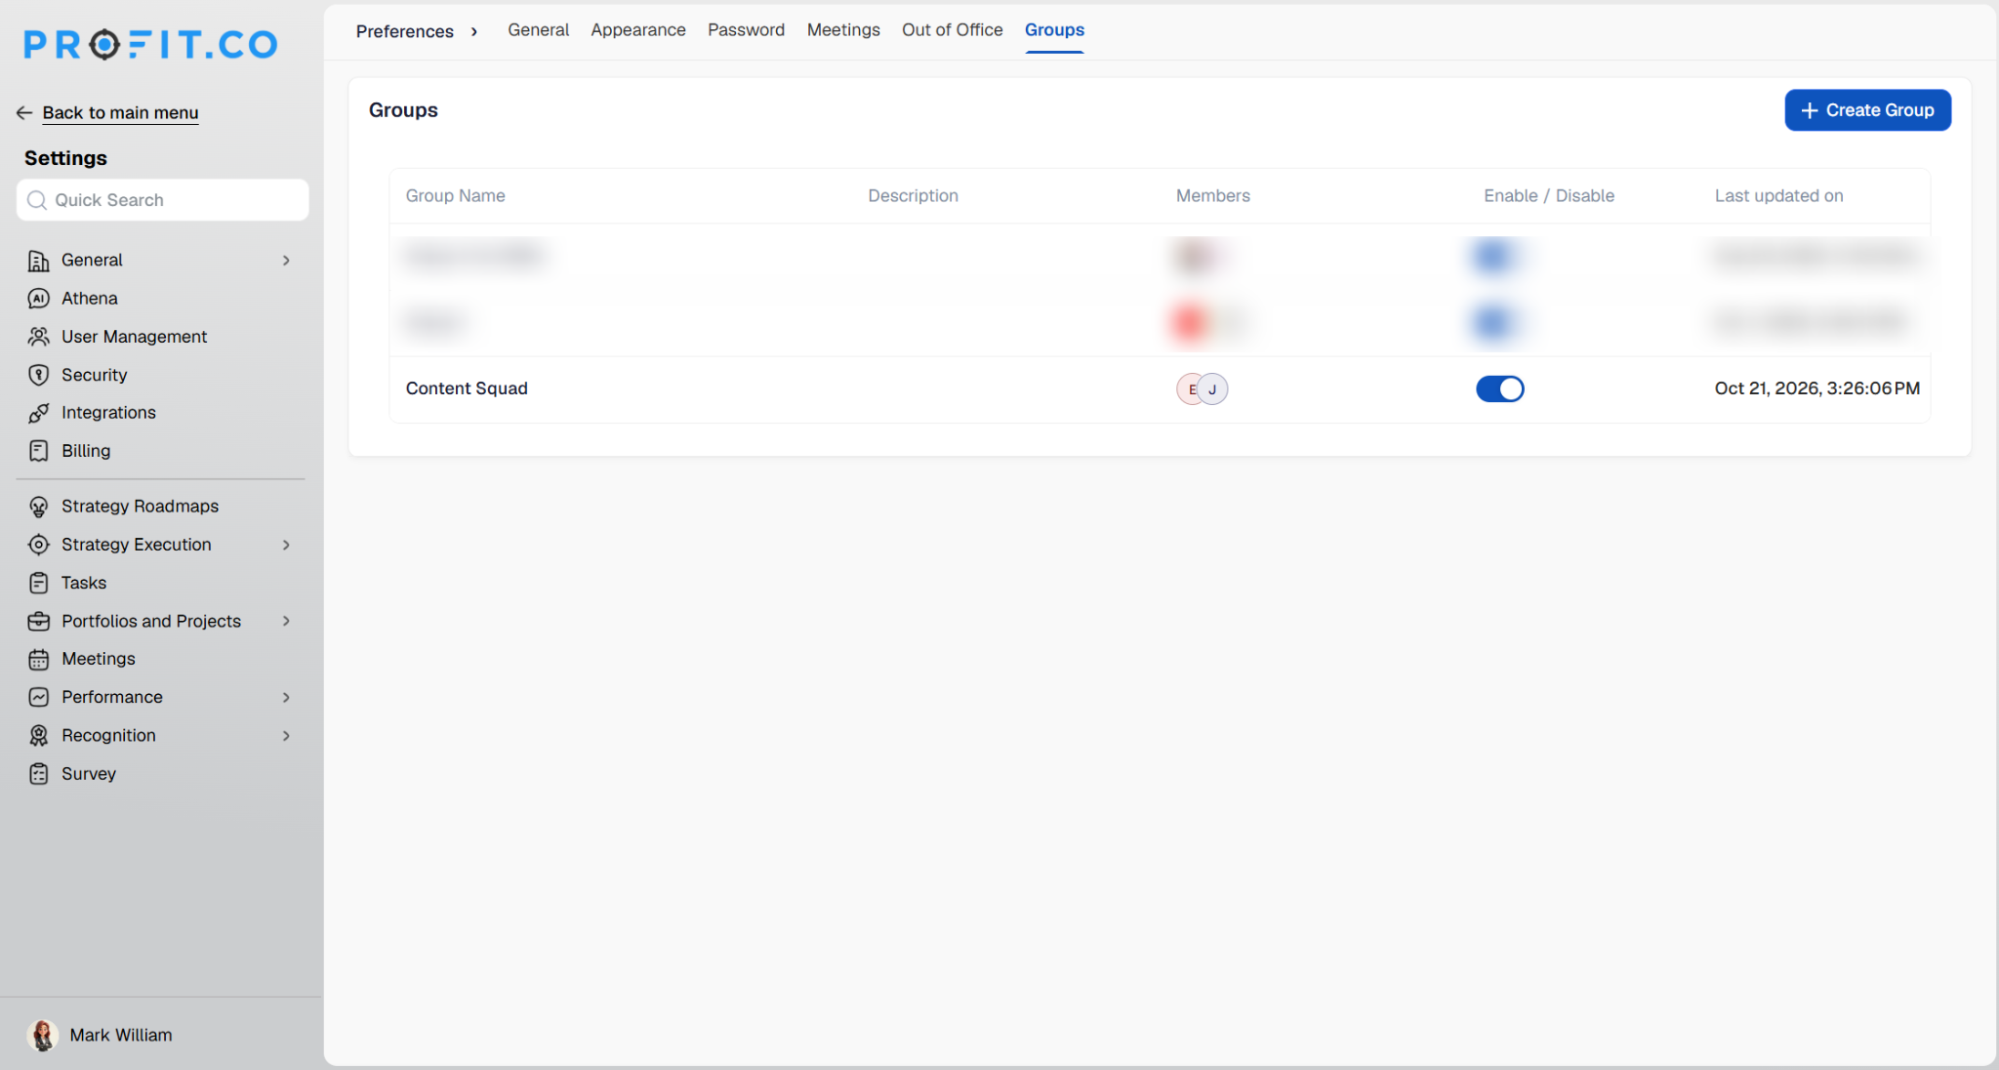
- When creating or editing a task, or subtask, open the Owner field. The dropdown lists available groups with their member count, alongside individual users who have access to the module.
- Selecting a group shows the group name in the owner field and on list pages. Hovering over it shows the members.
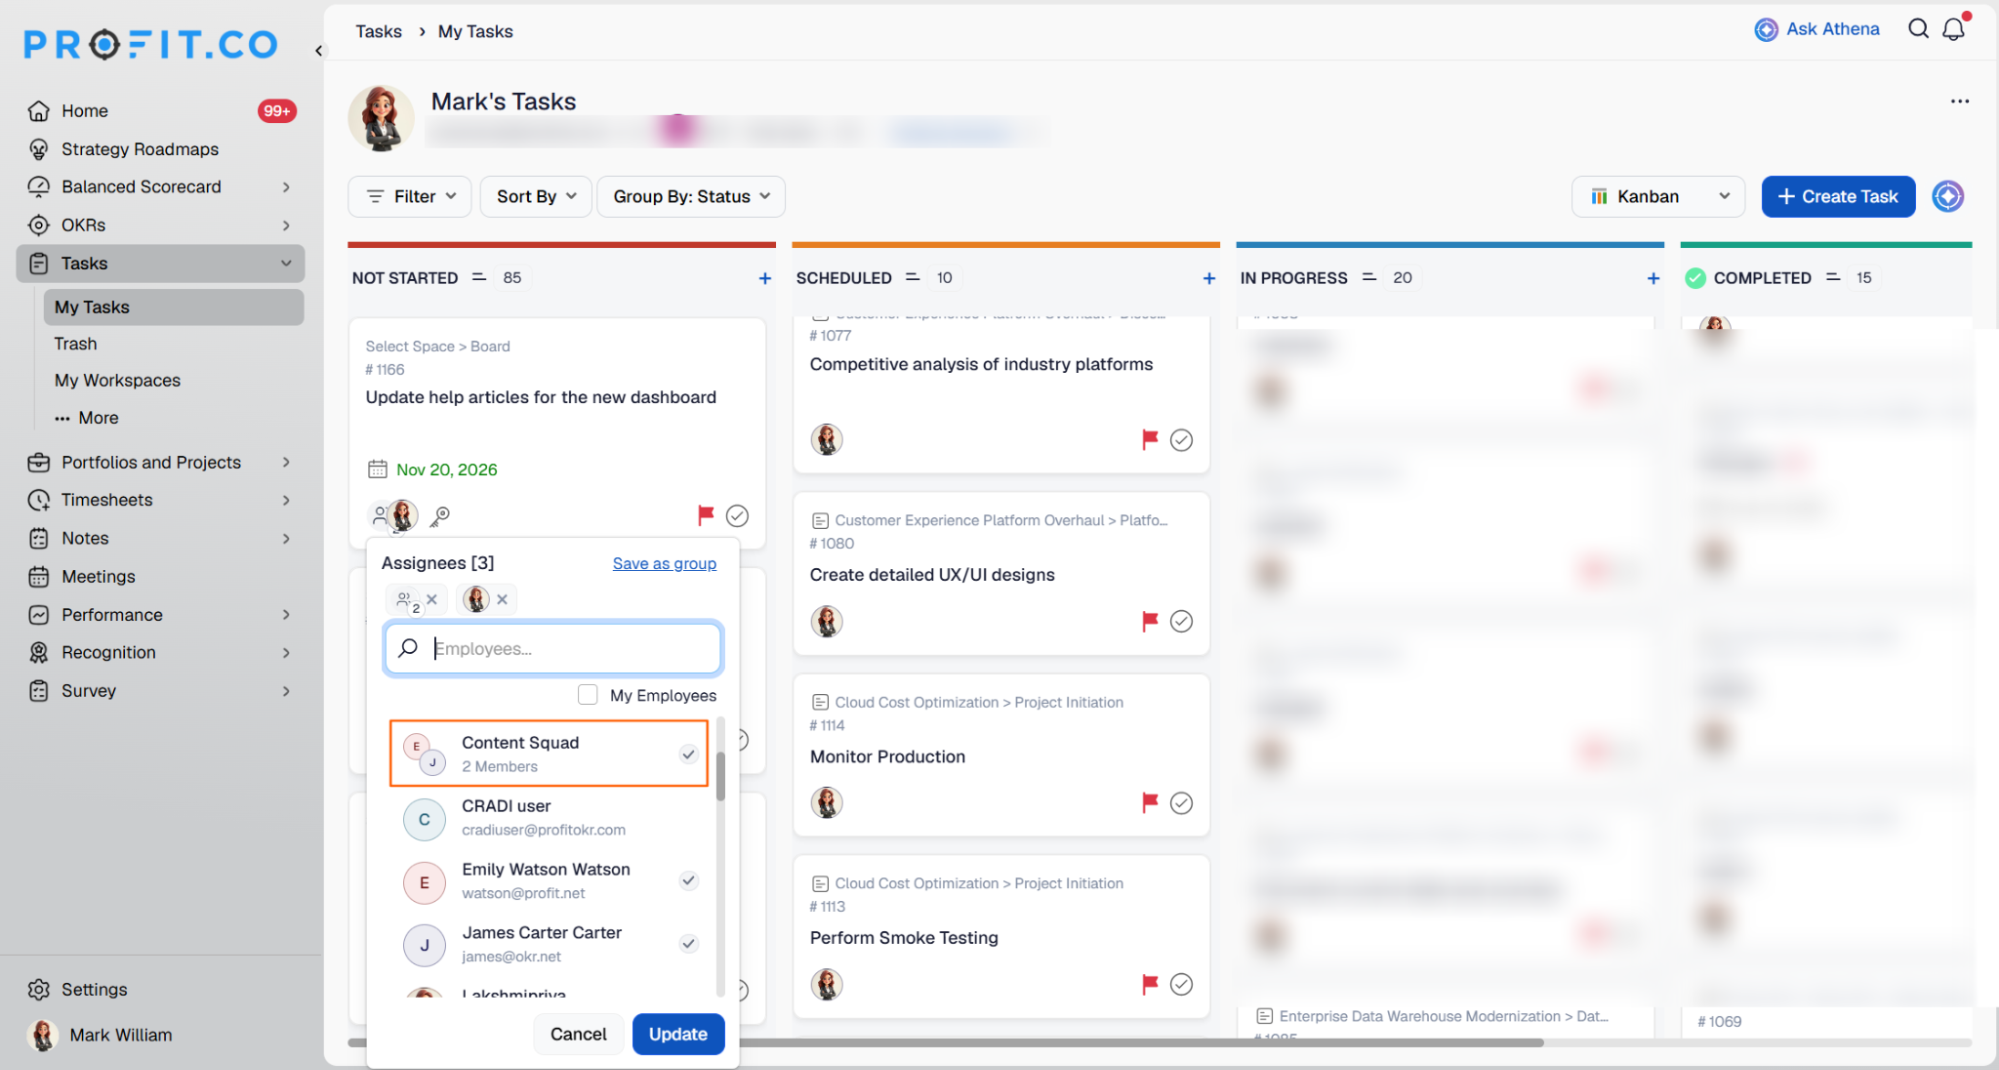
- When a group is modified, the impact summary now lists affected records in separate, Task tabs. Super users can choose which current and future records keep the group, while past records keep the current members as direct assignees. A change is blocked if a new member does not have access to a module or record where the group is used.
- Disabling a group removes it from all PPM, task and OKR records and assigns its members individually.
- Cockpit, exports and Present mode show individual members. Exports list the group name followed by its members.
- Departments are no longer available for selection as task assignees. On existing tasks assigned to a department, the department is removed and the task stays assigned to its individual assignees. For example, a task assigned to two individuals and a department is now assigned to the two individuals only.
Why It Matters
- One team, every module: The same group can own an objective, the project delivering it and the tasks within it, without reselecting people on each record.
- Full impact before any change: Editing a group shows every affected portfolio, project, task and OKR in one place, so no record is changed without review.
- Person-level reporting stays intact: Cockpit and exports still count ownership per person, so workload and accountability are never hidden behind a group name.
3. Co-owner editing for tasks in shared notes
Overview
Notes can now be shared with a specific level of access, and people given Editor access become co-owners of the tasks created in the note. Previously, everyone a note was shared with could edit the note itself but could not edit the tasks created in it, because those tasks followed the access rules of their board. Collaborators can now update the tasks in a note, not only its content.
How It Works
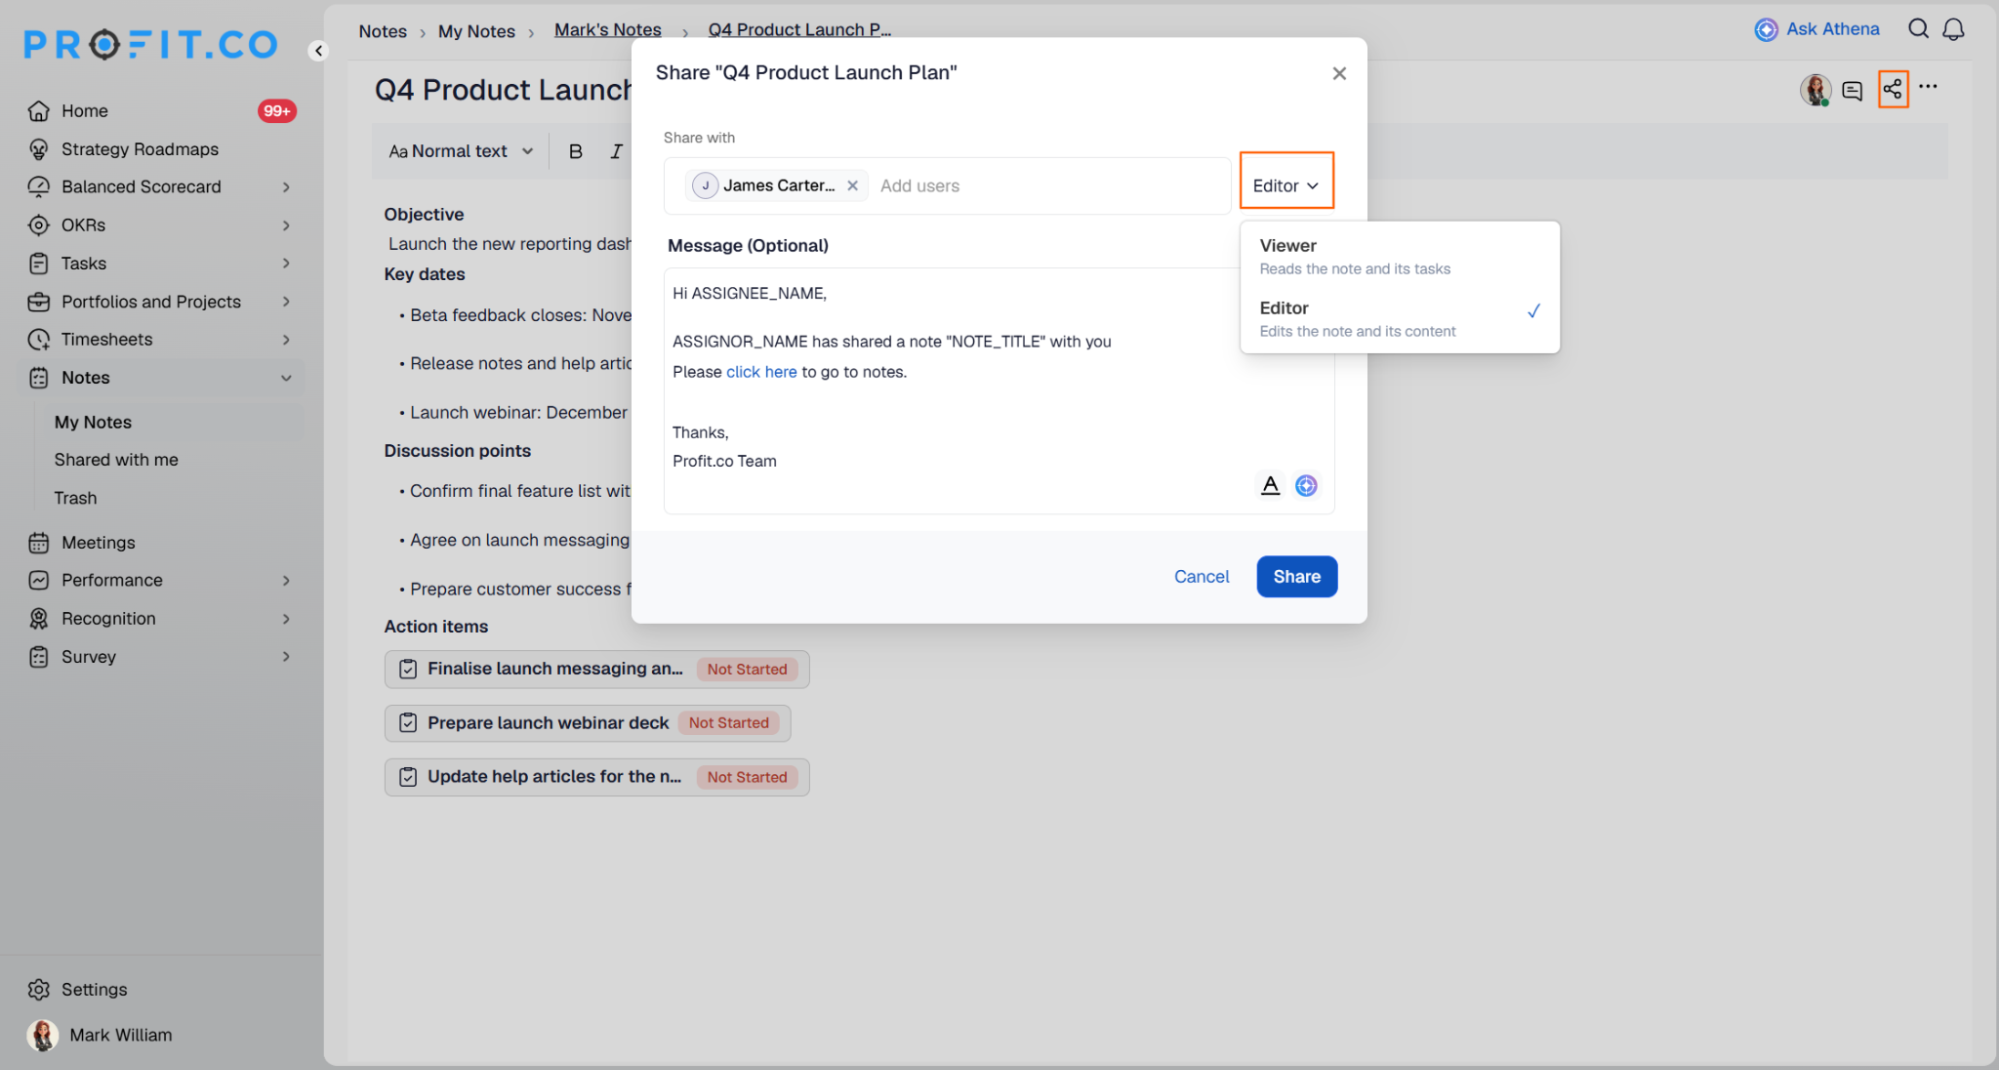
- Open a note and click Share. Choose Viewer or Editor for the people being added. Each person's access level is shown in People with access.
- Viewer can read the note and its tasks.
- Editor can edit the note and becomes a co-owner of tasks created in it.
- People who already had access to a note are set to Editor, so they keep the same access as before.
- When a task is created in a shared note, every person who holds Editor at that time is added as a co-owner of the task, even if they are not a member of the task's board. This requires Multiple Assignees to be enabled in Settings → Tasks → General → Task Assignment.
- When a note that already contains tasks is shared with a new Editor, the share panel lists those tasks and asks the person sharing to confirm before the new Editor is added as a co-owner.
- Departments can be given access to a note, but their members are not added to tasks as co-owners. To make someone a co-owner, add them to the note individually as an Editor.
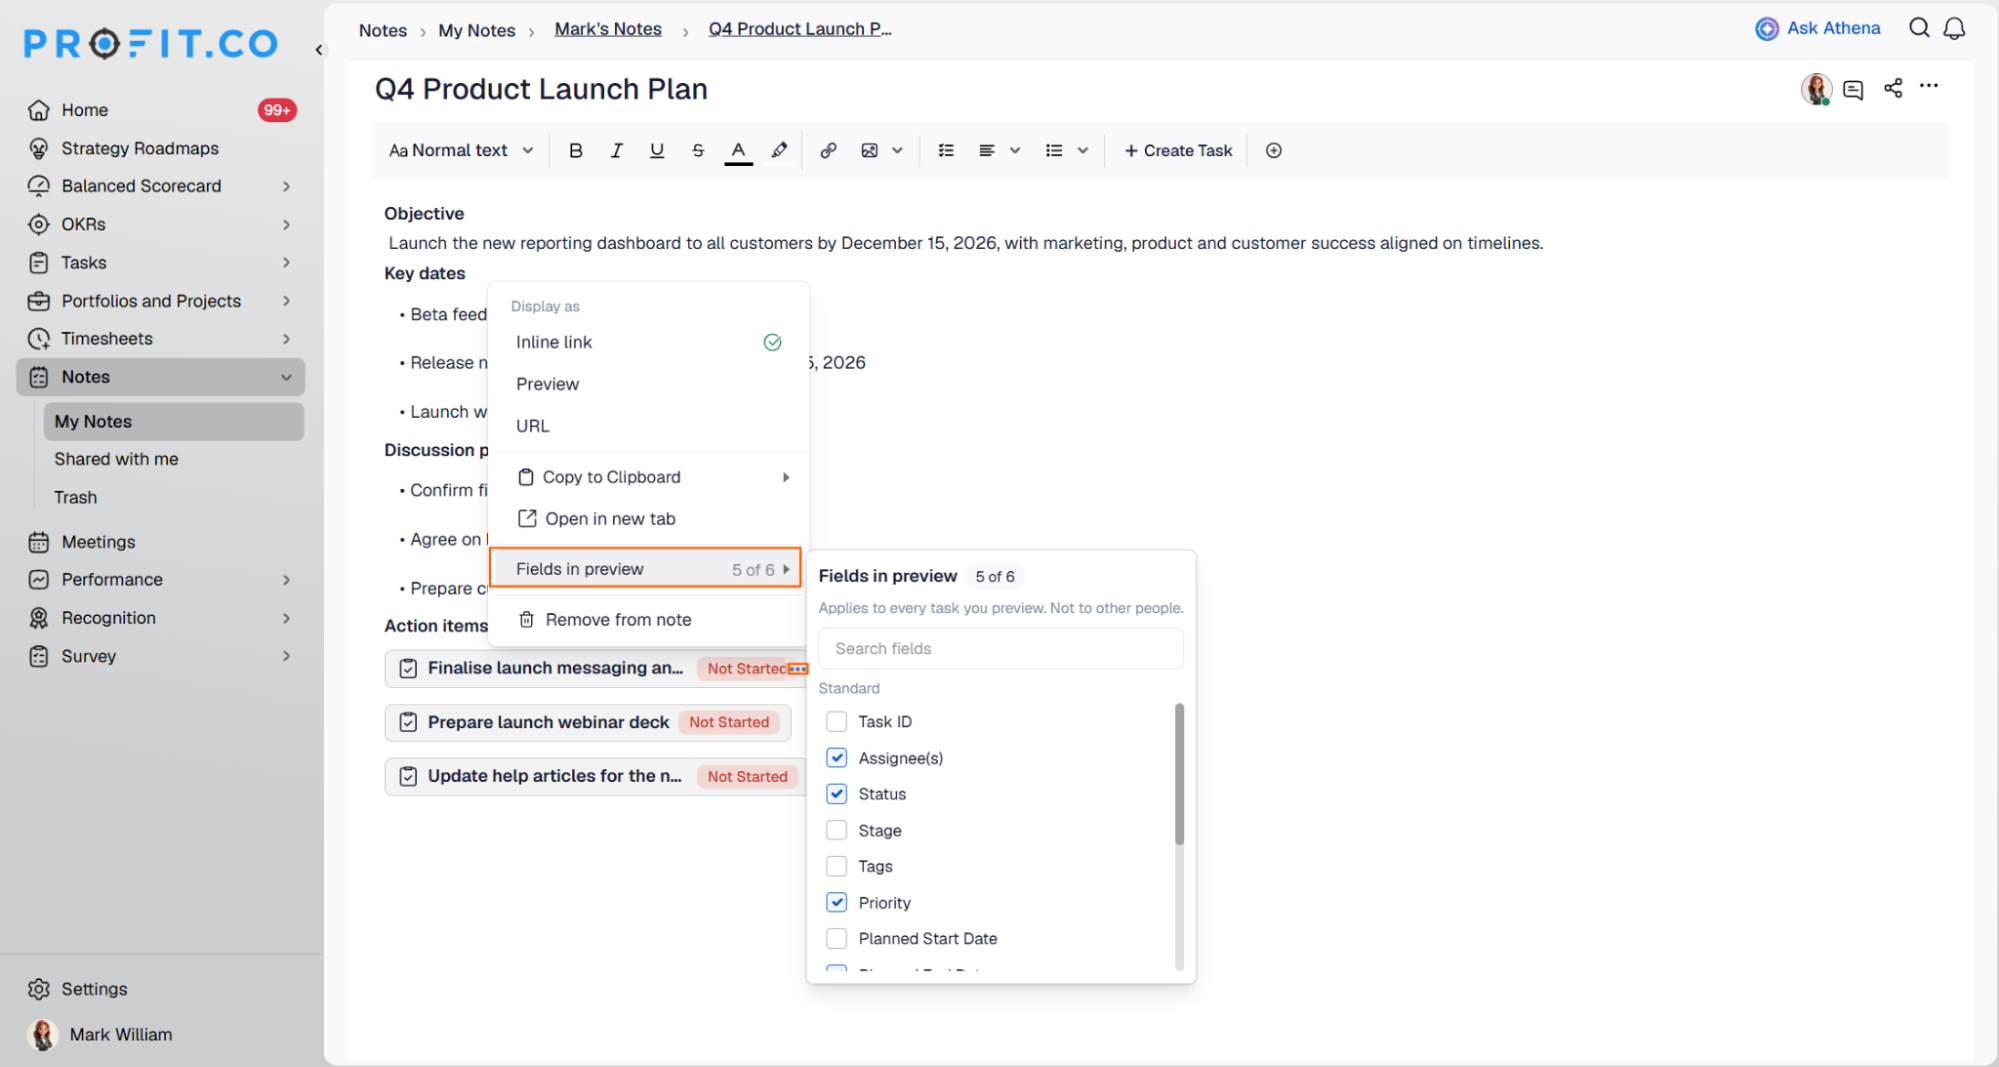
- Each task in a note now shows its status. Hover over a task to preview details such as assignee and due date, or use the ⋯ menu to display it as an Inline link, Preview or URL, copy its details, or remove it from the note.
Why It Matters
- Collaborators can act on the work: People editing a note can update the tasks created in it, without being added to each task's board.
- Access matched to each person's role: Viewer and Commenter let stakeholders follow or give feedback on a note without being able to change it or its tasks.
- Clear record of who can edit what: Every co-owner added from a note is shown on the task with the note they came from, so access can be reviewed and removed in one place.
4. Schedule conflict warnings for overlapping assignments
Overview
Users are now warned when a person is assigned to tasks whose planned dates overlap. Previously, the system didn't flag double-booking when tasks were assigned, and the only related signal was the Cockpit utilization warning, which shows a capacity issue but not which tasks are causing it. Affected tasks now show their schedule conflicts in the project list and on the task itself, with the overlapping tasks listed, so clashes can be caught during planning.
How It Works
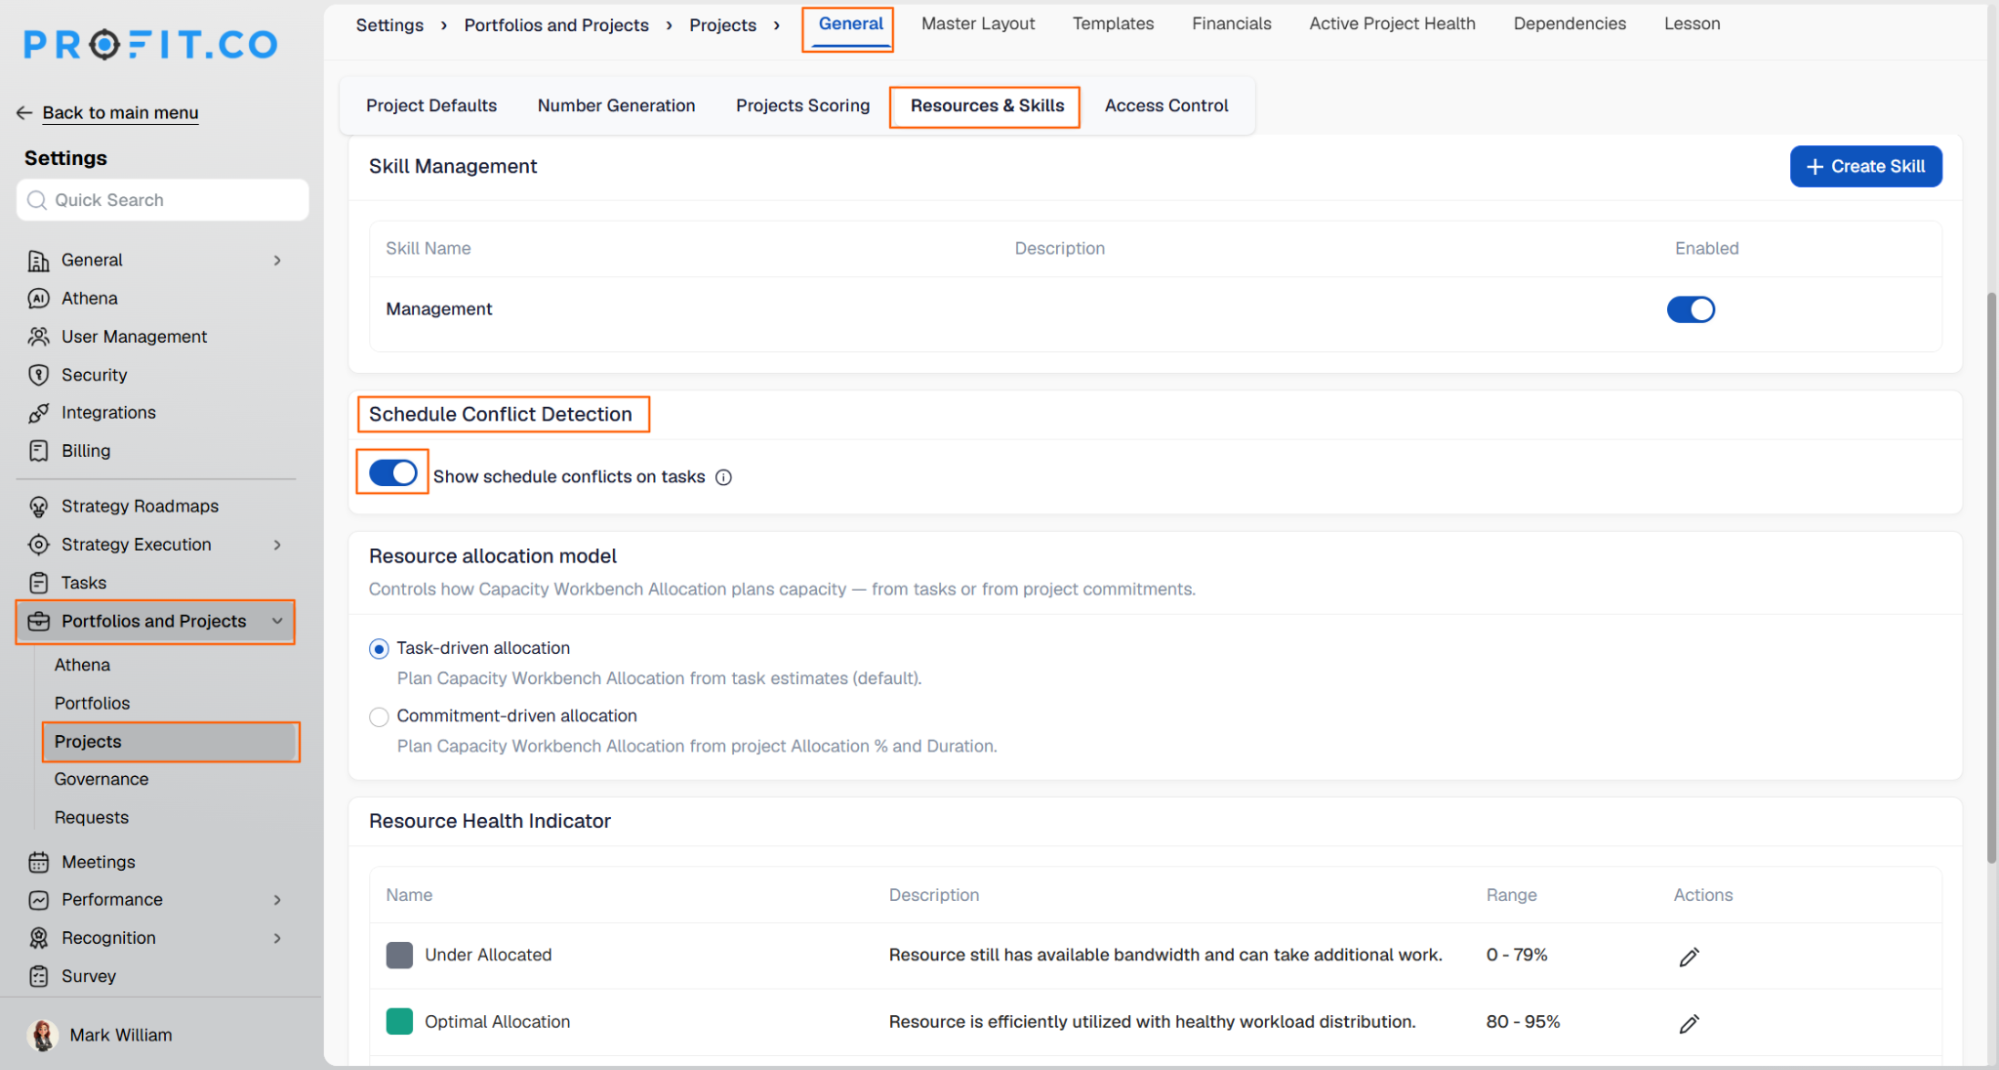
- Navigate to Settings → Portfolios and Projects → Projects → General → Resources & Skills. Under Schedule Conflict Detection, turn on Show schedule conflicts on tasks.
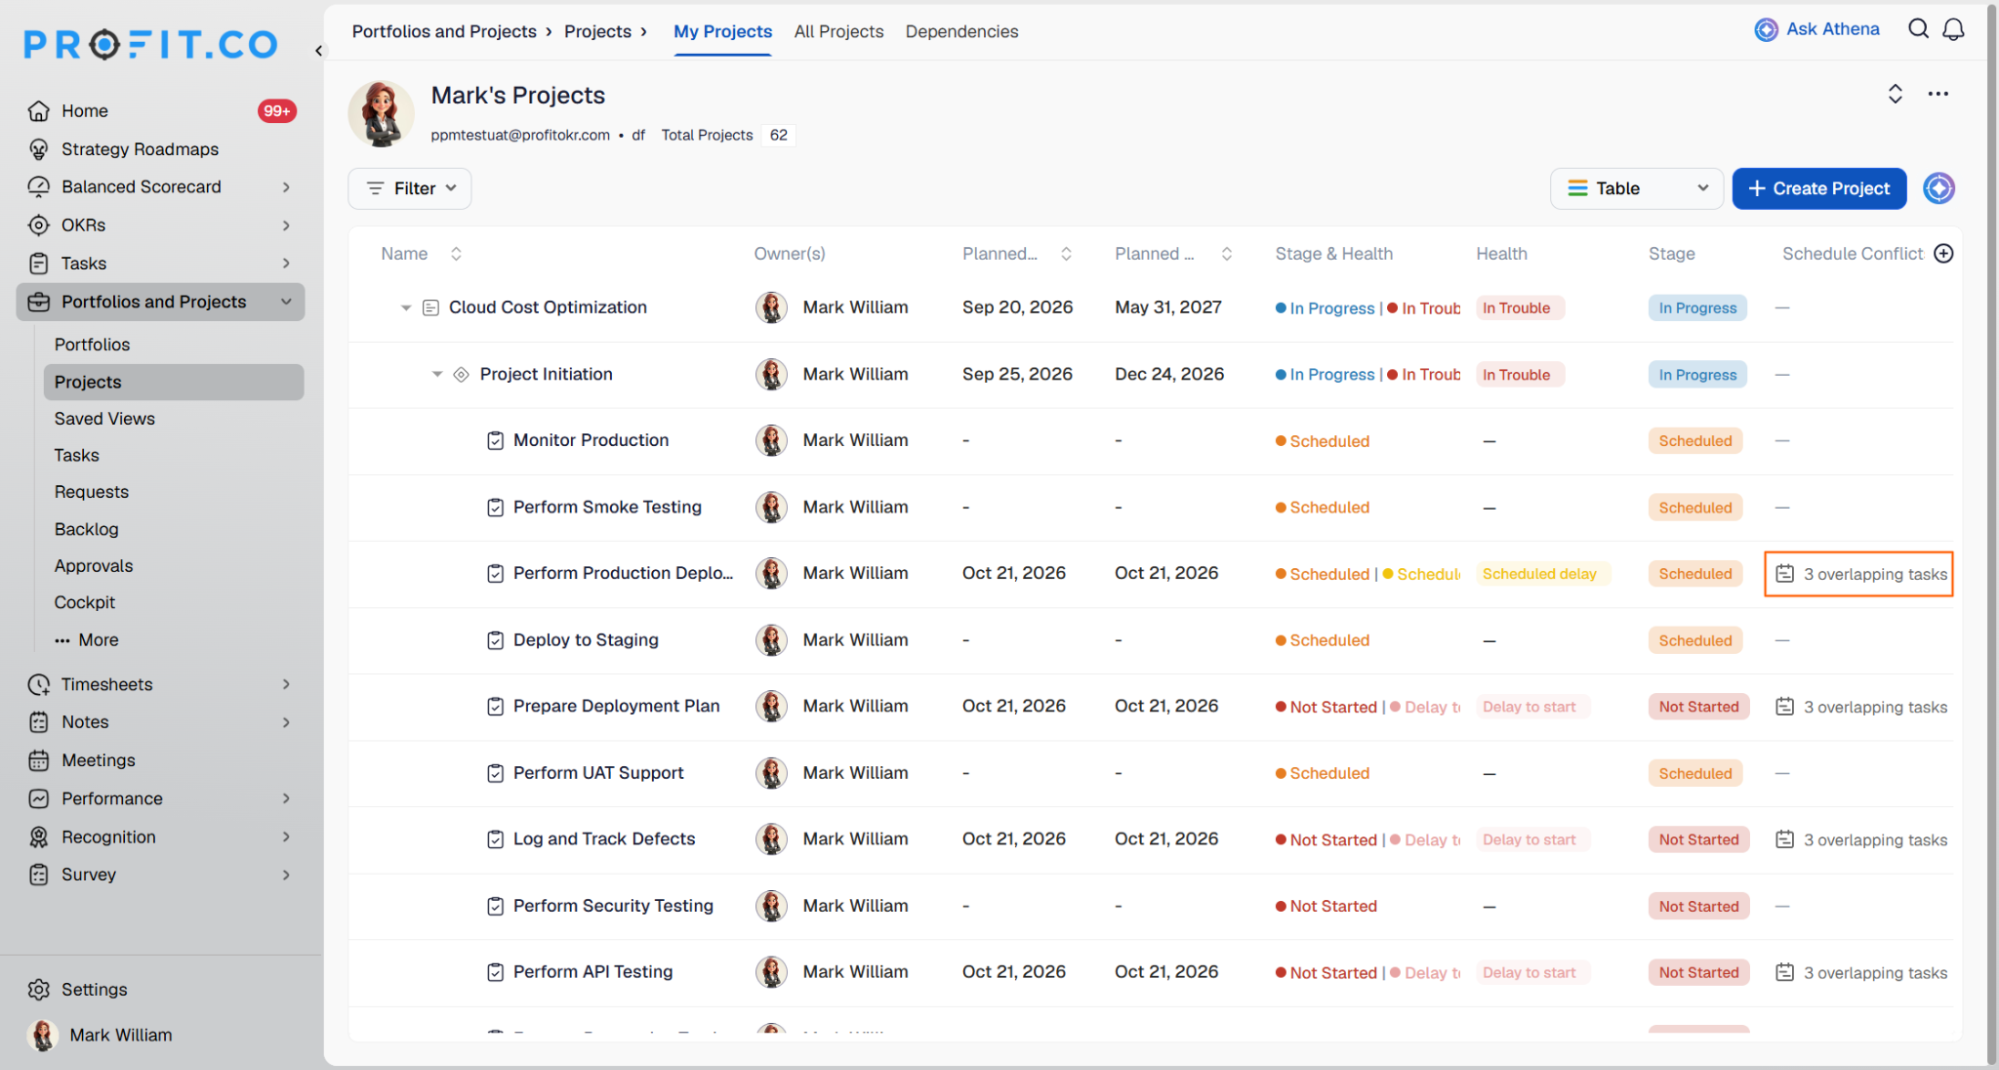
- In Portfolios and Projects → Projects, the Schedule Conflicts column shows the number of overlapping tasks for each task in the project (for example, 3 overlapping tasks). Tasks with no conflicts show a dash.
- The same Schedule Conflicts field appears when a task is opened.
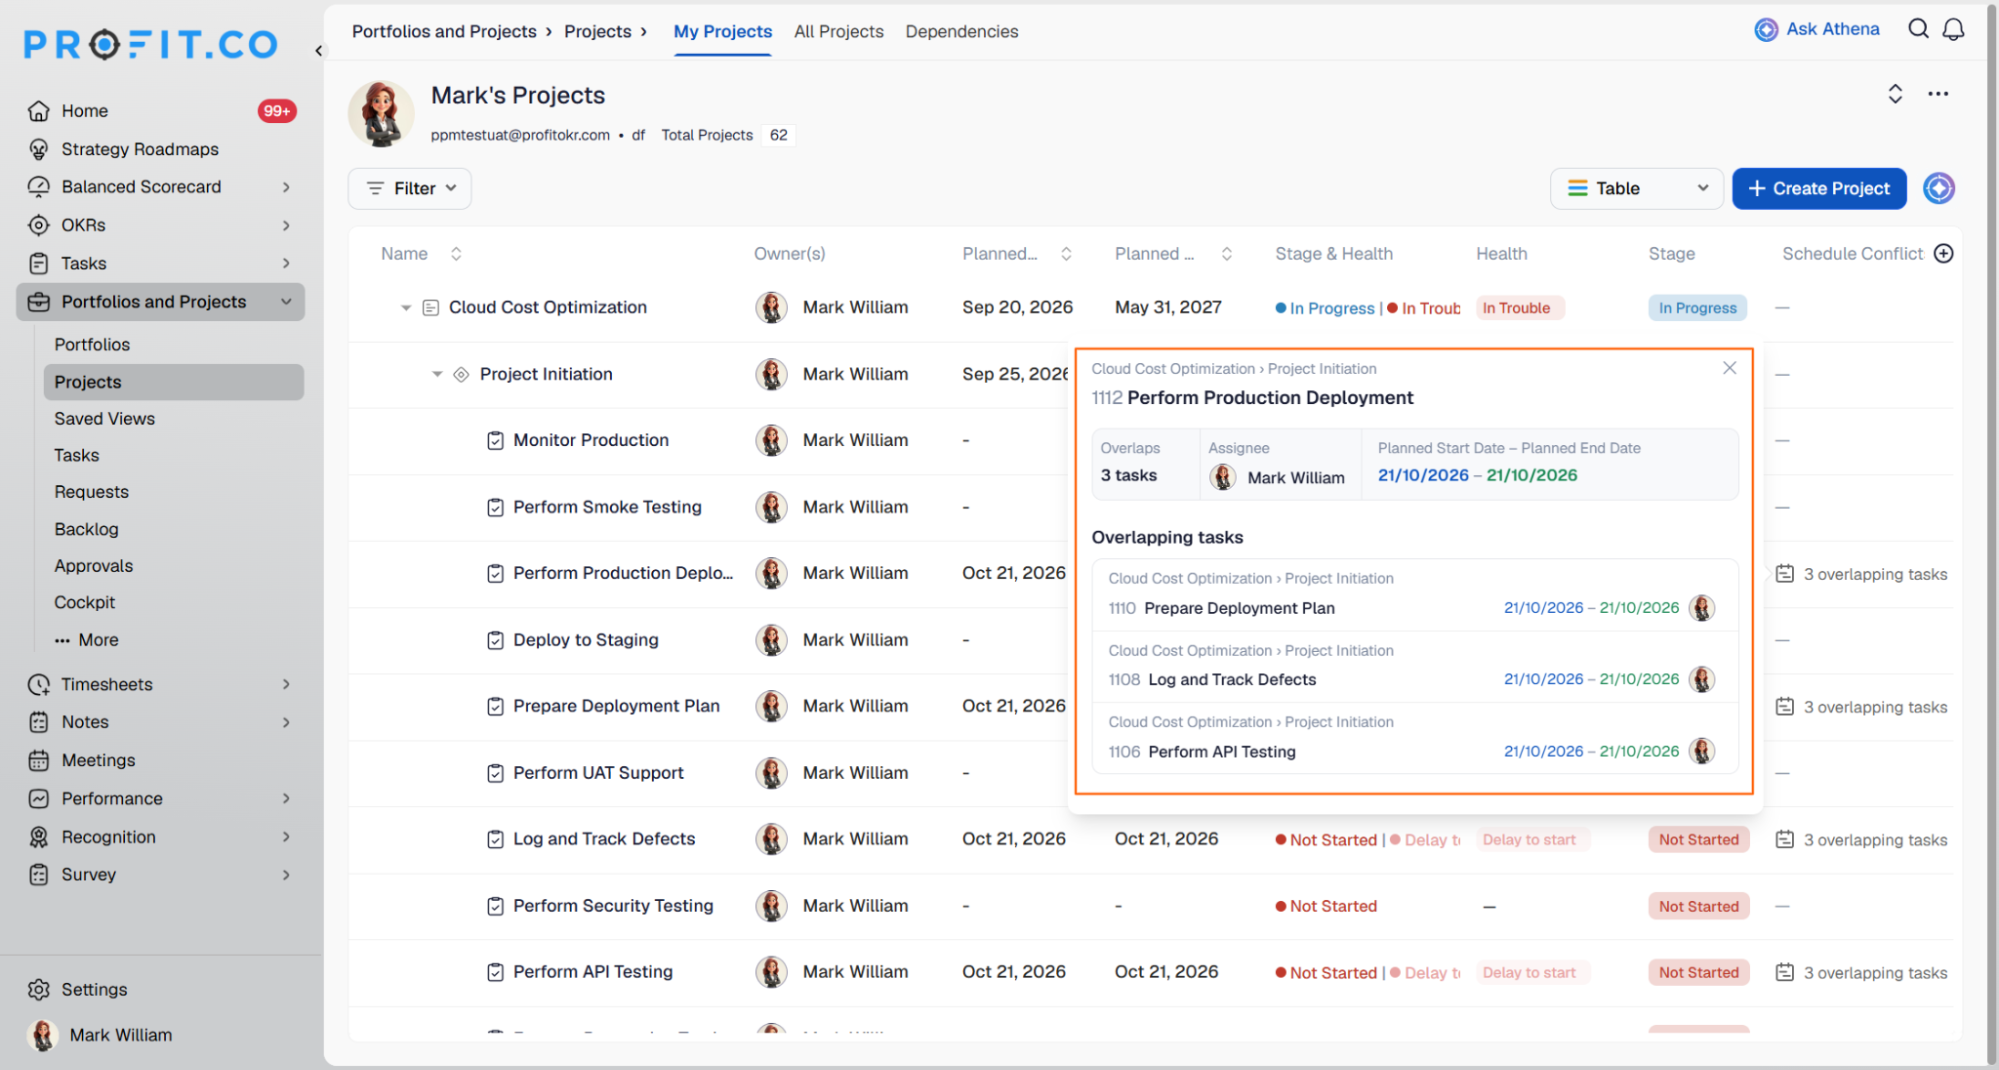
- Click the conflict count to open the details, which show the assignee, the task's planned dates, and each overlapping task with its project, task ID and planned dates.
- Overlapping tasks are listed across projects, not only within the current project.
- Conflicts are checked whenever a task's assignee, planned start date or planned end date is added or changed.
Why It Matters
- Double-booking caught during planning: Project managers see a conflict as soon as it is created, rather than discovering it once delivery is affected.
- The exact tasks behind a conflict: Unlike the Cockpit utilization warning, the conflict details name each overlapping task and its dates, so the clash can be resolved directly.
- Commitments across projects in view: A person's assignments in other projects are included, so a schedule that looks clear within one project is not hiding a clash elsewhere.
5. Choose how resource allocation is calculated
Overview
Super users can now choose whether resource allocation in the Capacity Workbench is calculated from task estimates or from project commitments. Previously, allocation could only be derived from tasks, so a person committed to a project before its tasks were planned appeared to have no allocation. Organisations that commit people to projects first can now record that commitment and plan the tasks later.
How It Works
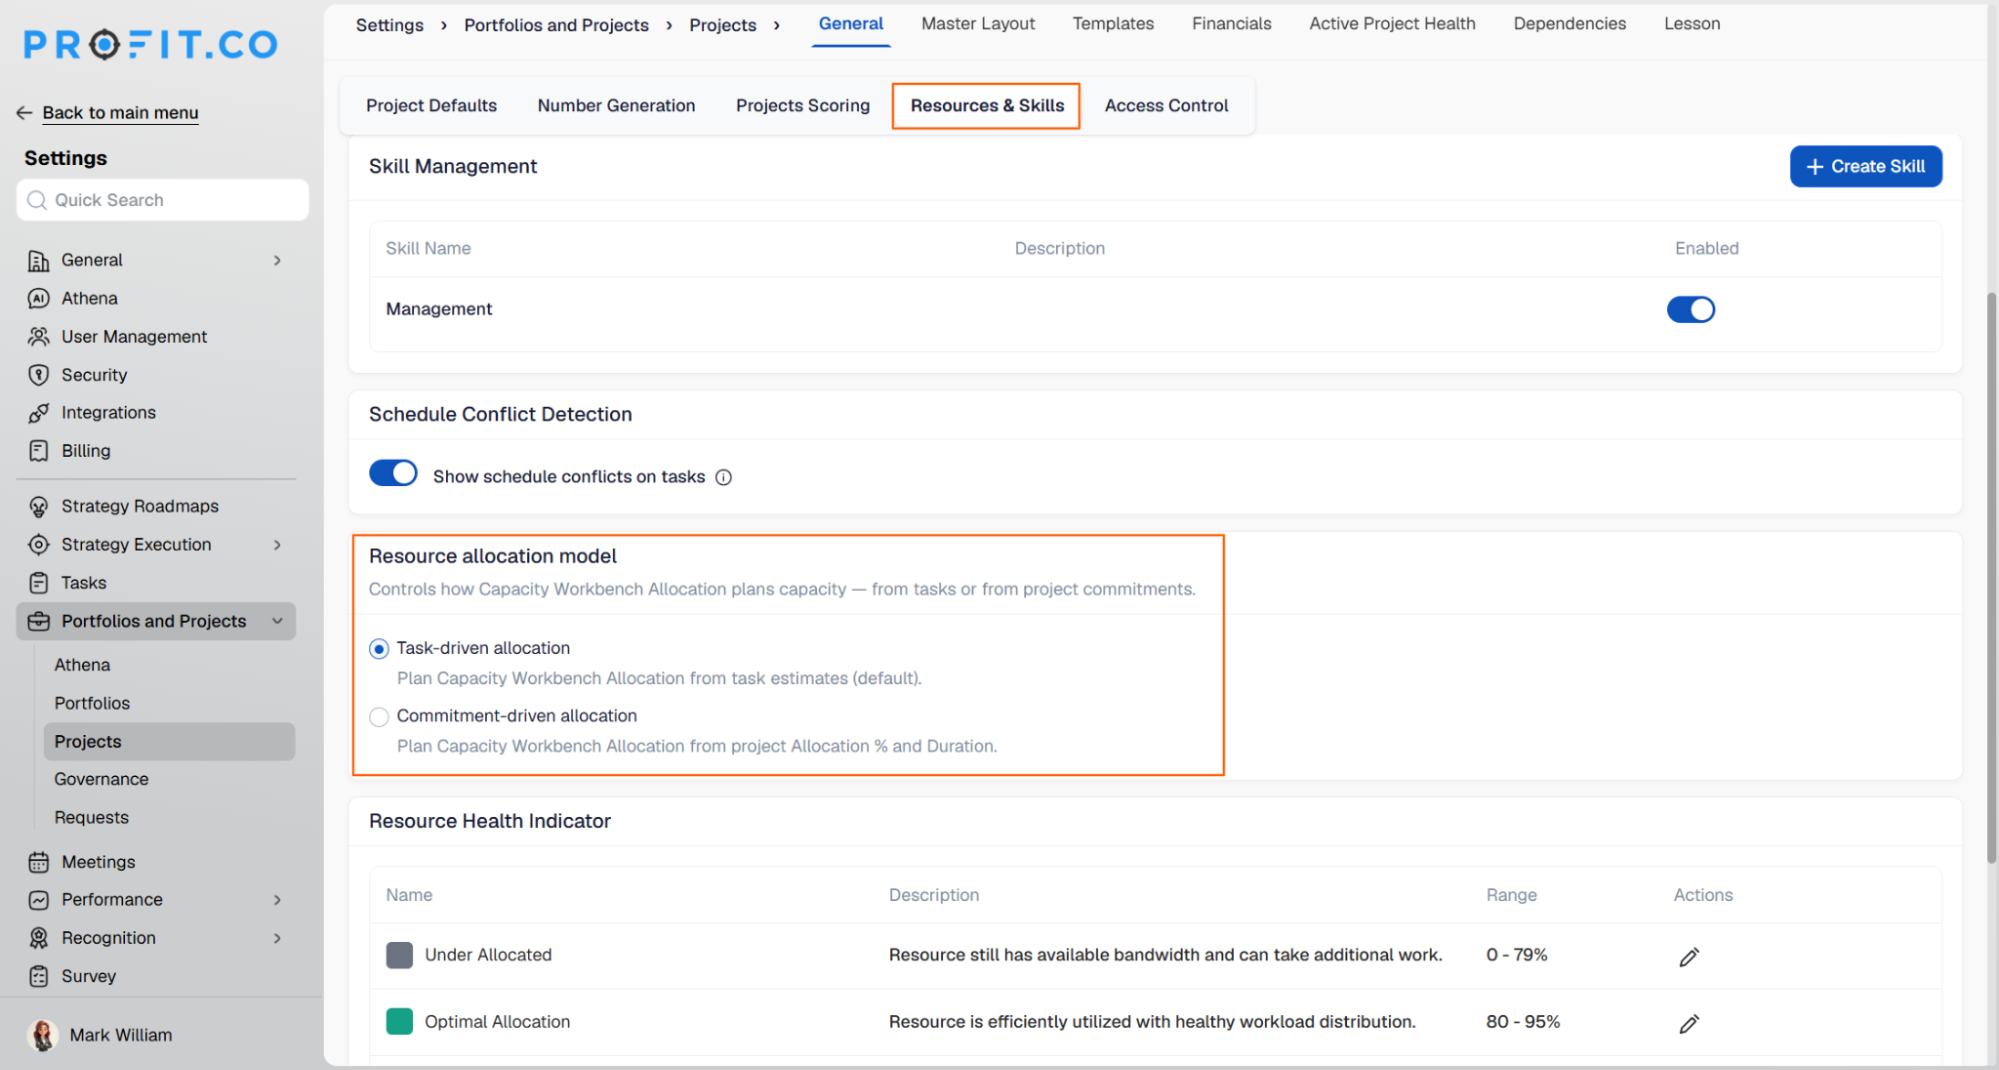
- Navigate to Settings → Portfolios and Projects → Projects → General → Resources & Skills. Under Resource allocation model, choose one of two options:
- Task-driven allocation (default): Allocation is calculated from task estimates and planned dates, as before.
- Commitment-driven allocation: Allocation is calculated from each project’s allocation percentage and duration.
- With commitment-driven allocation, a person is allocated a percentage of their time for a project between a start and end date. Hours for each month are calculated from the working days covered, so a partial month counts for less.
- Tasks planned later draw against the commitment, and any remaining unplanned time is shown as its own row.
Why It Matters
- Staffing recorded before the work is planned: People can be committed to a project as soon as they are booked, rather than only once tasks exist.
- Allocation that matches how the business plans: Organisations that staff by share of time and those that plan by task can each use the model that fits.
- Unplanned commitment in view: The time committed but not yet broken into tasks is shown separately, so managers can see how much planning is still outstanding.
Enhancements:
6. Descriptions, required fields and Athena for governance items
Overview
Governance items in projects, such as risks, issues, decisions, assumptions and constraints, now explain what each value means and record why each item exists. Super users can add a description to every governance status and type, and project teams see these descriptions when choosing a value. Decisions, assumptions, constraints and project changes gain fields that capture their reasoning, every governance item now asks for confirmation before deletion, and long text fields support formatting and Athena.
How It Works
- Navigate to Settings → Portfolios and Projects → Governance. Each governance item tab now shows the item’s description under its heading.
- Every status and type list has a Description column. Super users can add or edit an optional description of up to 120 characters in the Create and Edit panels, with default descriptions provided for the standard values. Impact and Probability descriptions are edited inline.
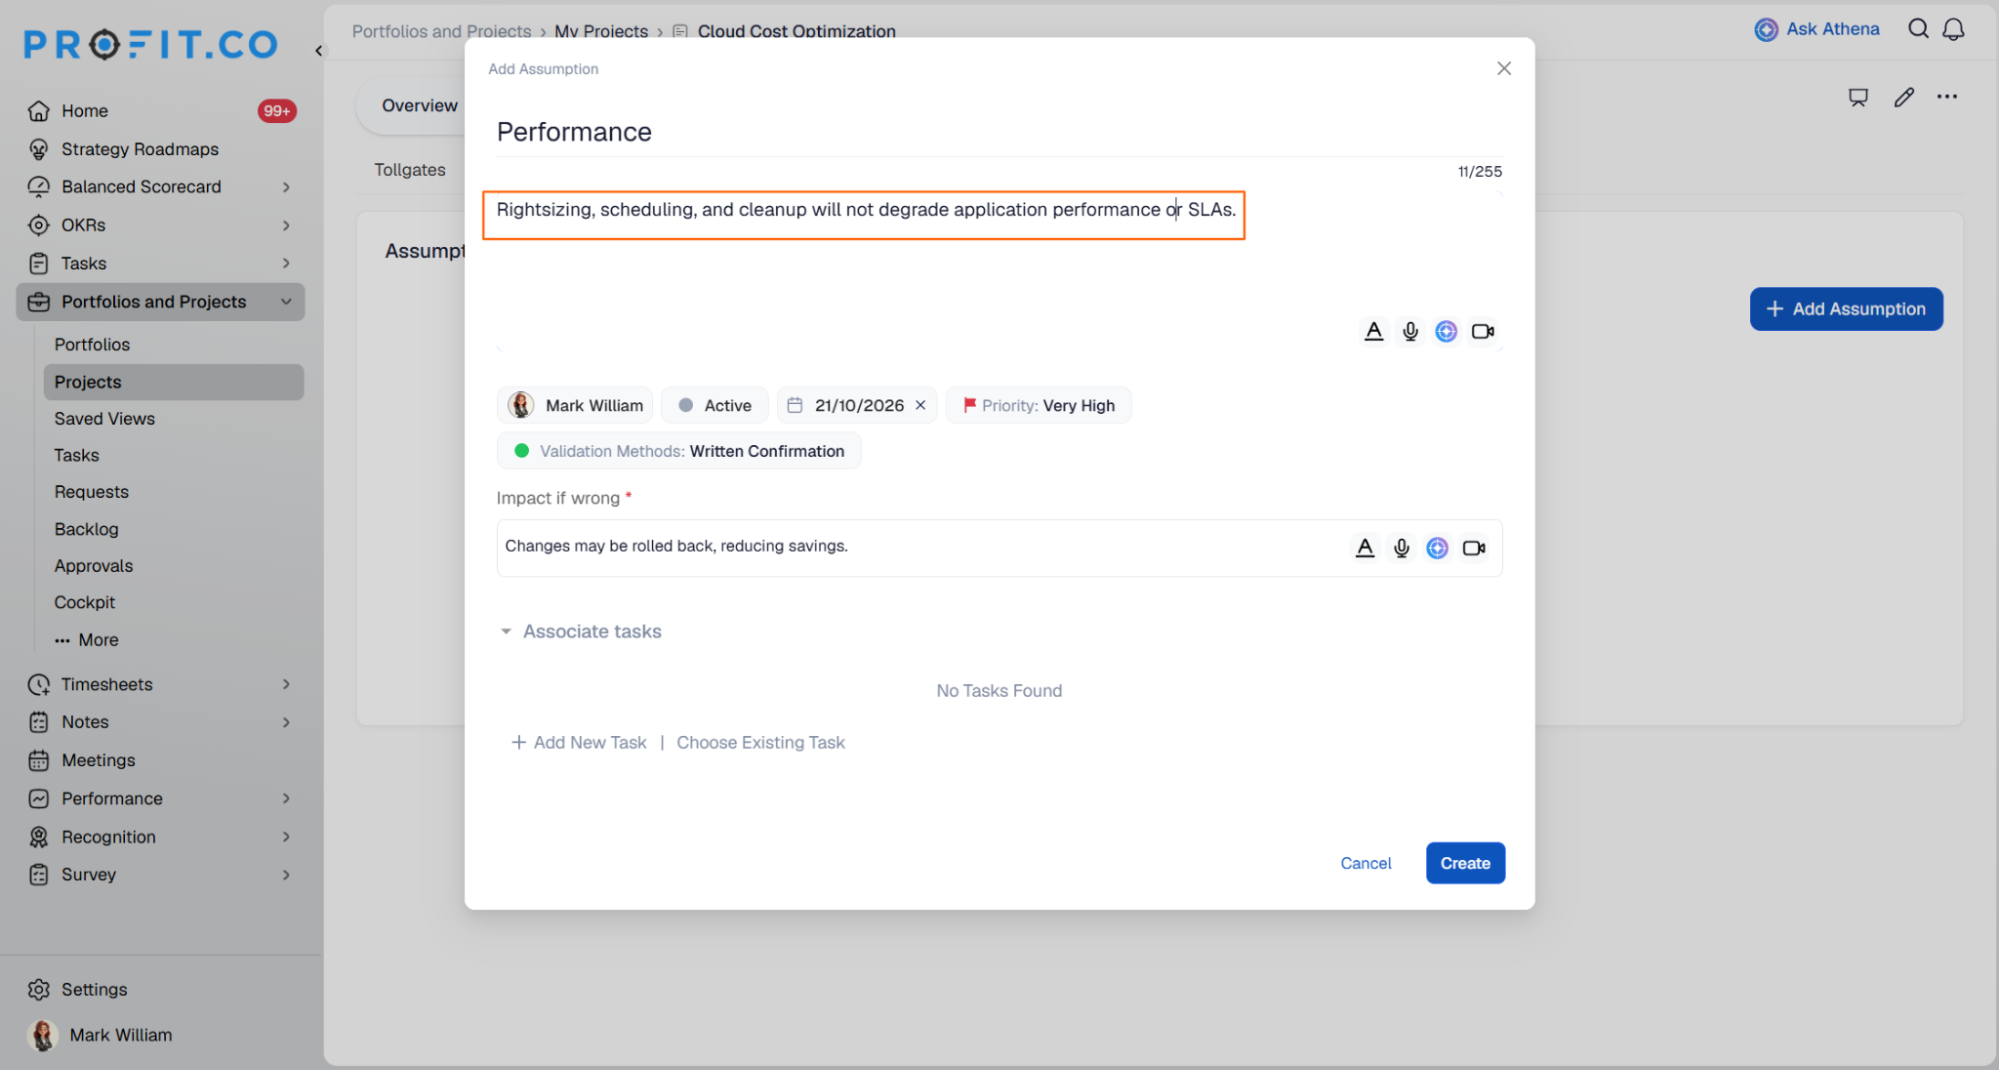
- In a project’s Governance tab, status and type dropdowns on the create and edit forms show each option’s description below its name.
- New fields are added to four governance items:
- Decision: Reason (required) and Alternative solution (optional, added through the Add an alternative solution link).
- Assumption: Impact if wrong (required).
- Constraint: Waiting on (required).
- Project Change: Reason (required).
- For records created before this release, the new required field must be filled when saving the Edit panel. Inline changes to status, owner, priority or due date continue to save without it.
- Every governance item now shows a confirmation before deletion, in the same way Risks and Issues already did.
- Long text fields on governance items include a formatting toolbar and a Write with Athena option. Athena suggestions are applied only when the user accepts them.
Why It Matters
- Consistent choices across teams: Descriptions at the point of selection help teams pick the same status or type for the same situation, such as Mitigate versus Avoid for a risk response.
- Reasoning stays with the record: Every decision and project change records why it was made, so later reviewers do not have to reconstruct the context.
- No accidental deletions: Decisions, assumptions, actions and other governance items can no longer be removed with a single click.
7. Task access and mentions follow project access
Overview
Users who can see a portfolio but are not part of a project within it can no longer open that project's tasks or update its progress. Previously, portfolio visibility allowed these users to open a task's full overview and update progress on projects they had not been added to. Task access, and the list of people who can be mentioned in a task, now follow project access.
How It Works
- Navigate to Portfolios and Projects → Portfolios. Projects, milestones and tasks under a portfolio continue to be listed for portfolio members.
- Opening a project the user is not part of shows the message "Sorry, you do not have access to perform this action.", as before.
- Opening a task in that project now shows the same message, instead of the full task overview.
- Users without project access can no longer update the project's progress.
- When typing @ in a task, the mention list shows only people with access to that project.
- To give someone access to a project's tasks, the project owner adds them to the project.
Why It Matters
- Project data stays with project members: Task details are visible only to people who have been given access to the project, not to everyone who can see the portfolio.
- Accurate progress records: Project progress can be updated only by people working on the project, so reported progress reflects the team's own updates.
- Mentions reach people who can act: Users are mentioned only if they can open the task, so no one receives a notification for work they cannot see.
PERFORMANCE (Performance, Goals, Development Plans, Recognition, Survey)
1. Competency activities in performance reviews
Overview
Employees and reviewers can now view the activities linked to each competency directly within a performance review. Building on the competency activities introduced earlier, this update brings those activities into the review form so they can be referenced while assessing a competency. Activities are displayed for reference only and are not rated individually, so the competency remains the unit of assessment.
How It Works
- Navigate to Performance → Reviews and open a review.
- For competencies that have activities, the overall activity progress and an Activities count appear beside the competency description.
- Click Activities to view the list of activities under that competency.
- Each activity shows its name, time period, progress percentage, and status (for example, On Track).
- Rate the competency on the rating scale as usual; no separate rating is required for the activities.
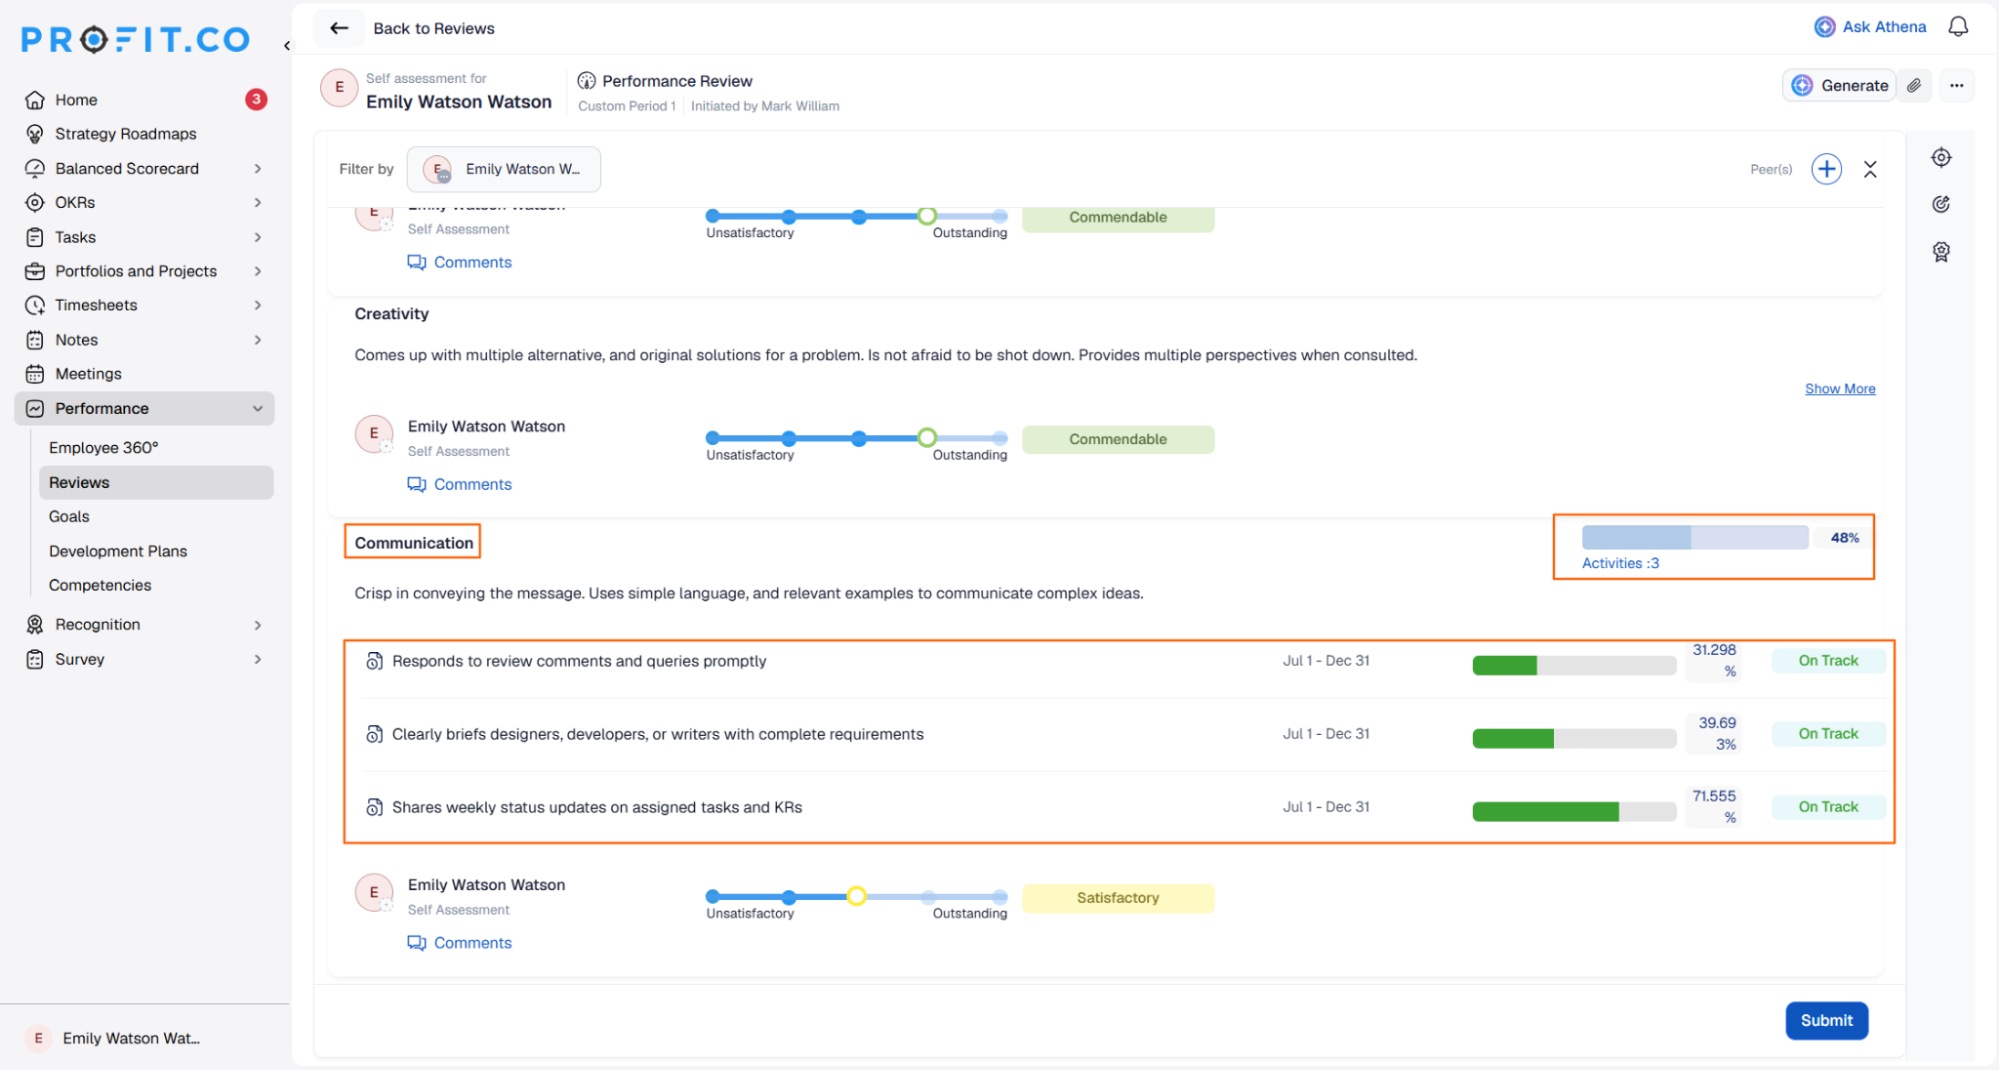
Why It Matters
- Evidence at the point of rating: Reviewers can see the progress made on each competency's activities while rating it, without leaving the review.
- Rating structure stays unchanged: Because activities are reference-only, existing review templates and competency scoring work exactly as before.
- Fairer, better-supported assessments: Ratings can be grounded in the actual work tracked against a competency rather than recall alone.
2. Mandatory comments when reviewer ratings differ
Overview
Super users can now make the Overall Rating comment mandatory only when a reviewer's rating differs from another reviewer's rating, for example, when the Self and Manager ratings do not match. Previously, comments were either optional or required for every rating, so rating gaps could go unexplained, or reviewers had to comment even when they agreed with the earlier rating. Reviewers whose ratings align can now submit without a comment, while any difference must be justified.
How It Works
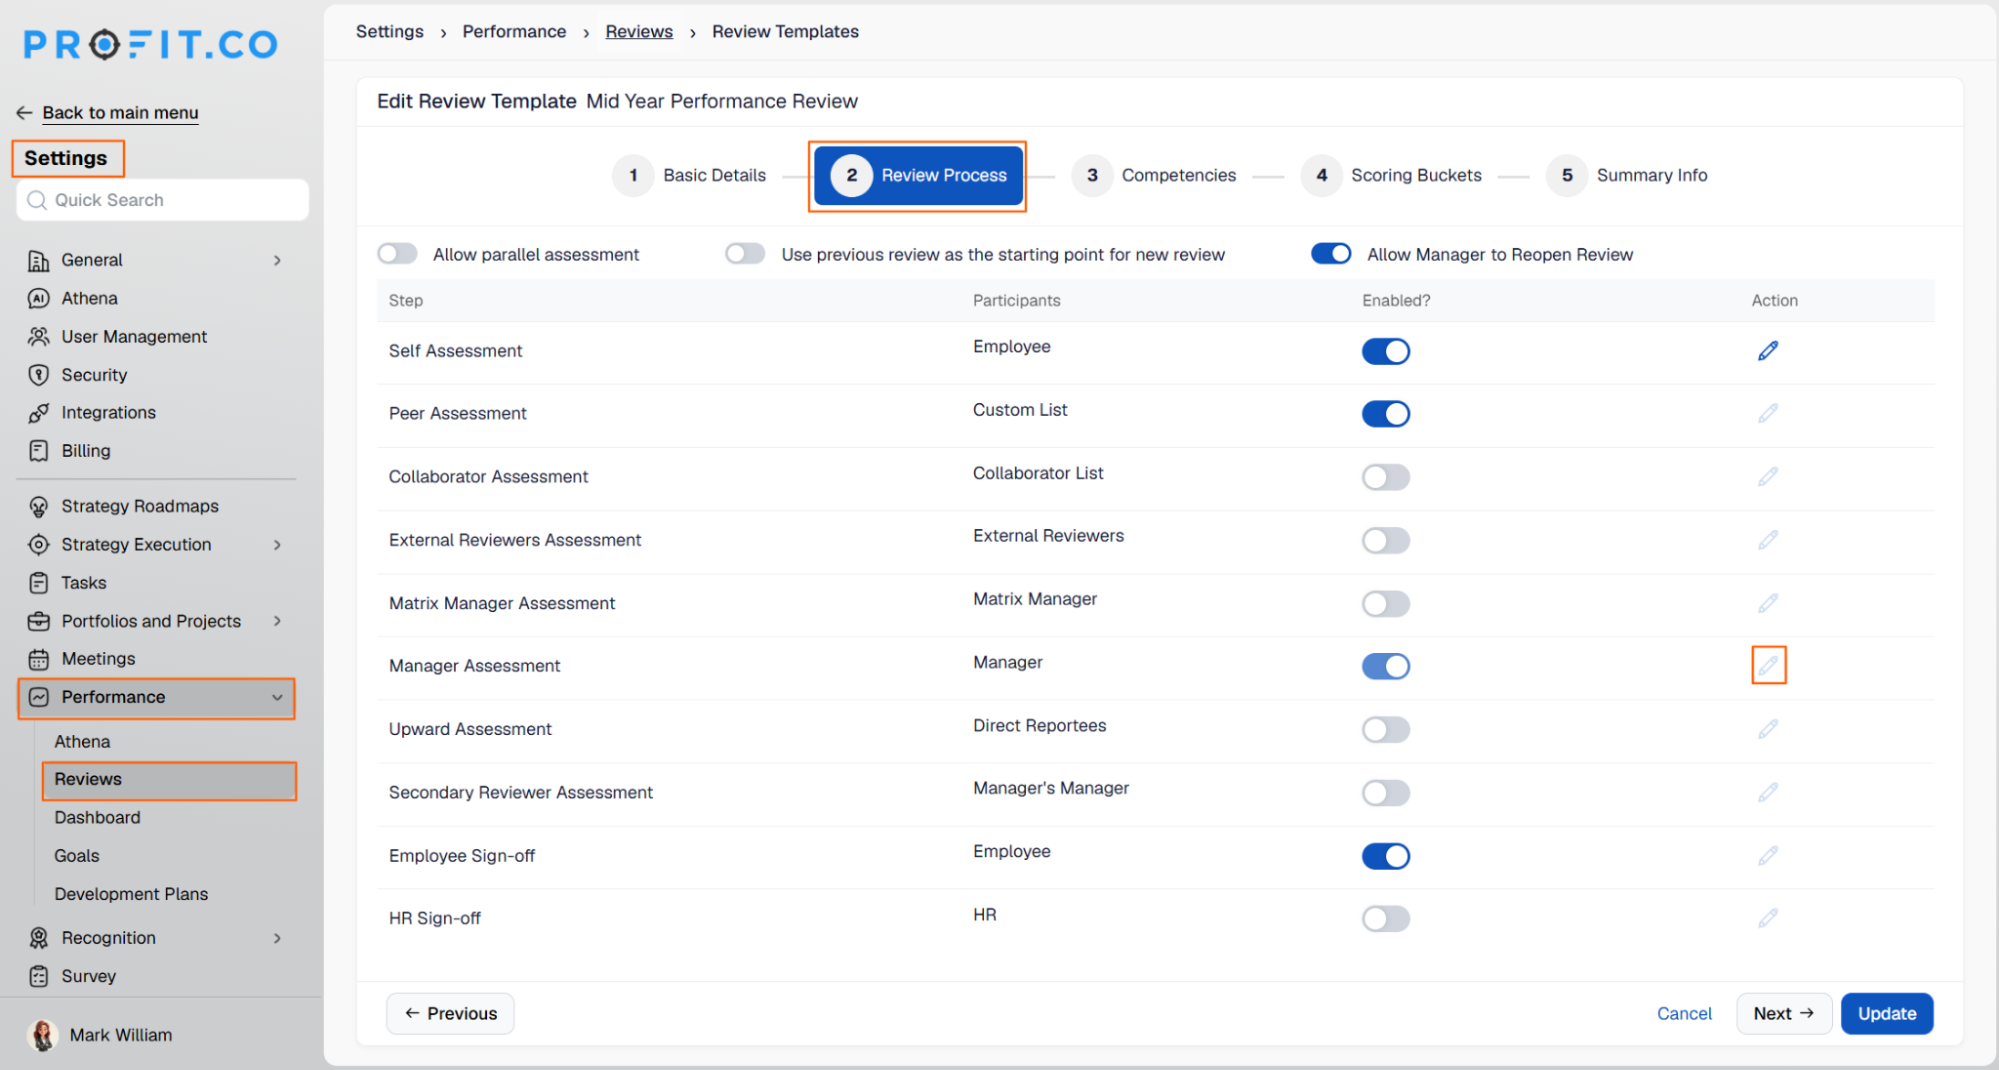
- Navigate to Performance → Reviews → Review Process, select a reviewer step (for example, Manager Assessment) and click the Edit icon.
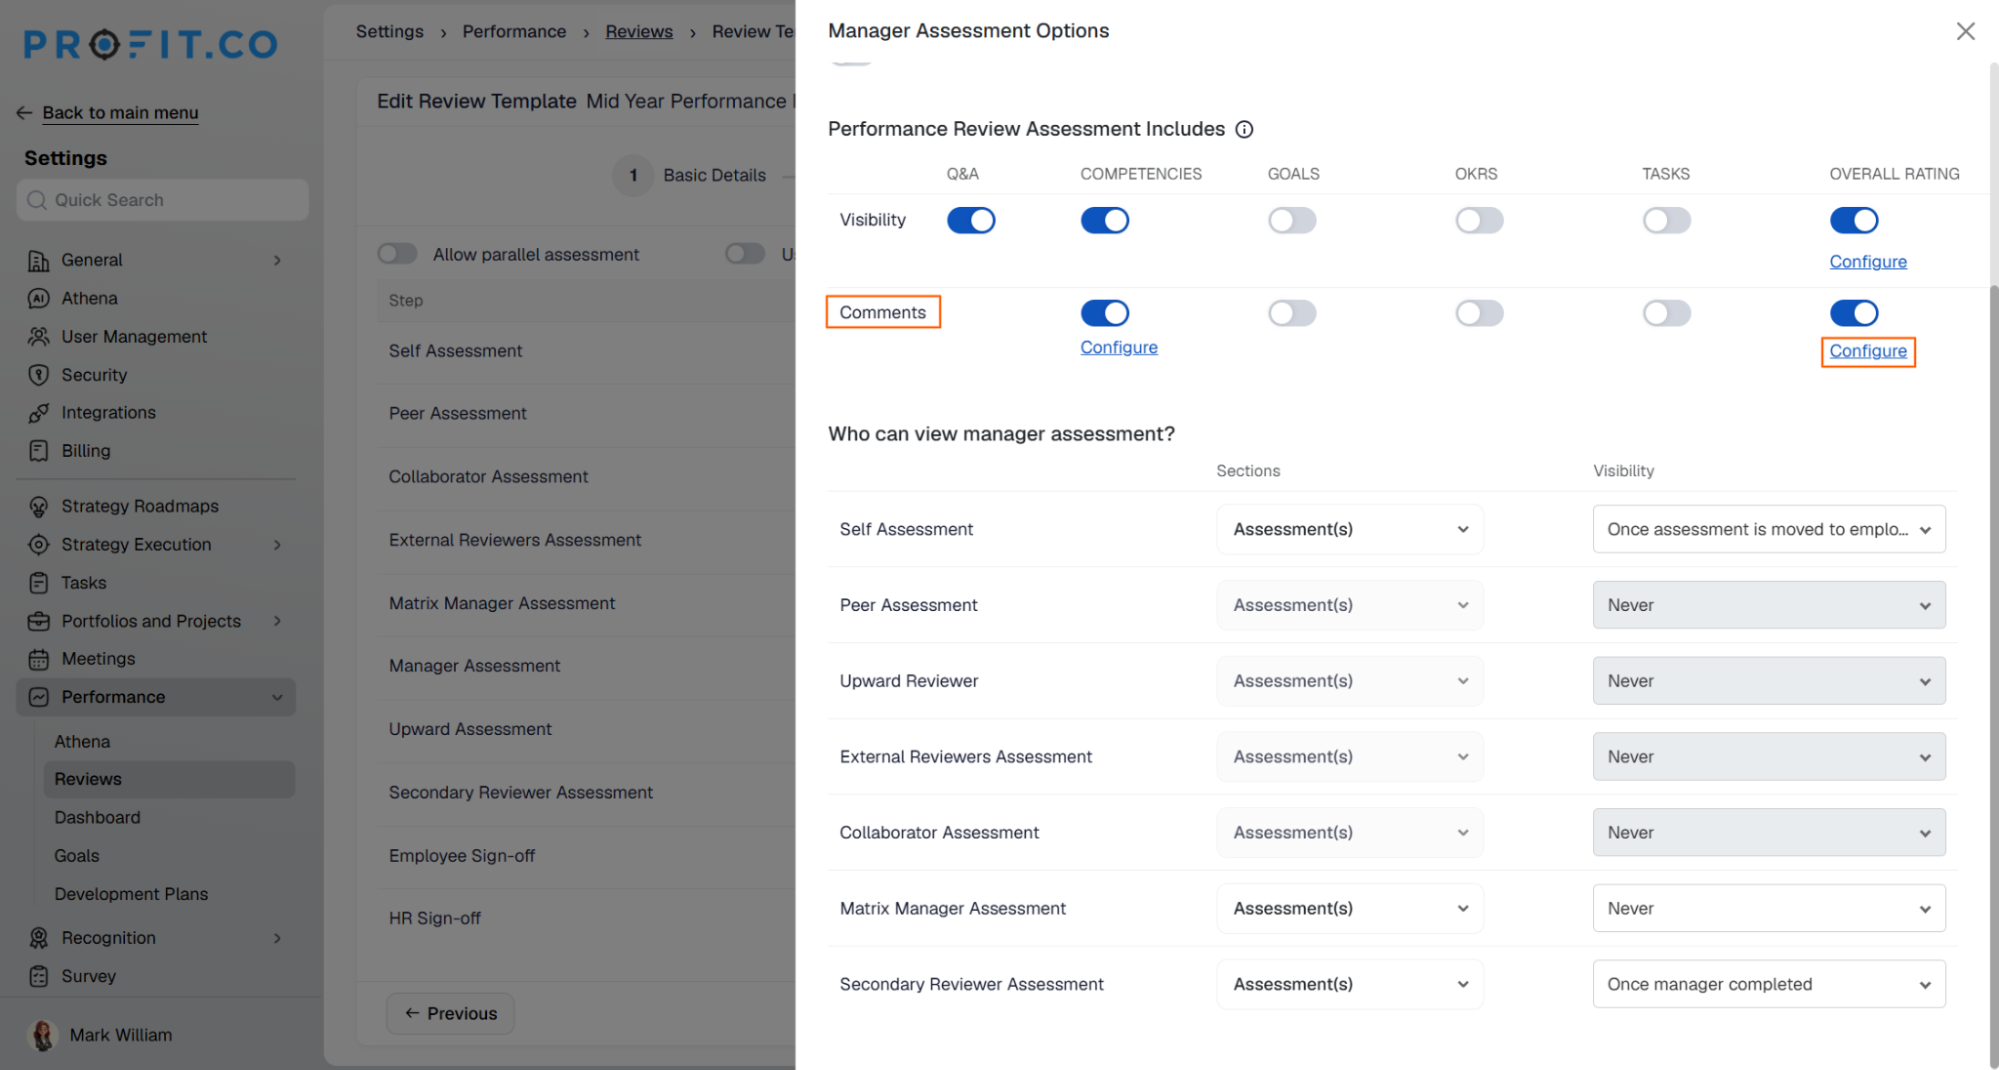
- Under Performance Review Assessment Includes, click Comments, then Configure, and add a DIFFERS FROM condition with the reviewer to compare against.
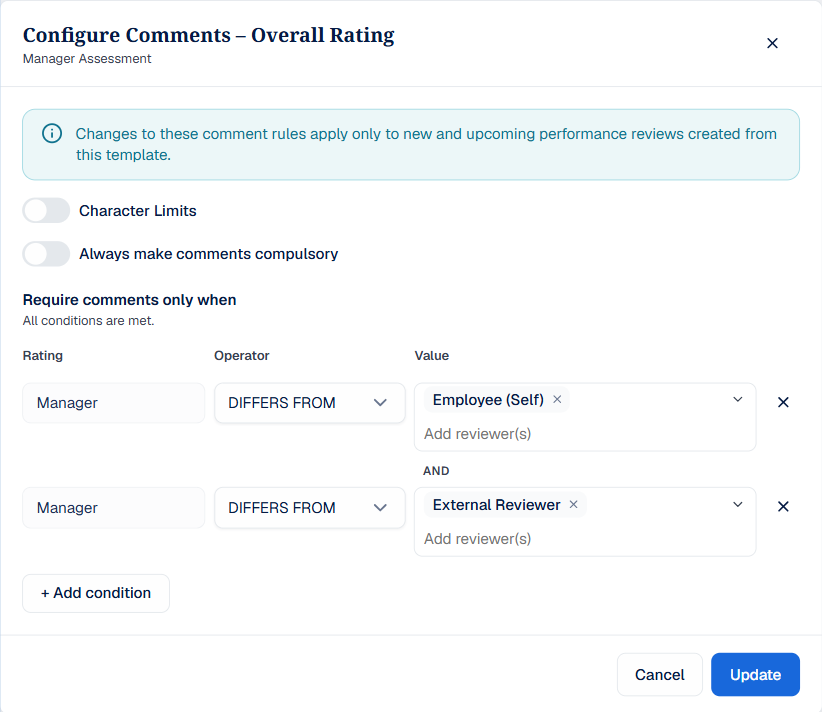
- Which reviewers can be compared depends on the review type:
- Sequential review: A step can be compared only with the stages before it (for example, Manager with Self, or Secondary Reviewer with Manager).
- Parallel review: Every reviewer step can be configured to compare with the other steps.
- Upward Assessment: The rule applies to direct reportees providing ratings.
- Click Update to save the rule.
- During the review, if the reviewer's rating differs from the compared rating, a pop-up prompts them to add an Overall Comment before submitting. If the ratings match, they can submit without a comment.
Why It Matters
- Rating gaps come with a reason: When a manager rates differently from the employee's self assessment, the justification is captured at the point of submission.
- No filler on aligned ratings: Reviewers who agree with the earlier rating are not forced to write a comment just to clear a mandatory field.
- Calibration-ready records: HR teams reviewing rating differences can see why each gap exists without following up with individual reviewers.