Introduction to the PEEL approach
Profit.co’s OKR software is designed and developed in such a way that it helps businesses set challenging and ambitious goals with measurable results. This document will help you use the OKR software better.
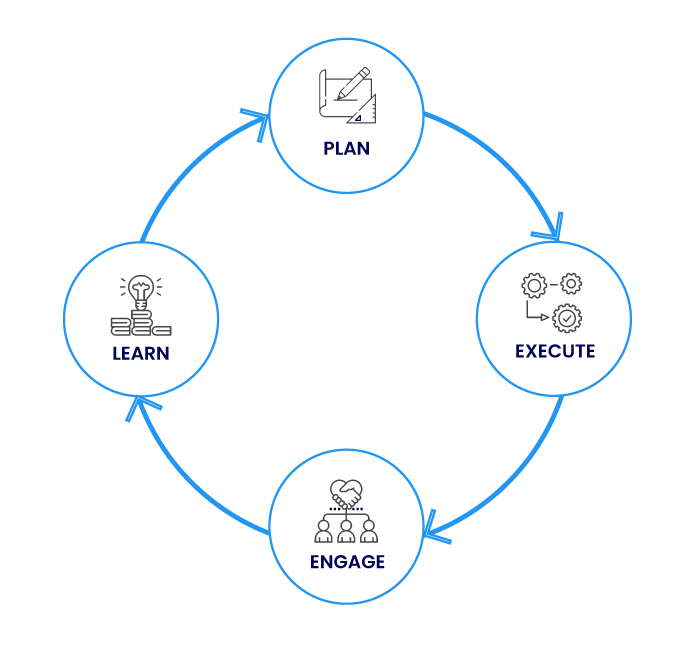
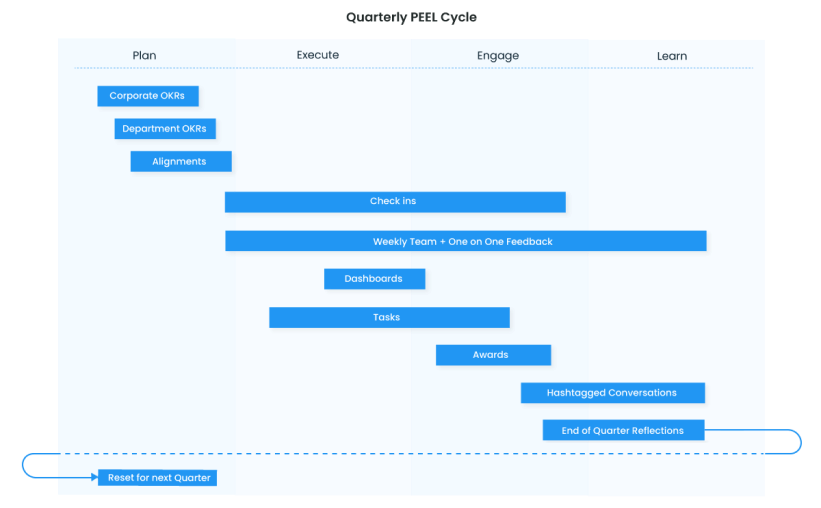
The PEEL approach walks you through each step of the OKR journey:
- Plan your OKRs
- Execute your OKRs
- Engage your employees
- Learn from your successes and failures in an institutionalized way
Planning
Planning is the first thing that you have to do before creating and executing successful OKRs. Your objectives and key results are conceptualized during this stage, whether you’re developing new OKRs or improving existing ones.
Execution
Following the completion of planning, you must proceed to the execution stage. Once OKRs have been created, you can start checking in your key results. Profit.co has a check-in feature that sends you a notification to progress your OKRs and update the status of your key results.
Engagement
Profit.co supports employee engagement by rewarding them for their performance and the success of their OKR progress. You can reward managers, peers, and subordinates. These awards, which are set by superusers, are a points-based rewarding system.
Learning
In Profit.co, you can use hashtags, tags, and @ mentions to note and communicate issues or successes that you’ve had during your OKR experience. Keeping a record of problems can really be beneficial in figuring out a solution and helping in learning your OKR management better. It’s important to remember that this PEEL approach of Profit.co isn’t a finite process; instead, it’s a cycle that requires engagement and practice in order to truly learn from experience
Plan
The use of OKRs as a system for setting goals has proven to be extremely successful for businesses like Google, LinkedIn, and Netflix. They keep pushing themselves and rising to every challenge by working tirelessly to succeed. Even they had to start somewhere, and planning for OKRs from scratch can seem like a daunting task.
In this section, we will discuss creating objectives, creating key results, aligning/assigning OKRs, and creating dependencies.
Objectives
Creating an Objective
In Profit, there are four ways to create an objective:
1. Step-by-Step Guide
The Step-by-Step guide, also known as an education wizard, helps you in clearly defining your objective with its functionalities and detailed steps, the Step-by-Step option takes the most time, but it also provides you with a comprehensive guide for creating your objectives.
2. Quick Create
Quick Create is the simplest way of creating an objective. It allows you to create objectives easily without having to go through several steps. By default, the objective created here will be public visibility.
3. Using Form
The Form option provides you with another quick way to create an objective in a single window to select KPI, change visibility, select target dates, and create alignments.
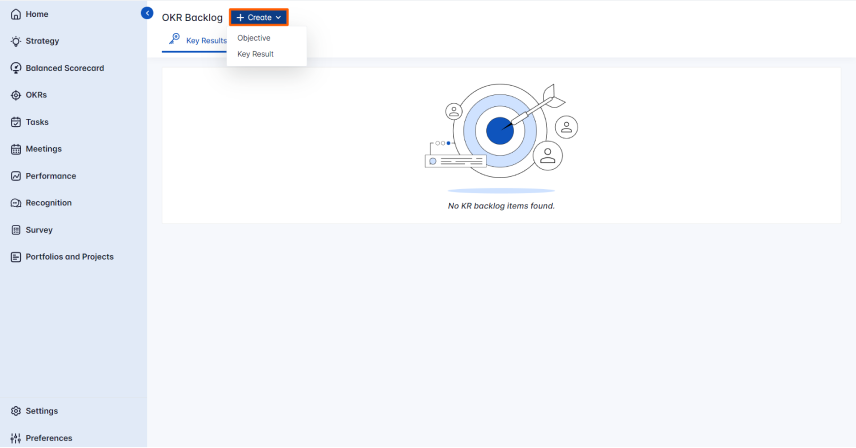
4. From backlog
The objectives backlog can be used as a space for drafting objectives. Click the icon between the action and help centers in the top right corner of your screen to access the backlog.
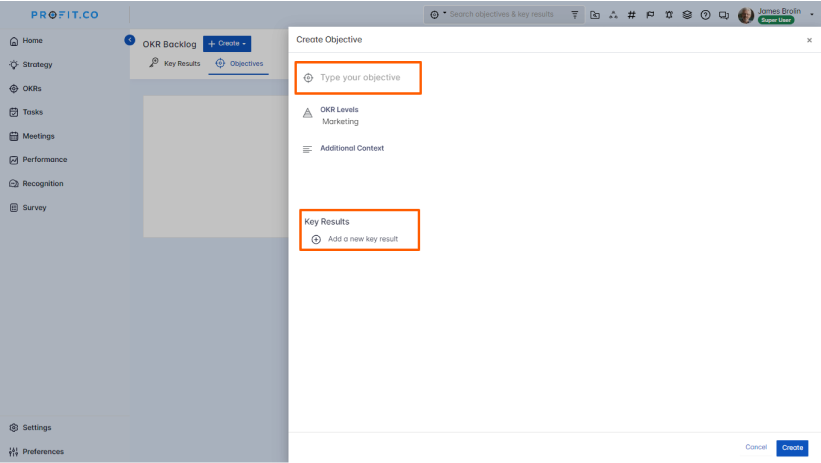
Once you enter the backlog, you can create an objective by clicking on the Create button at the top left of the screen.
Here you can write your objective, select the OKR Levels and add the key results in the same window. Once written, click on the “Create” button.
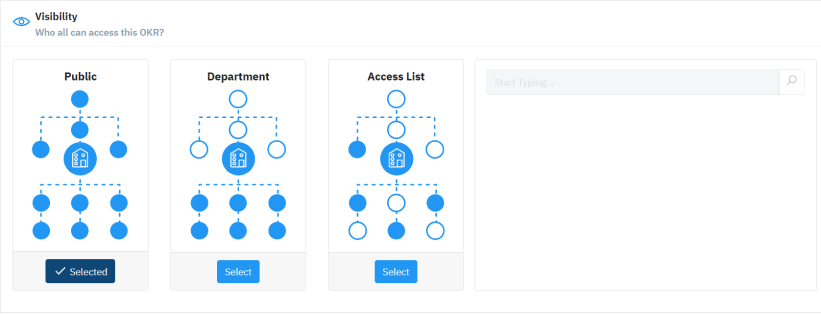
OKR Visibility
While creating an objective at the department, team or individual level, you need to select the visibility.
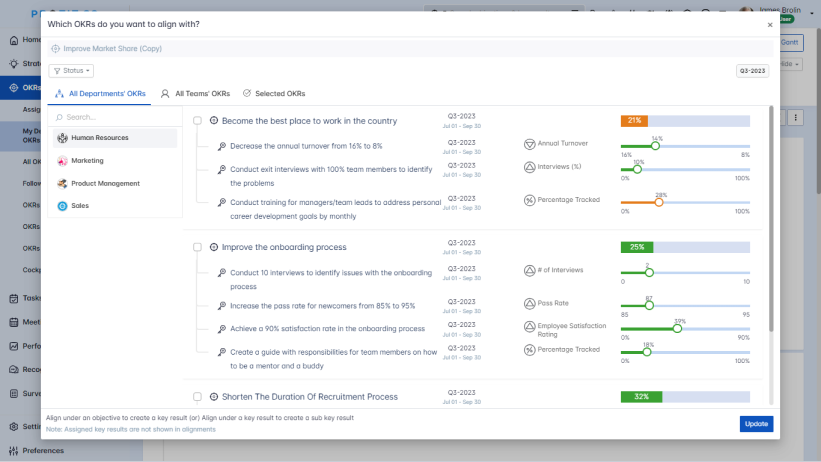
OKR Alignment
Alignment is one of the most powerful features of objectives and key results (OKRs). By aligning your objectives at an individual, team, and organization level, strategically aligned OKRs rapidly get everyone on the same page, working toward results that matter. The purpose of alignment is to unify the goals of your company.
Key Results
Creating Key Results
Key results are the actionable steps needs to be taken to achieve your objective. Key results are basically measured or tracked to determine the progress made towards your objective.
Similar to how objectives are created in Profit.co, key results can also be created in four different ways.
Default key result type
Depending on your needs, Profit.co lets you set the default key result type. This will allow you to save time whenever you create a new key result since you won’t need to manually set the key result type for each key result you create.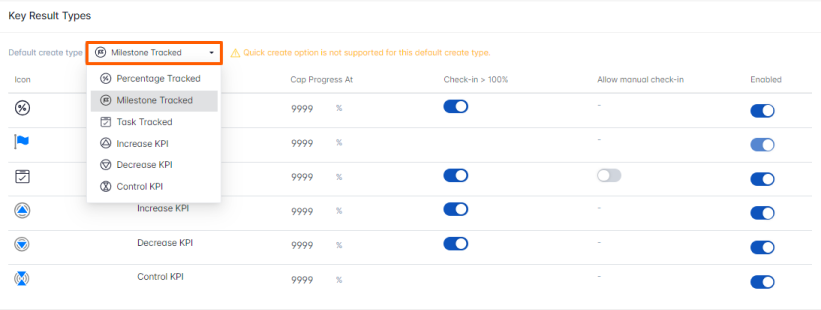 Click here to read more about how to set the default key result type.
Pending Check-ins
You can keep track of employees’ progress toward their key results by viewing their pending check-ins in Profit.co’s in Profit.co’s cockpit section.
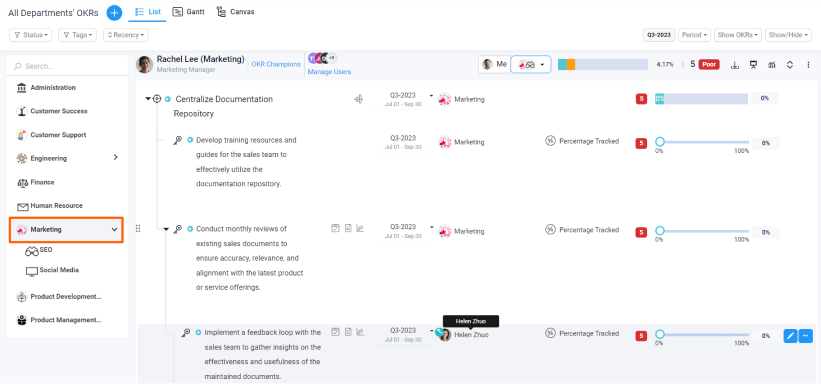
Creating Subkey Results:
In Profit.co sub key results can be created just below the parent key result and users can assign it to their sub-ordinates. Users can also create sub-key results by distributing a key result and assigning it to multiple assignees using the distribute option.
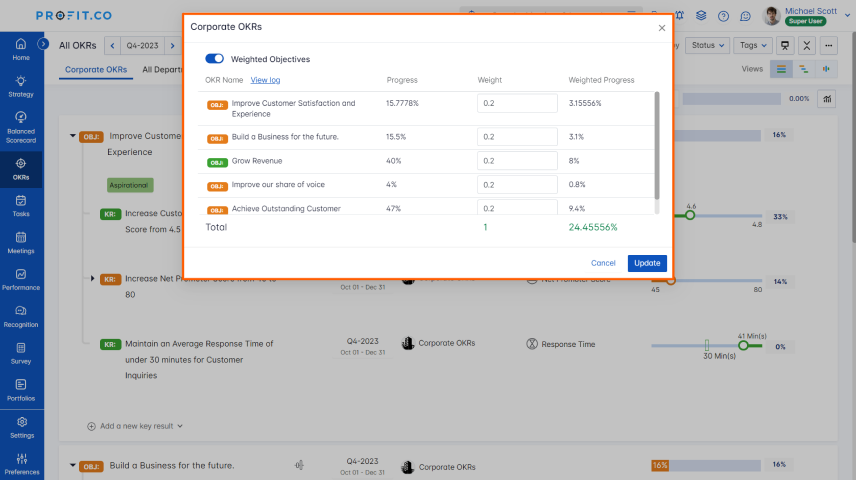
Distribute weightage for key results
Weighted Key Results allows you to set weights and define importance for every key result. The sum of weights should be equalto 1. The weighted average of each key result will be used to calculate the overall objective progress.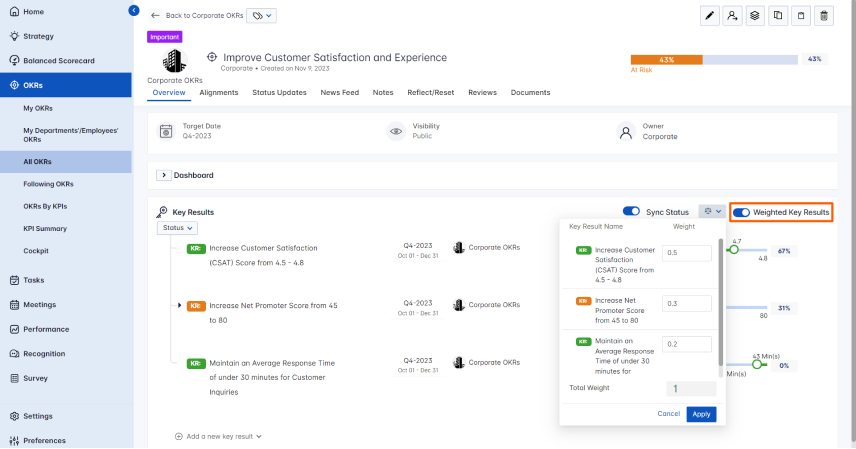
Distribute weightage for sub-key results
Profit.co provides an option to distribute weights among the subkey results. By doing so you can create sub-key results, assign multiple assignees and distribute weightage to each key result.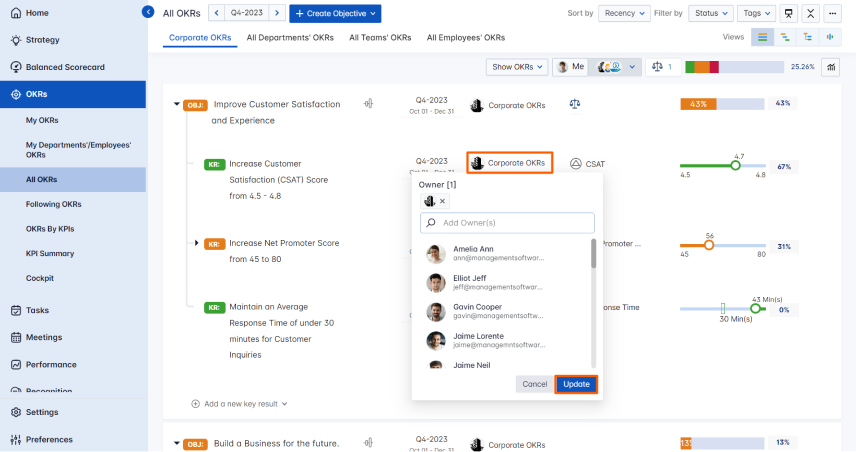
Restrict Visibility for OKRs
Profit.co allows users to set visibility for OKRs to manage privacy when you want to create an objective for a particular group of people or for yourself alone. The visibility settings can be modified at any time by the person who created that objective.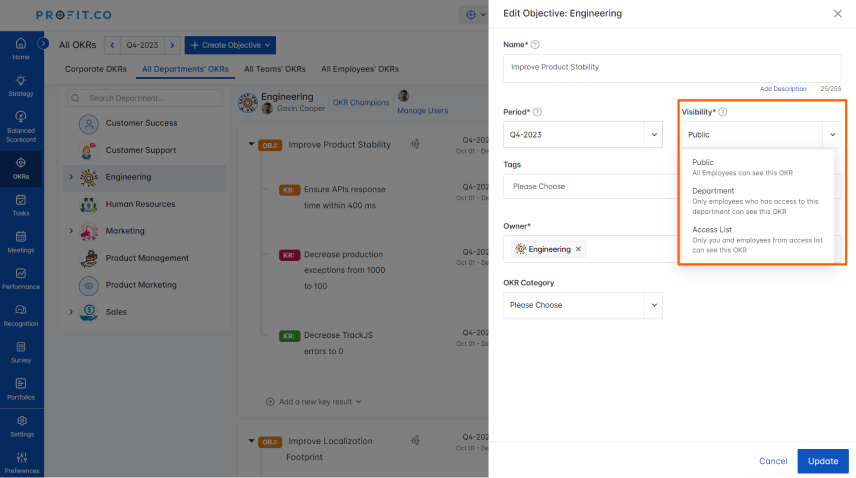
Stretch targets for Key Results
Profit.co allows users to set stretch targets. They are often set to challenge individuals, teams, or organizations to achieve ambitious goals that may initially seem beyond their reach.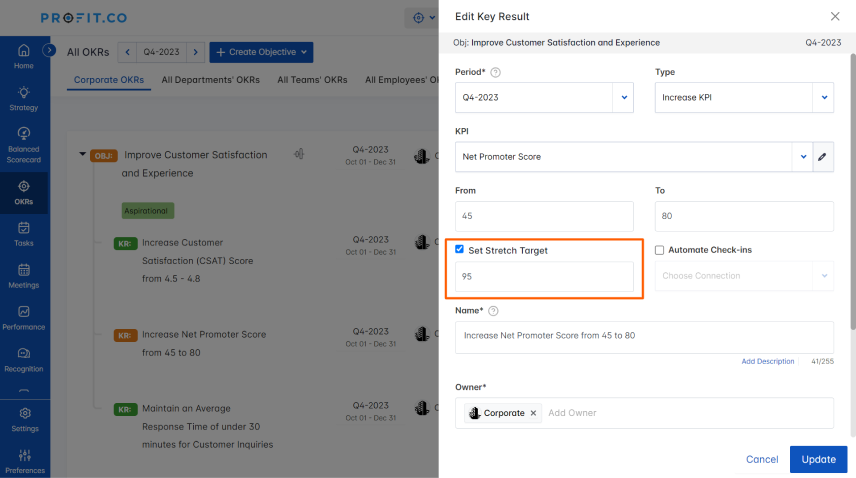
Key Result types
There are seven key result types, in which you can show progress by using the following KPI in the key results.
Percentage tracked
Percentage Tracked key results allow you to track and measure key results using percentage. For example, “Publish 10 Blog Posts” can be represented by the percentage of blog posts you’ve published. If you’ve published five posts, your key result would be 50% complete, or if you’ve published nine, it would be 90% complete.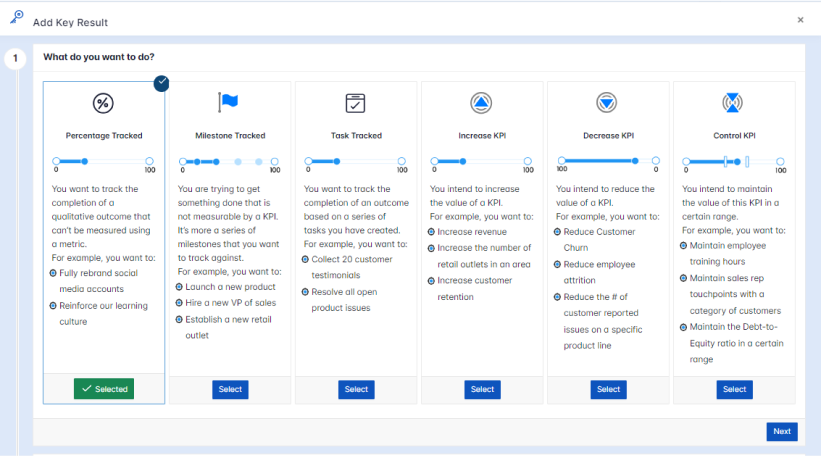
Milestone Tracked
The Milestone Tracked option is ideal for tracking key results that need to be completed through multiple steps. While many key results are quantitative, there are times in which your progress can’t be measured numerically. During such instances, Milestone Tracked key results can be used and you can achieve your key result by completing sequenced steps or milestones.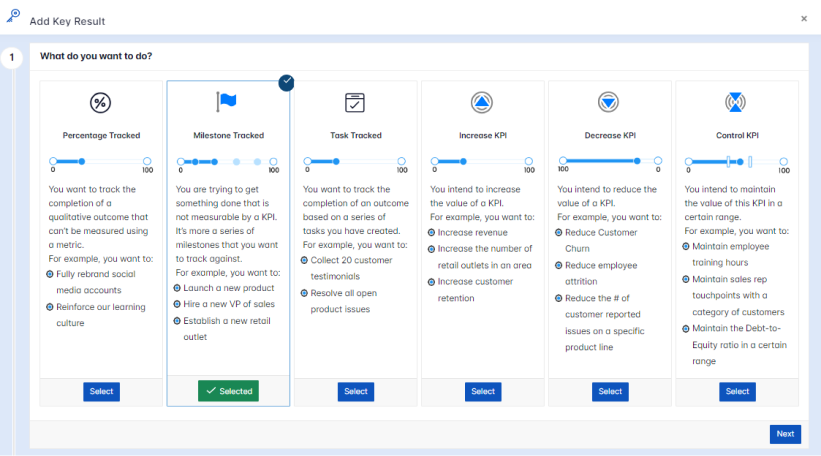
Task Tracked
You can create key results using Task Tracking in Profit.co. This key result type directly associates your task with the created key result, so that you can track the progress of your selected tasks from the workspace via key results.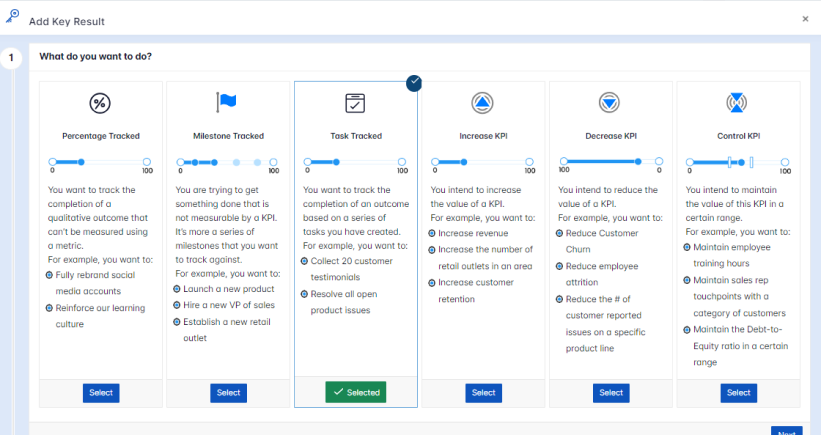
Increase KPI
Next is the Increase KPI. This can be used when you are trying to increase the value of a KPI. For example, you may use this option for increasing the revenue or increasing the number of retail outlets that your organization focuses on. Depending on what you’re looking to increase, you can make your KPI increase the value of a specific number, percentage, amount of money, or time etc.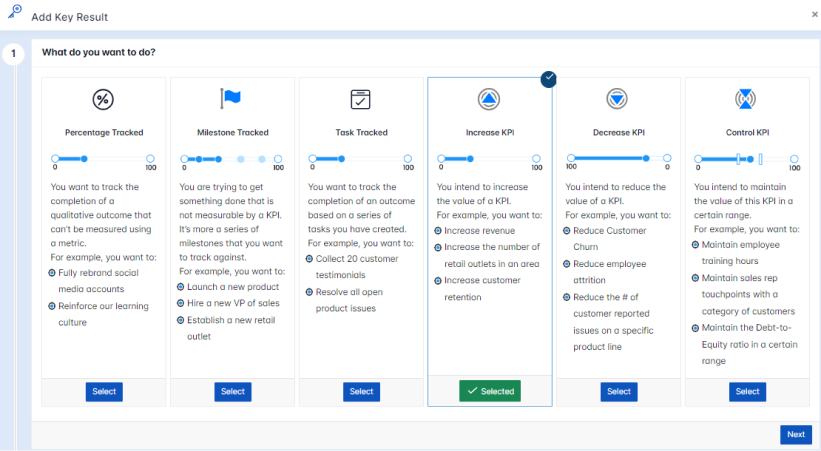
Decrease KPI
In some instances, it may be best to lower the value of a KPI. For example, an organization may aim to reduce the employee attrition rate, reduce the customer churn rate, or reduce the number of issues in a test or product. With Decrease KPI, you can decrease the numeric value, percentage, currency, or time of the key result.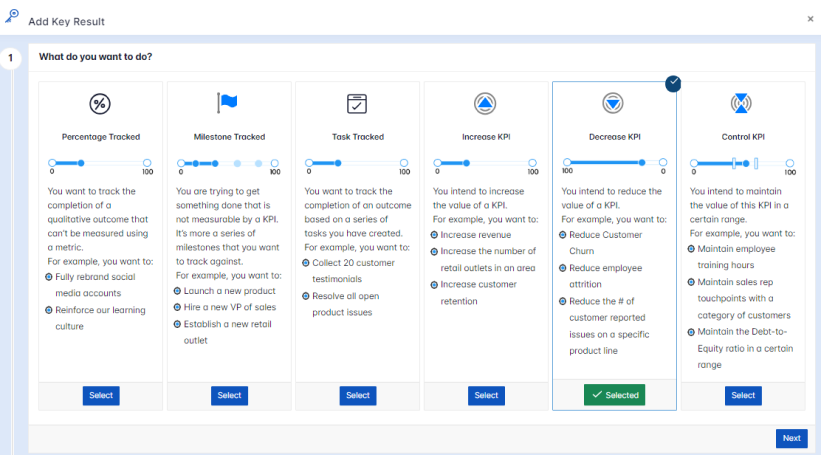
Control KPI
The control KPI, allows you to keep the value of a KPI within a specific range, mostly above or below a certain amount.
For example, if you want to control the employee training hours between 20-40 hours a month, and maintain the click per cost at $2 to $4, it can be measured using the control KPI measure type “In between” because you’re looking to maintain a range between certain values.
Sometimes, It can be helpful to set goals from time to time. For example, you might aim for at least 10,000 visits every week on your website. The “at least” measurement type in the control KPI can be used in this case to measure the visits.
Consider the scenario where you want to enforce an upper limit. The key result of “Maintain APIs response at 400 milliseconds” is a classic example. In this case, you are measuring the API response which shouldn’t go over 400 milliseconds. Here “at most” measurement type in Control KPI is the right choice to measure the value and progress the key result.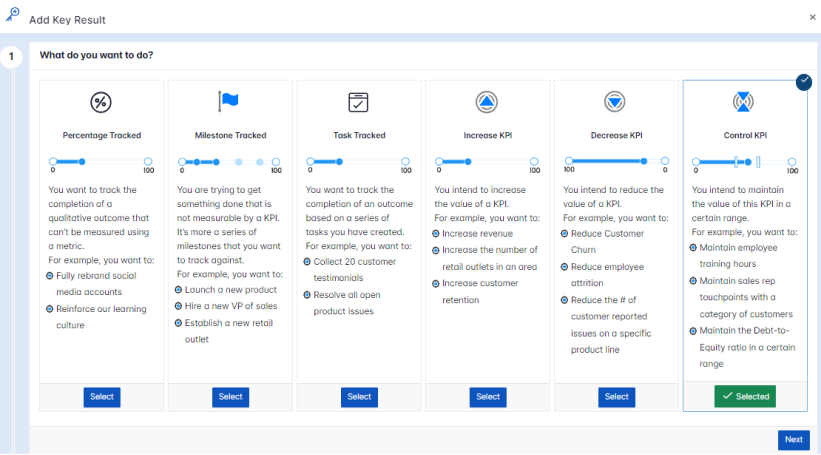
From KR Backlog
If you’re looking for a drafting space for these key results, you can use the KR Backlog. You can also create a key result backlog to store your created key results. In Profit.co you can move your key result to the backlog and vice versa. If you want to remove the backlog from the list you can remove it easily.Move Key results
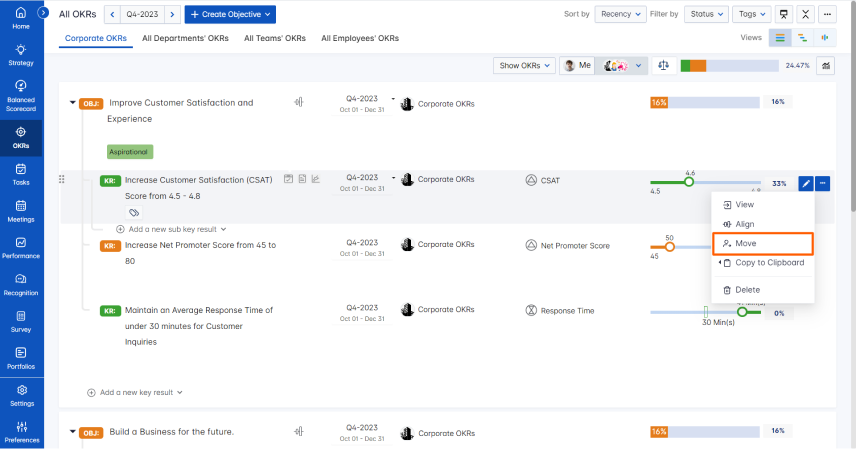
Using the drag and drop method similar to how you rearrange key results in objective, you can also quickly move key results to any objective in the same department.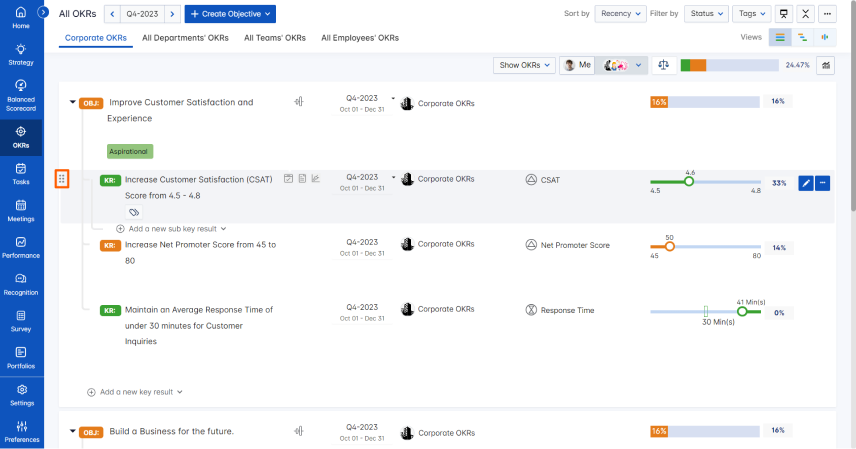 You can also move the objectives and key results to another department using the move option in the more button.
Weight Roll-Up Approach
A roll-up approach named KPI Based will set the progress calculation based on the KPI value. While choosing this option, we can sync the subkey result progress changes when the subkey result type and KPI are matched with the parent key result.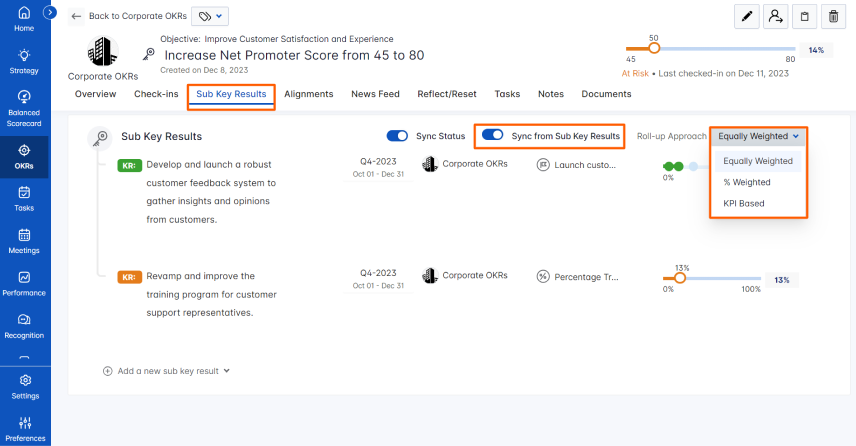
Assignments/Top down Alignment
Multi Assignee
You can assign a single key result to multiple users if the multi assignee toggle is enabled in Profit.co. This helps the assignees work collaboratively over a single target with combined effort.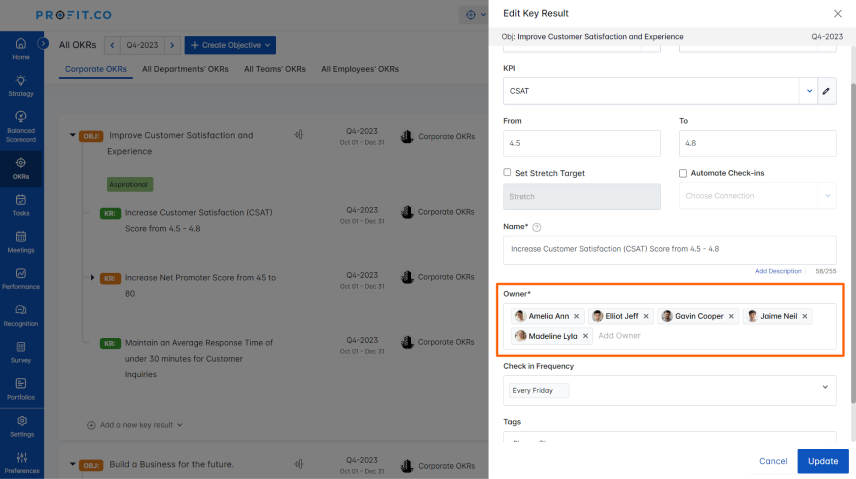
Filter OKRs by Periods
OKRs are based on periods. Profit.co provides an option to filter your OKRs based on periods.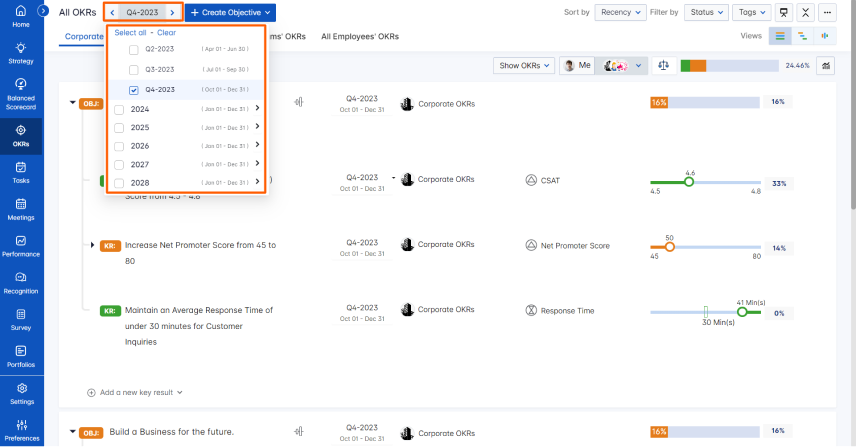
Change the cascade approach of a key result
In Profit.co you can now change the Assignment approach of a key result while creating itself or in the editing page before making any progress. Once the progress is made the cascade approach cannot be changed.
Clone/Copy OKRs
This feature enables the users to create duplicate copies of OKRs. By cloning OKRs you can edit and make changes to cloned OKRs and use them without creating any new OKR.
Note: The progress from the original KR will be reset to the cloned OKRs. You can also clone the associated tasks along with the key result.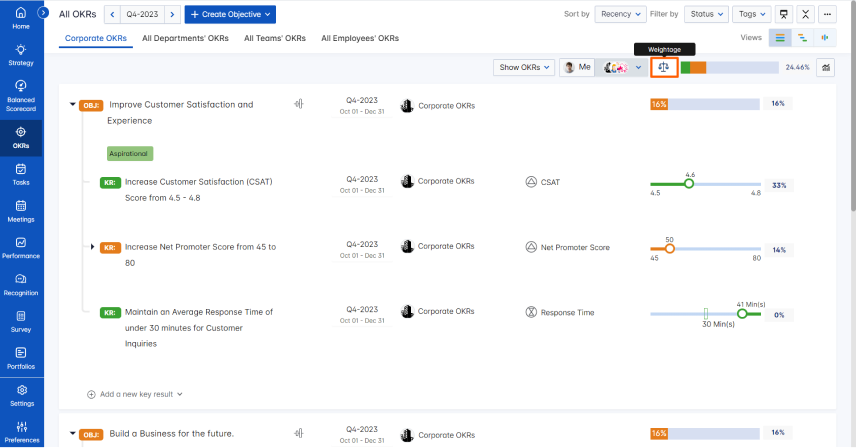
Add Notes to the Objectives
Mouse hover over the objective name and click the notes symbol to add notes to the objectives.
Copy OKR Link
Users can copy the OKR link and share it with other employees to collaborate and get their comments. Mouse hover the objective and click on the copy link icon.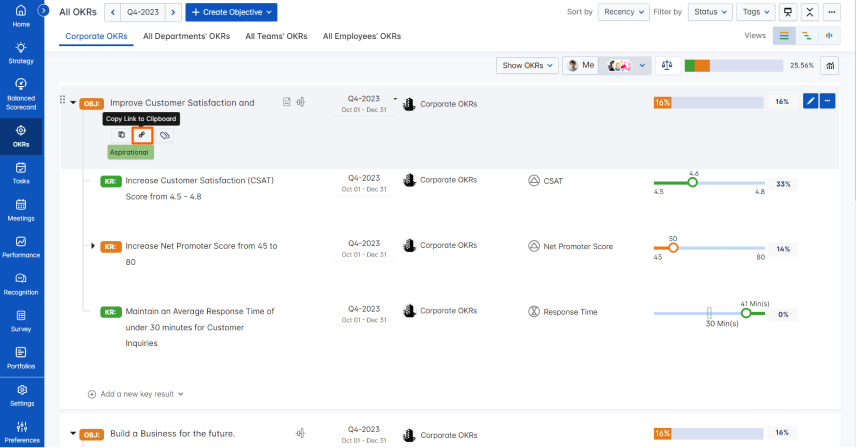
Copy OKRs name to the clipboard
Users can copy the OKRs name to the clipboard directly from the OKR List page. This enables the users to share OKRs’ names with other employees in the organization.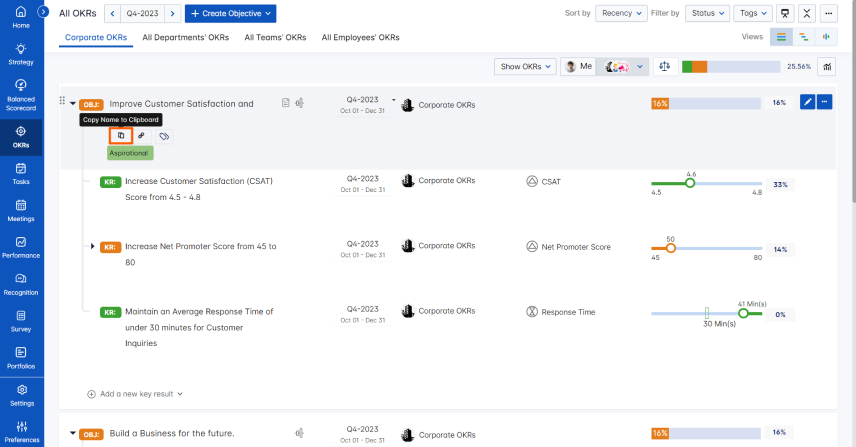
Share OKRs to other employees
Profit.co provides an option to share the OKRs with other employees within the organization. This helps the employees understand the status of other employees’ OKRs in the organization.Dashboard in the OKR view menu
Users can view the progress and the status of objectives and key results in the Dashboard in the OKR view menu.
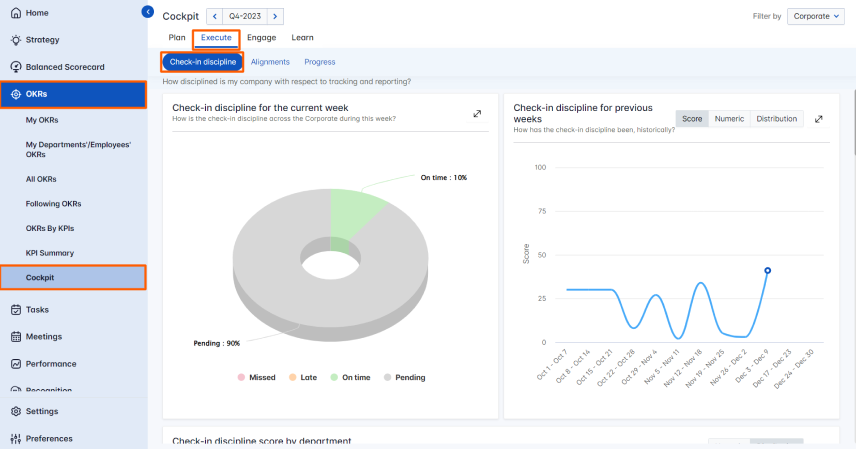
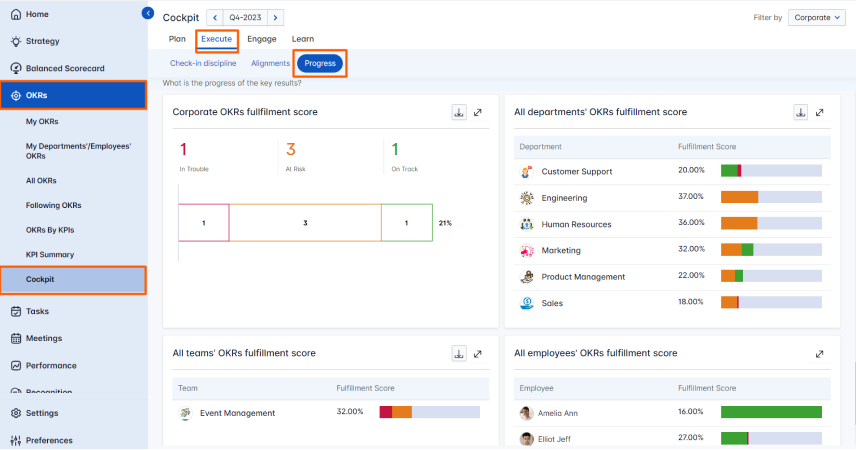
Cockpit Dashboard
The cockpit displays the infographic data of employees’ unassigned OKRs period and department-wise. Note: Only the Super User, OKR Champion, and the OKR Captain can view the cockpit dashboard.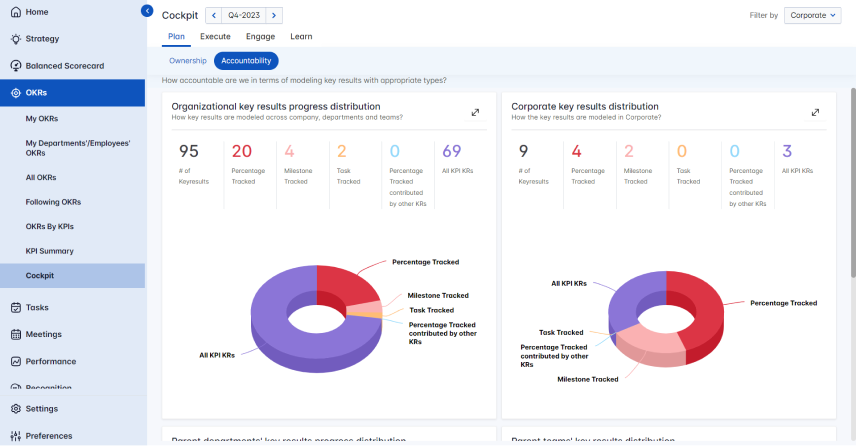
Alignments
What are OKR Alignments?
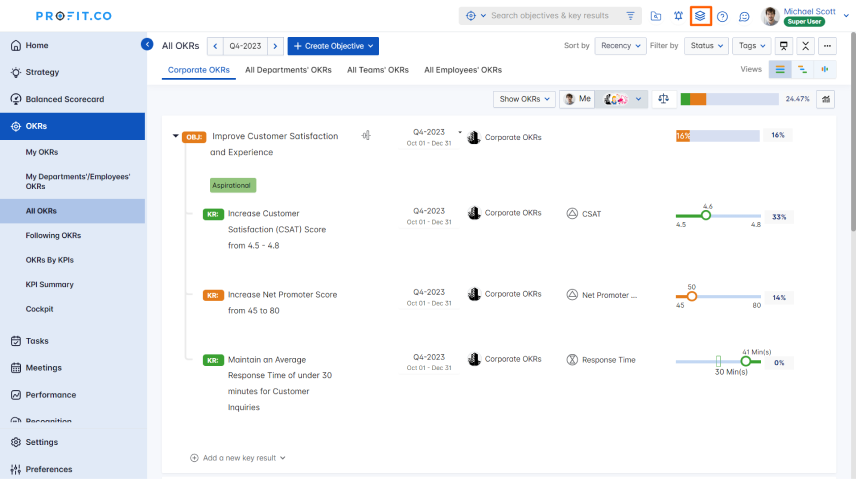
- Alignment is one of the most powerful features of objectives and key results (OKRs). By aligning your objectives at an individual, team, and organization level, strategically aligned OKRs rapidly get everyone on the same page, working toward results that matter.
- First, higher-level management or the CEO of your company outlines the company OKRs for the quarter. From there, department managers would come up with their own department objectives based on how they plan to contribute to the company Objective. You can also cascade down the OKRs at individual level and If you want to use those, you can align them.
- The purpose of alignment is to unify the goals of your company.
Profit.co allows you to align your OKRs in two different approaches,
- Top-Down Alignment – You can align your OKRs in Profit.co by assigning your Key Result as an Objective, or, as a key result/Sub key result. This way, the assignee will receive that Objective or Key Result/Sub key result. as a priority.
- Bottom-Up Alignment – There are times when individual contributors may have more insight into customers’ thoughts or other ideas that don’t necessarily reach the executive level. Taking into account employees’ ideas and contributions also adds an incentive to be invested and see the OKR through.
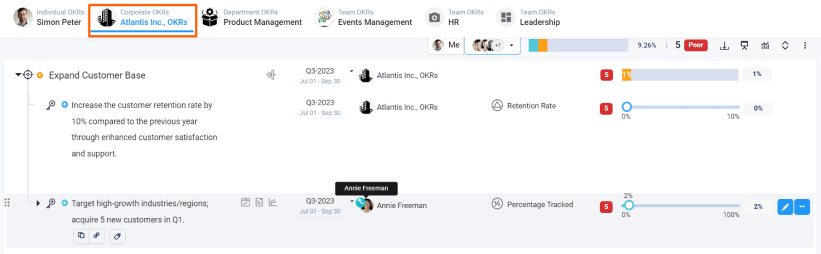
Top Down Alignment
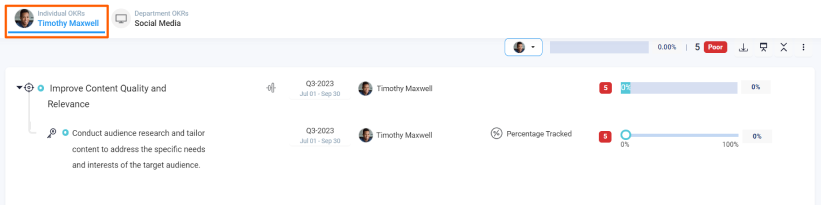
 Higher level qualitative KR can be assigned as an objective to an individual, department and team.
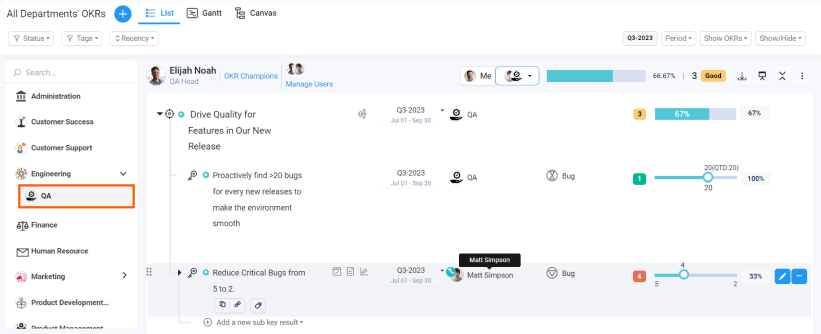
 Assign a key result as an key result / Sub key results
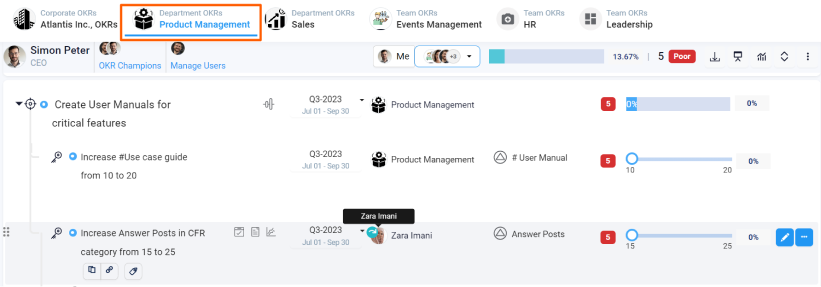
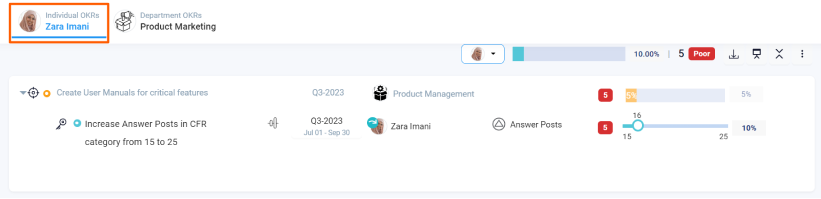
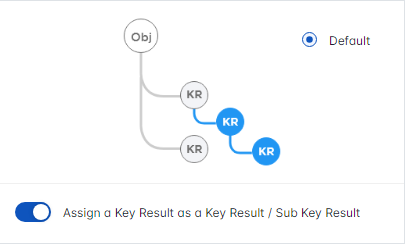 Any level KR can be assigned as a KR/Sub KR to an Individual, department and team.
Bottom-Up Alignment
There are times when individual contributors may have more insight into customers’ thoughts or other ideas that don’t necessarily reach the executive level. Taking into account employees’ ideas and contributions also adds an incentive to be invested and see the OKR through.
Bottom-up alignment gives ownership to those levels of owners for contributing their initiatives or OKR progress to the corporate level or any level above them.
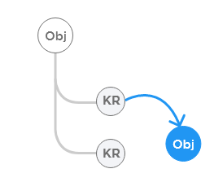
Aligning the Objective as a Key Result to another Objective
Align an individual, department and team objective as a contributing KR to another objective.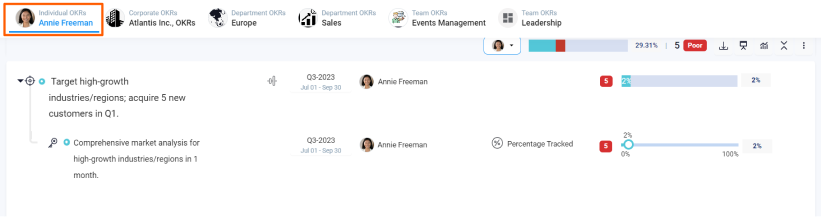

Align the Key Result as a Key Result to an objective.
Align an individual’s,department and team KR as a KR to another objective.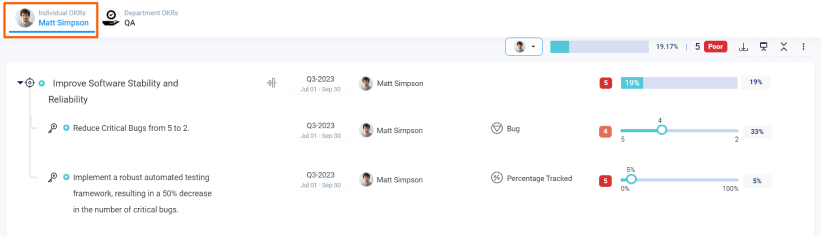
Align a key result as Sub Key Result to a key result
Align an individual’s,department and teams KR as a sub-KR to another KR.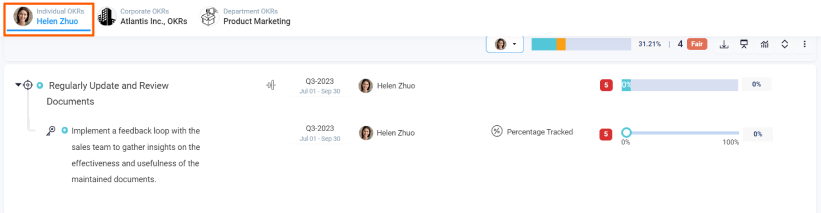
Aligning the Objective as a Sub Key Result to another Key Result
Align an individual’s objective as a sub-key result to another Key Result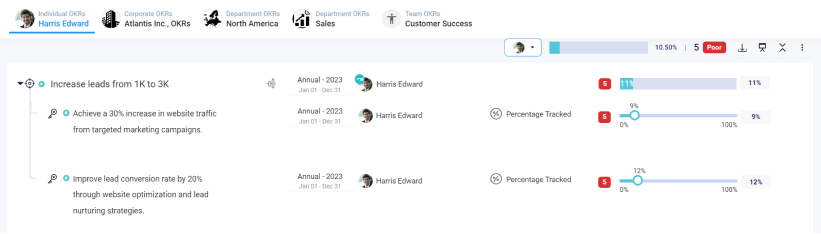

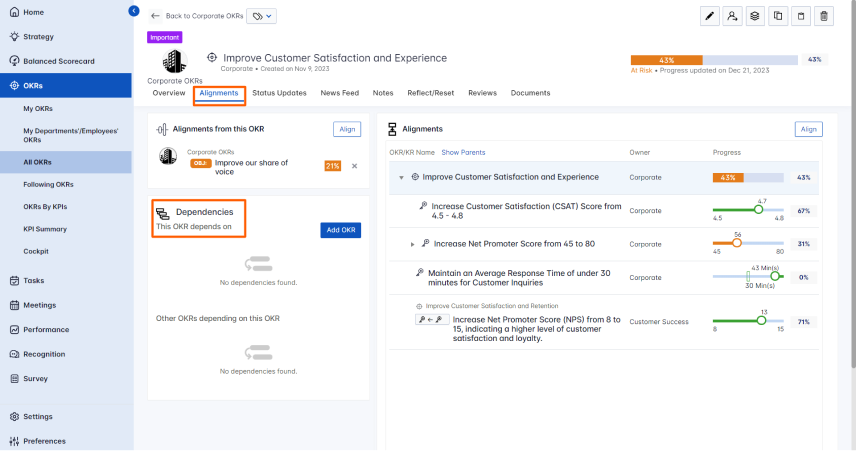
Dependencies
In Profit.co, you can enable and add dependencies to your key result. This feature allows you to create a dependent key result to manage the dependencies with other departments/teams. With this feature, you can effectively monitor the OKRs progress without any delegations because of the dependency factor.
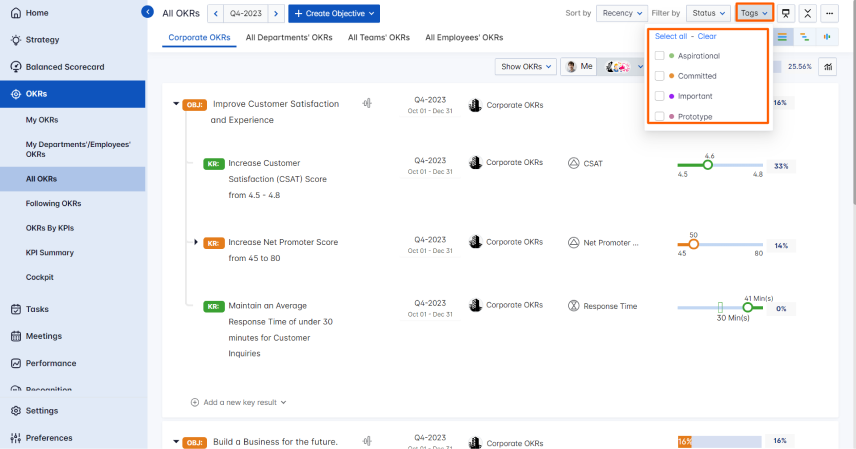
Tags
Objectives in Profit.co can be organized using a system of tags or labels. Tags can either describe your OKRs using words like “Aspirational” or “Committed”, or you can categorize them based on the department with words like “Sales” and “Finance” so that you can search for the objectives based on tags right away.
Note: You can choose more than one tag for your objective.
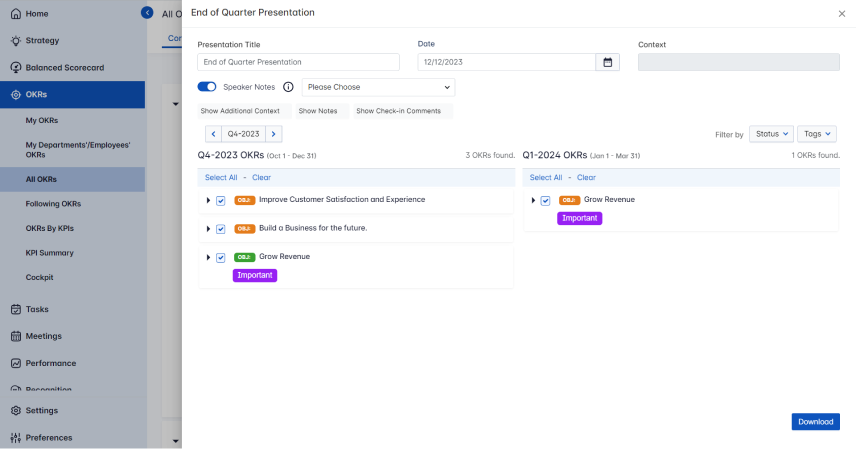
End of Quarter Presentation
End of Quarter Presentation helps users quickly and easily create a PowerPoint presentation with Overall OKR progress and KR progress for the current quarter, and plan for the next quarter for any department which is available in all the department tabs.
Navigate to Settings → OKRs → OKR list view to enable the End of quarter presentation
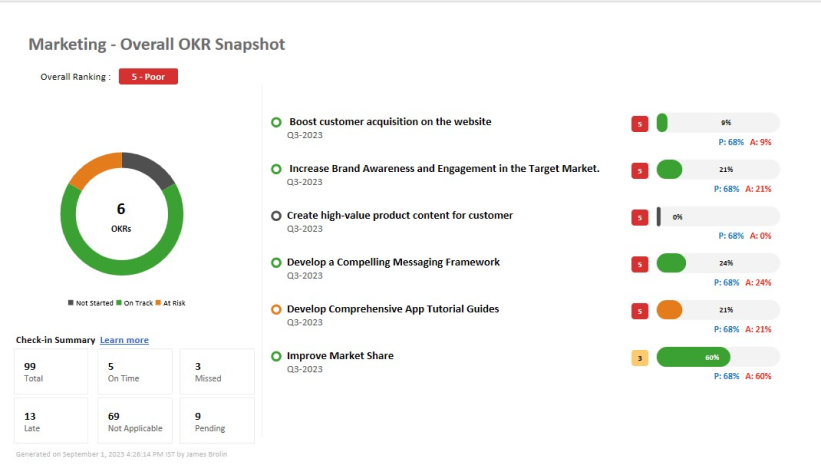
OKR Progress Presentation
Profit.co provides an option to enable and download your OKR Progress just like you do for your End of quarter presentation. The main use of this feature is to Download your progress report for the week or quarter periods with a single click, instead of preparing it manually. This feature helps you to save time and get ready with a presentation within a minute.
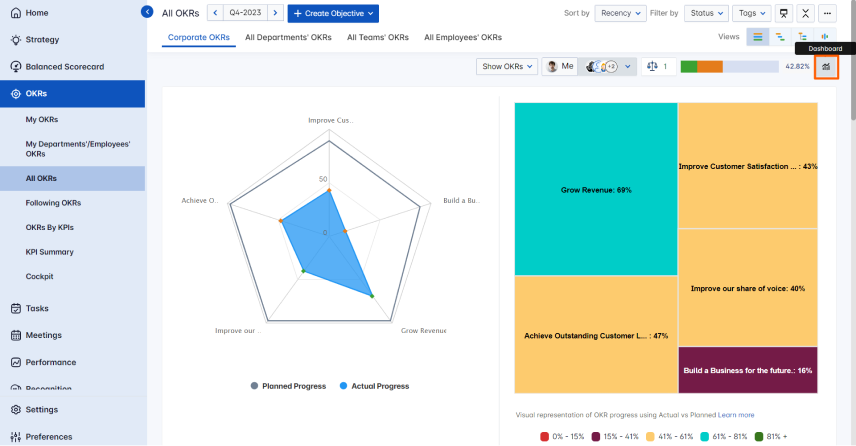
Radar Chart
The Radar chart in Profit.co gives the user an illustrative and quantitative representation of data specific to the planned and actual progress of the OKRs. By using this feature the user can track progress and overview the OKRs.
Execute
Check-Ins
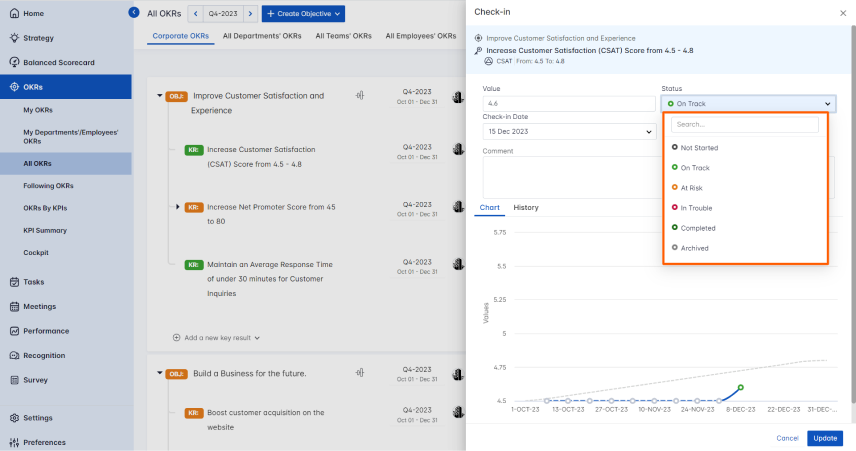
Key result check-ins are an opportunity for you to track your KR progress and indicate your confidence level in achieving your key results. How often you check-in on a key result is dependent on the frequency you set for your key results during the creation process.
Many organizations select a frequency of once a week. Whether you’ve selected once a week or once a month, this will be the day where you check-in on your key results. In the check-in window, you can complete three components of the check-in process: value, status, and comments.
The status is a label that you can attribute to your KR based on your confidence level to complete it. The status labels are: Not Started, On Track, At Risk, In Trouble, Completed, or Archived.
You can also share OKR status through email. to learn more about it, click here.
Your check-in history is also visible in this window below the projection graph. You can filter check-ins based on “On Time”, “Missed”, or “Late” check-ins.
Note: Superusers can enable action center notifications to remind you of check-ins that are due today and check-ins that are overdue.
You can also edit check-in value in the check-in history for key results under the History tab in your key result overview page.
You can also check-in for a future target date.
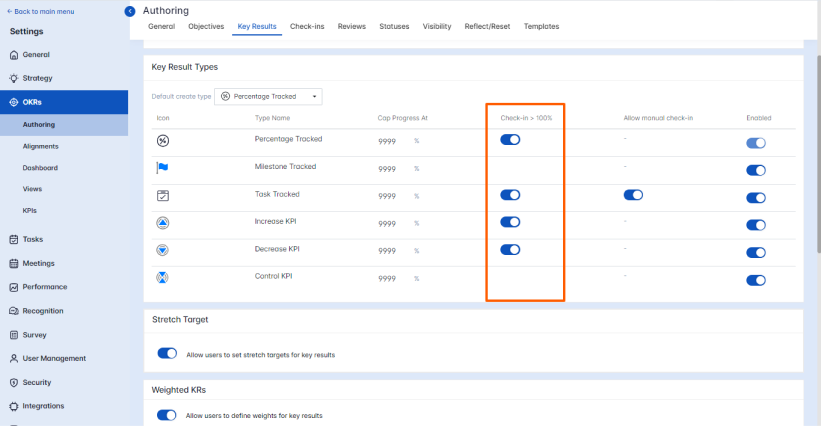
Check-in above the Target Value:
Profit.co allows users to stretch goals or progress the key results beyond 100%. To progress check in beyond 100% the super user must enable check in beyond 100% toggle in Settings → OKRs → Key Result types
You can change the check-in frequency of the existing key result. When you create key results, the check-in frequency will be created by default, but you can always change it. To know more click here.
Create new KPIs
You can create new KPIs to key results while creating measurable key results using forms. Select the KR type as Baseline, Increase, Decrease or Control KR type and click search for the + icon.

Task Management
Profit.co offers a world-class task management system that enables users to get things done easily and quickly. You can track the project roadmap, communicate and delegate subtasks to team members, and set deadlines.
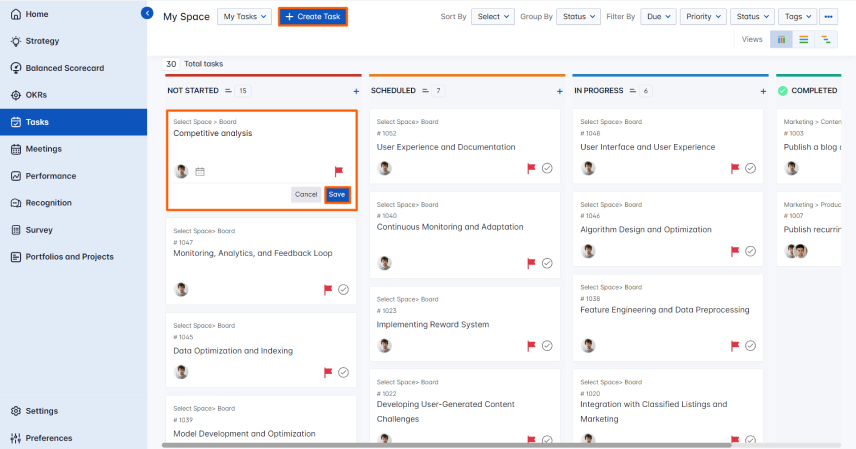
Create Task
Tasks can be created from Kanban View or List View to set various levels of priority based on importance and set deadlines with a time and date to get them done. Tasks can also be further broken up into sub-tasks and the users can track progress.

Task Assignment
The tasks that are assigned to you by your managers or peers will be available in “My Tasks”. You will also have an option to Accept/Reject the tasks which are assigned to you. If accepted the tasks will be added to your My Tasks page, if rejected it will be notified to the assignees.

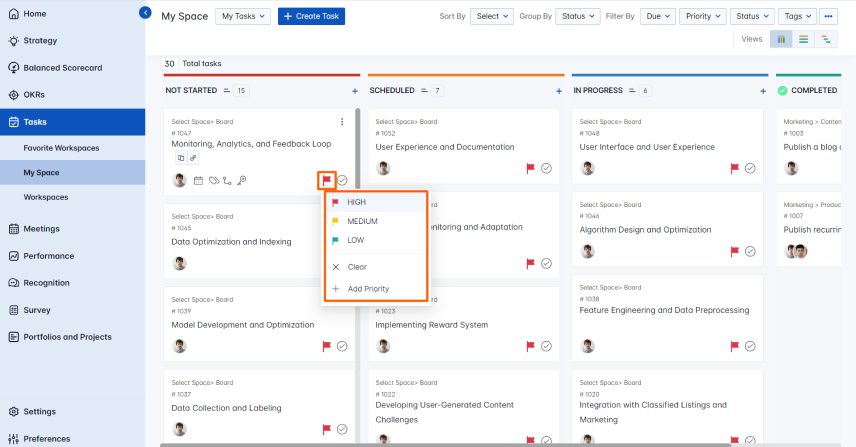
Setting the priority while assigning a task
All tasks in Profit are labeled with a priority status. The default label is “high” priority. You can set the priority while creating the task and also after creating it. The three default priorities are high, medium, and low. You will also have the option to Add Priority.
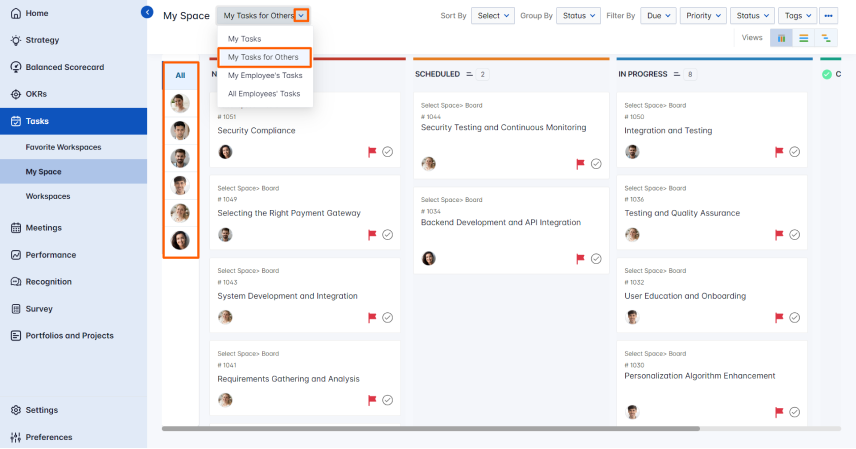
‘My Tasks for Others’ View
Profit.co allows you to view all the tasks that you have assigned to others on a single page and track the status.
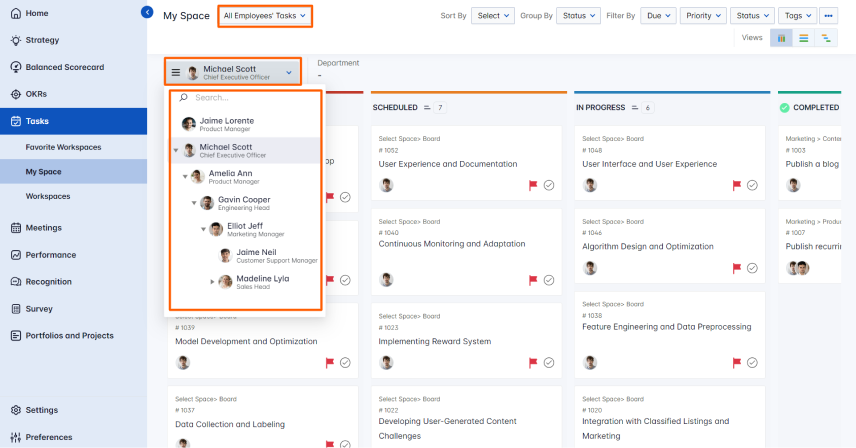
My Org’s Tasks
This option is used to see and track the status of the tasks that you have assigned to your team.
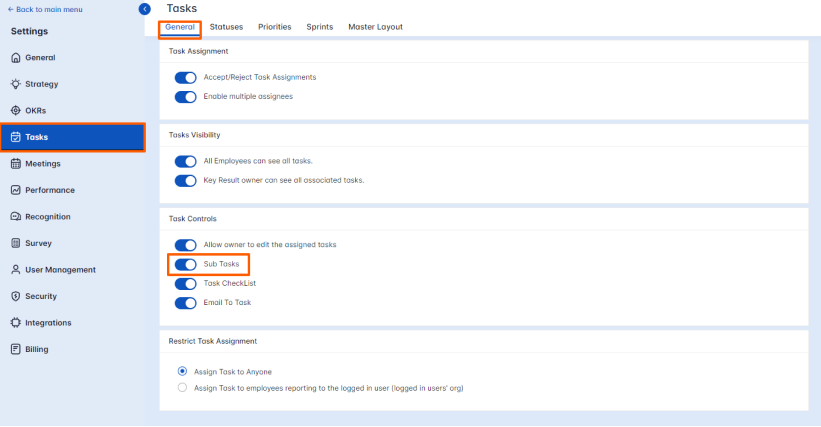
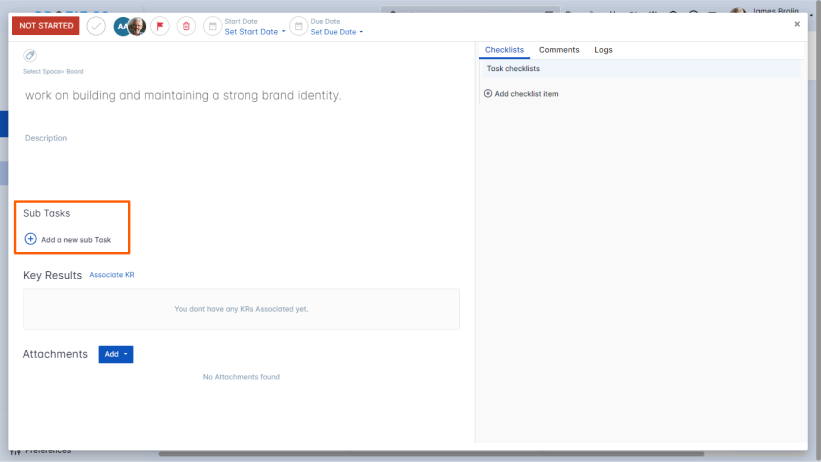
Create Sub Tasks
Profit.co provides an option to create a sub-task for an already existing task. This feature allows you to create sub-tasks underneath the existing tasks based on your requirements. Just like tasks, sub-tasks can also be assigned to an employee with added target date, priority, and other information.
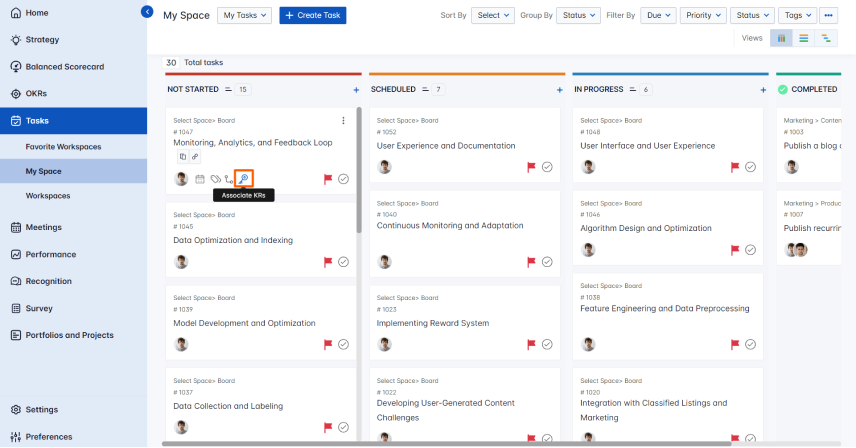
Associate key results with tasks
Profit.co provides an option to associate tasks with key results in the task card itself. Users can use this feature to track the progress of selected tasks in the workspace using the key results.
Create a recurring task
Profit.co allows an option to set recurring tasks within a scheduled time frame without any interventions, You can schedule the recurring tasks in advance.

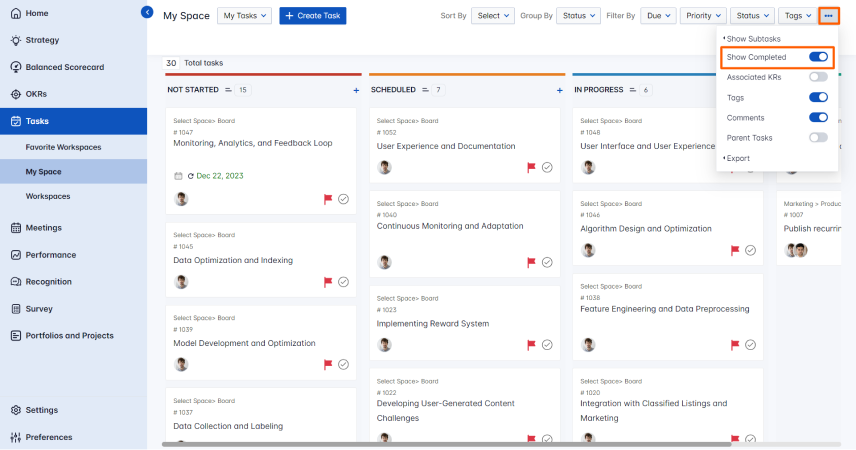
Hide the completed Tasks
Profit.co provides an option to hide the completed tasks. You will also have an option to show/hide the associated key result, tags, comments, and parent tasks.
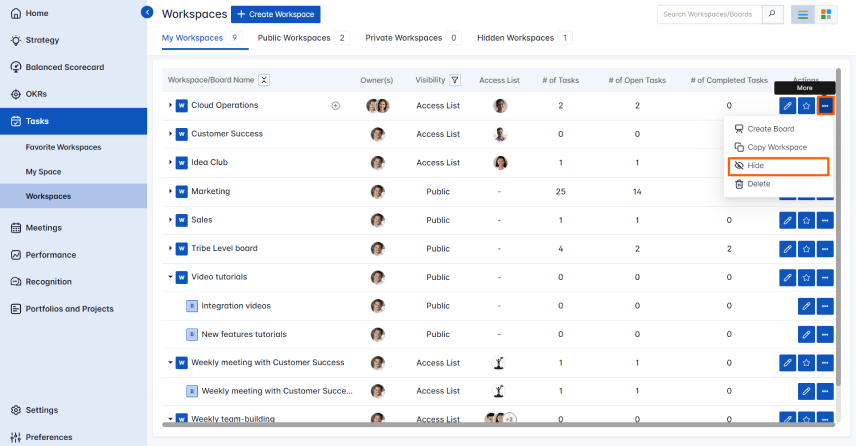
We can also hide the workspaces in Task Management to restrict the visibility of the particular workspace to other users.
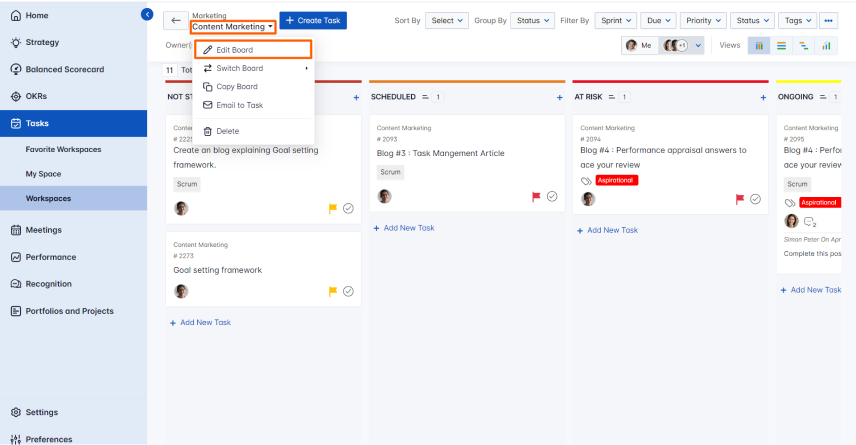
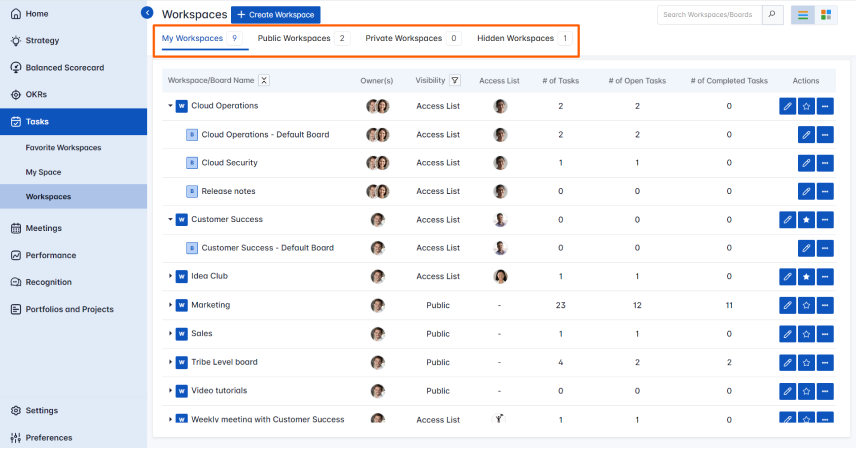
Create Workspace and Boards
Profit.co allows users to create a workspace with boards and track the status of the tasks. You can create any number of boards in a single workspace.
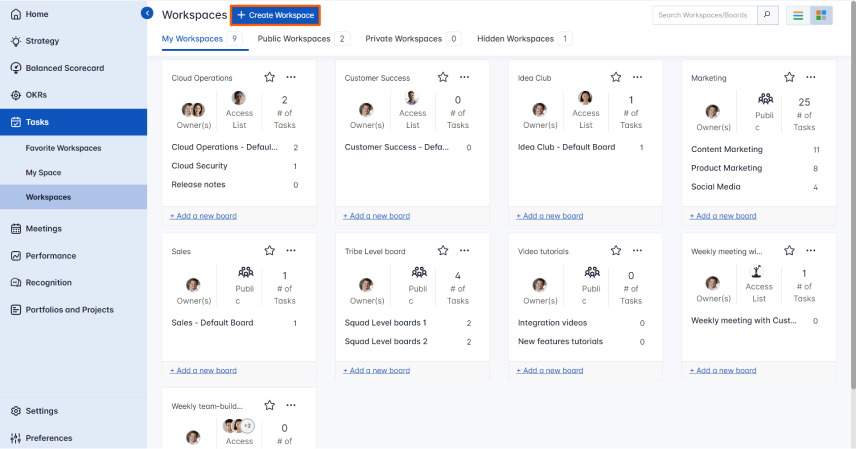
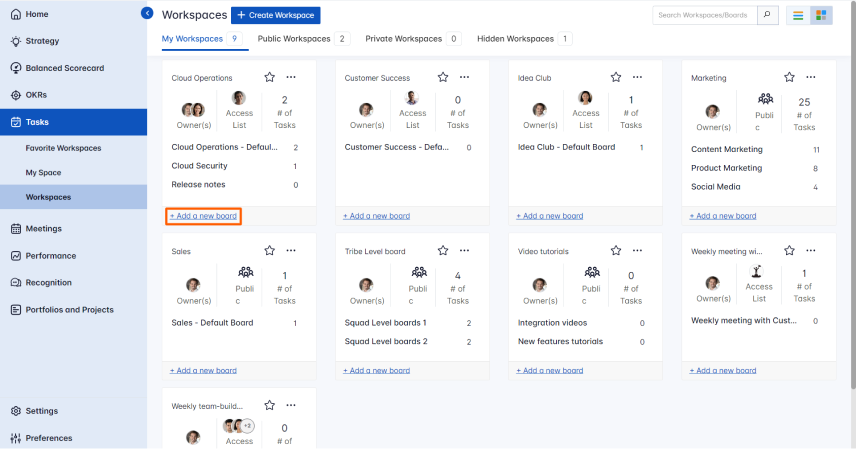
You can also add stages to the boards and enable assignees for each stage. You can have multiple assignees in a single stage, and you can add a checklist to it for the tasks moving from one stage to another.
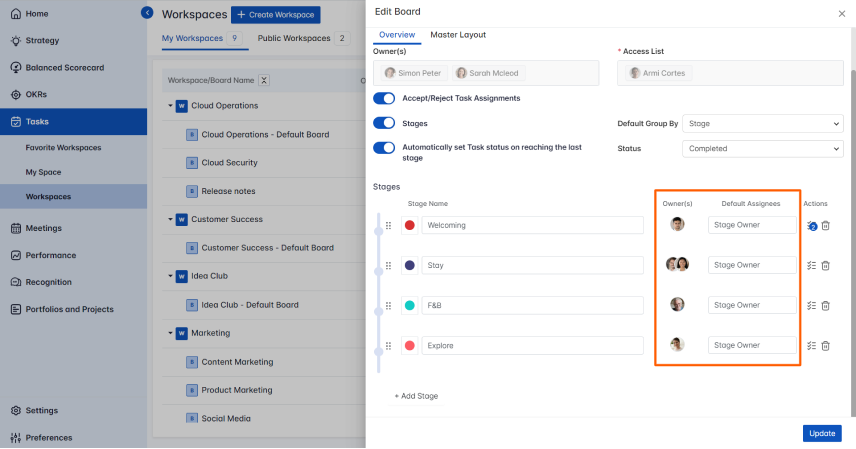
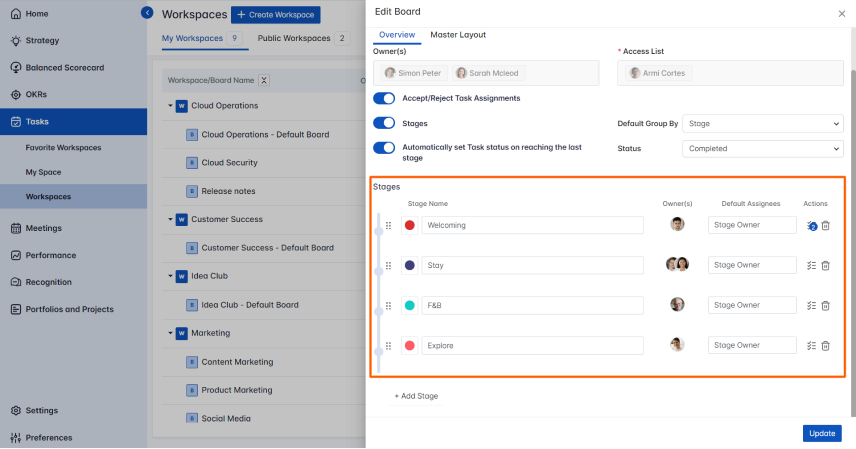
Task Stages
Profit.co provides an option to set board stages. To complete a task the users need to pass through different stages which can be created under the task board.
Task checklist
Profit.co allows users to add checklists to tasks individually and track the progress of each task. Profit.co already provides an option to add checklists to the stages of the task board, which will apply to all tasks in the task board. This feature will enable users to add checklists individually to the tasks.


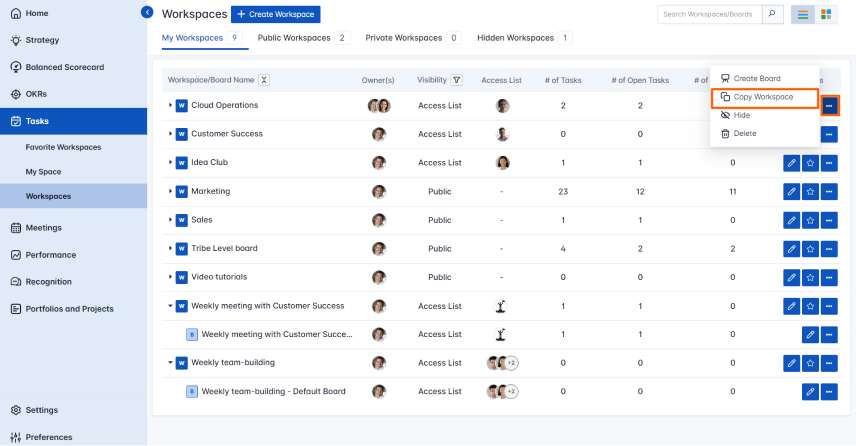
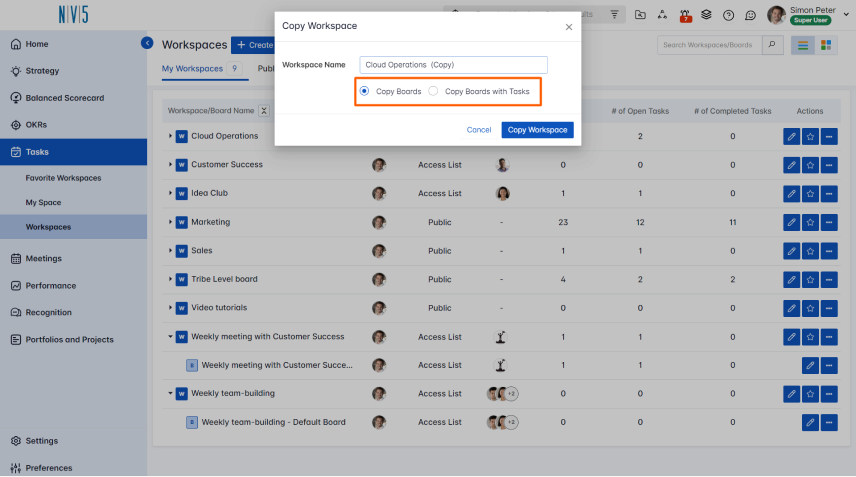
Copy Workspace and Boards
Profit.co allows you to copy the created workspace and boards along with the tasks.
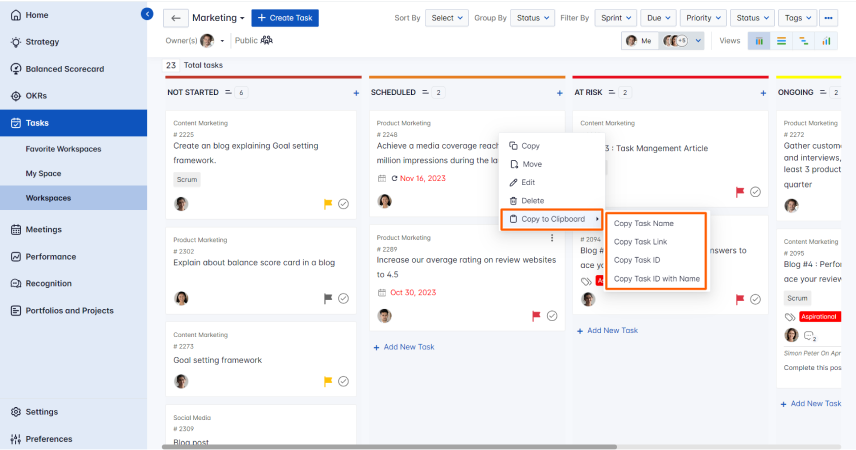
Copy the task name and link to the clipboard
Users can copy the task name and link to the clipboard from the task card.
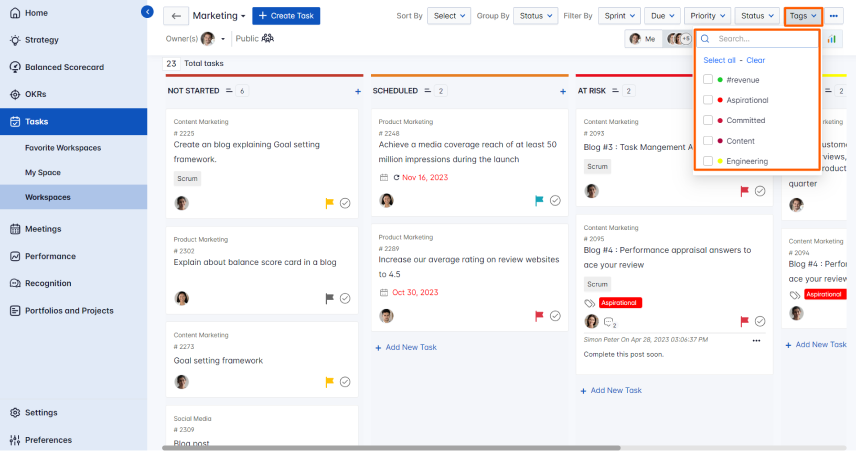
View task using Tags:
By using the Tags filter at the top of the My Task/Workspace/Board pages, users can select any Tags from the dropdown and view the tasks that are linked with the corresponding tags.
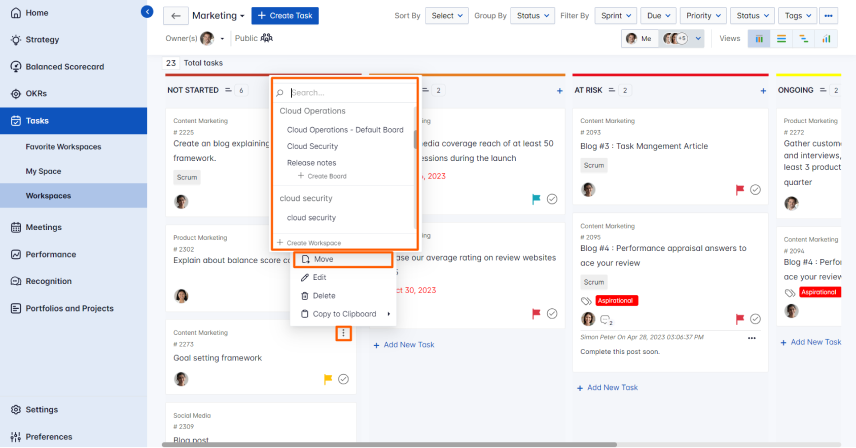
Move Task to Other Boards:
Users can move a task only from one Board to another. Every task in a workboard will have the task board name in it. by clicking the task board name, you can move the task to another workspace and board.
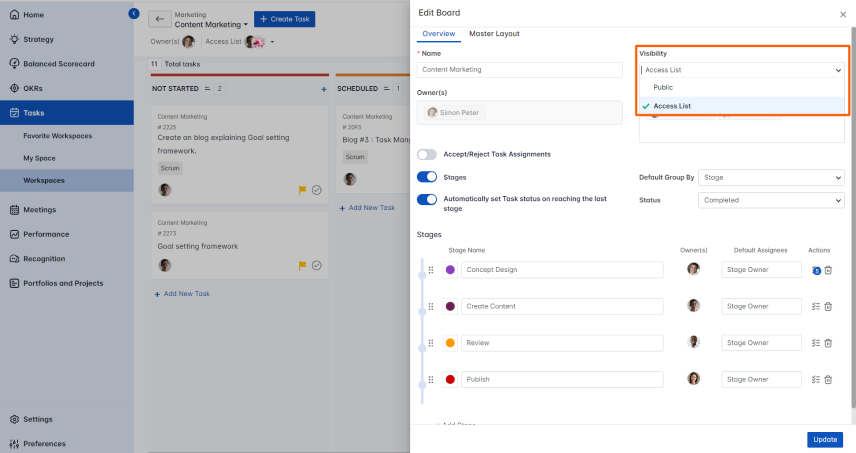
Enable/Disable boards and Restrict Visibility
Profit.co allows you to enable/disable boards in a workspace and restrict the visibility of the boards through the edit workspace option.
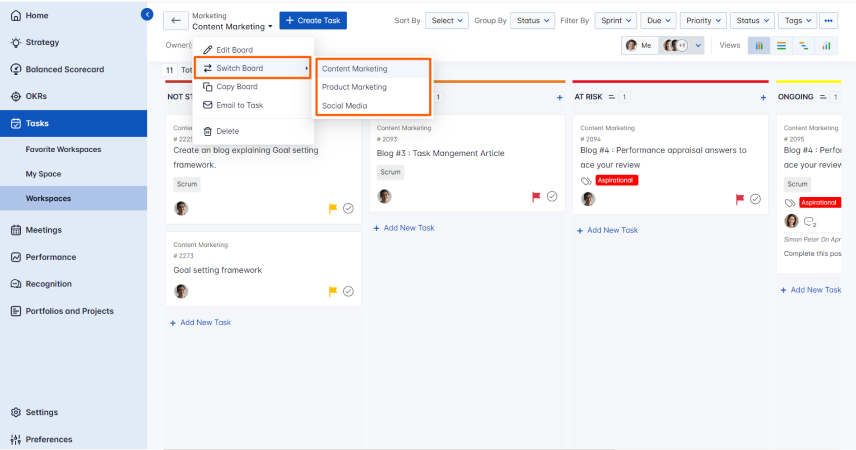
Switch to another board from a board:
Profit.co allows you to switch between boards in a workspace.
Set time for the due date in Tasks:
Profit.co allows you to set time for task due dates and assign them. You will have the option to set the time in the task overview page after setting the due date.

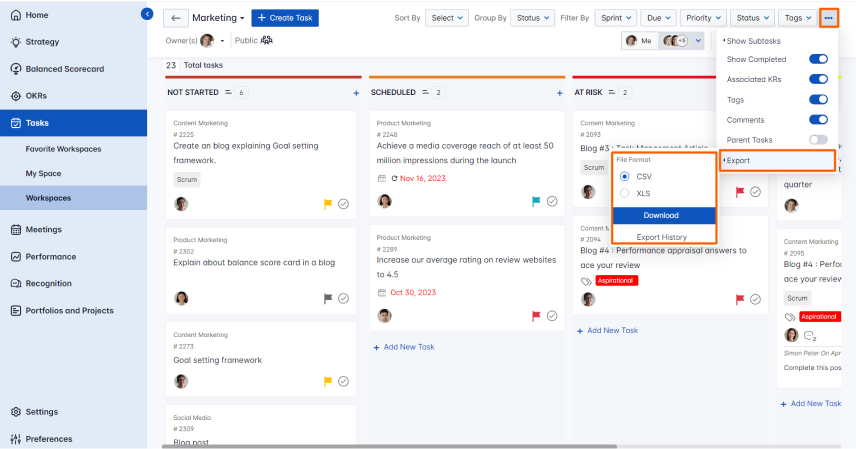
Download Reports from the Task dashboard:
We can download the reports directly from the Task Dashboard.
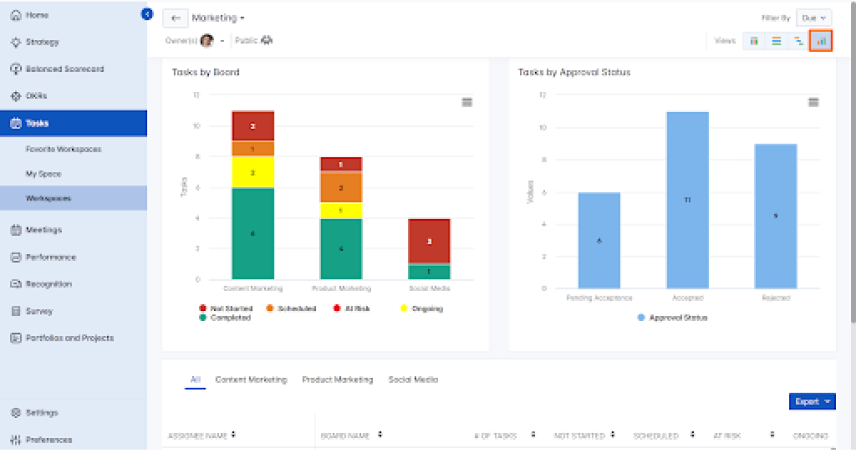
To know more about this, click here.
Sprint:
A sprint is a short-term period in task management where a team concentrates on a specific set of tasks. It allows the team to prioritize and work on those tasks within a defined timeframe, enabling focused and efficient progress toward project goals.

Task Logs
Profit.co provides an option to view the history of changes that you have made to the tasks.

Engage
Recognition
Awards and Leaderboard
Profit’s awards system allows you to view both the awards that you have received and the awards that others in your organization have received. The best way to compare your performance points and awards with those of others in your company is to view the Leaderboard. To access the Leaderboard, go to the engagement section of the toolbar and select “Leaderboard.”
Once you select “Leaderboard”, you’ll find an awards-based ranking of the organization’s top employees. The awards in Profit are associated with points, which are used in the employee ranking system.
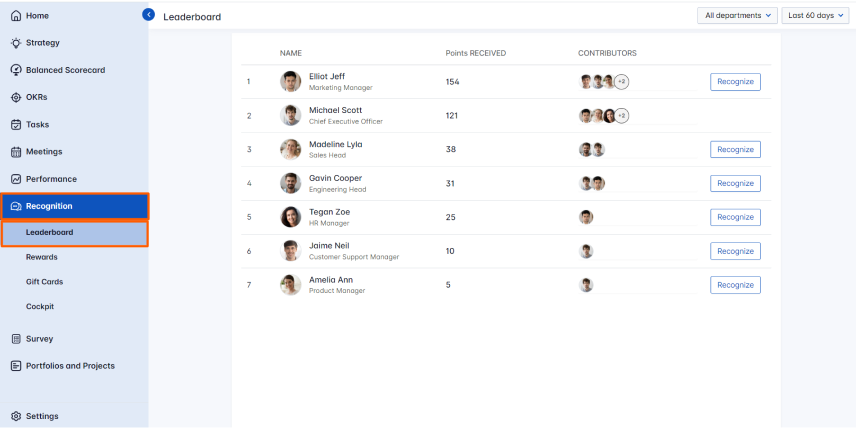
The default Leaderboard shows the top performers in the whole company; however, you can also view performance by department. To view points by department, select the drop down to the right of the chart that says “Departments.” You’ll find a list of the company’s departments which you can scroll through to find your department.
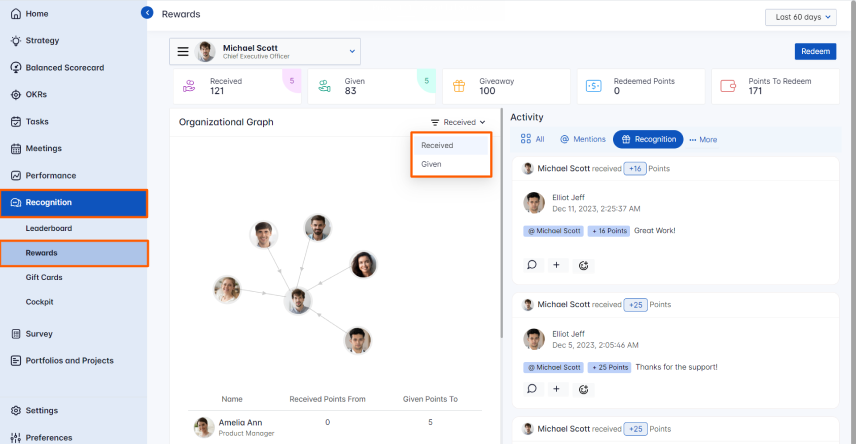
View awards given by my team members
You can view any of the awards given by members of your organization at any time in Profit. To view these awards, click on the “Rewards” section of the Engagement tab in the toolbar and select ” Given.”
You can see all of the awards given by your organization in the News Feed or you can organize the awards given by a specific user.
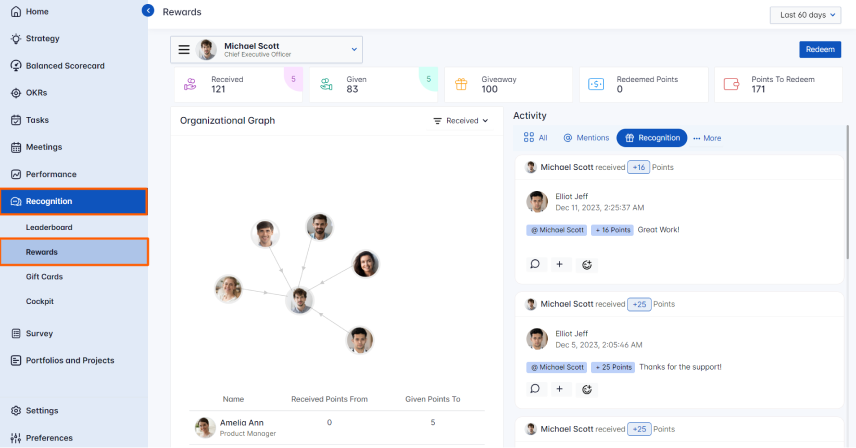
The awards appear in chronological order with the most recent ones at the top of the page and the older ones at the bottom.
View awards that I’ve received
To view awards that you’ve received, select “My Awards” and then “Received” from the Engagement section of the sidebar.The awards received by you will appear in chronological order with the most recent awards at the top of the page. Learn more on how to view all the awards that you have received or to view the awards that have been given to you by your team members.
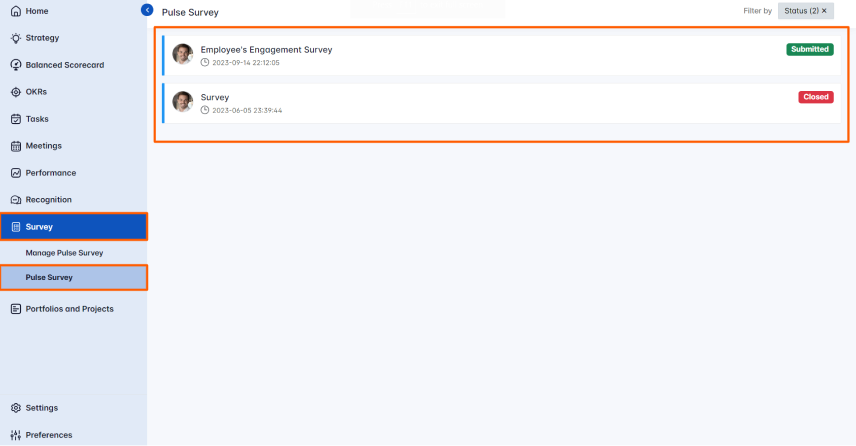
Pulse surveys
As an employee/user you will be asked to complete a survey that has been circulated by the manager or HR manager to get feedback on the satisfaction level of the enhancement, product, or the amenities of the organization that you work. Learn more on how to complete a pulse survey in Profit.co. You can also view the status of the survey after submitting.
OKR Score
Profit has a customizable scoring system for all users that evaluates their performance in four areas: reporting promptness, individual achievement, team achievement, and alignments. To view your Profit score, navigate to your OKRS → OKRs Program Status→ OKRs Fulfillment page. Your score is represented in a bar at the top of the page. The colors in your Profit score represent the different statuses of your OKR; to view the number of OKRs in each category, hover your mouse over the score to see what your score consists of.
For more about your Profit score, see the following Video
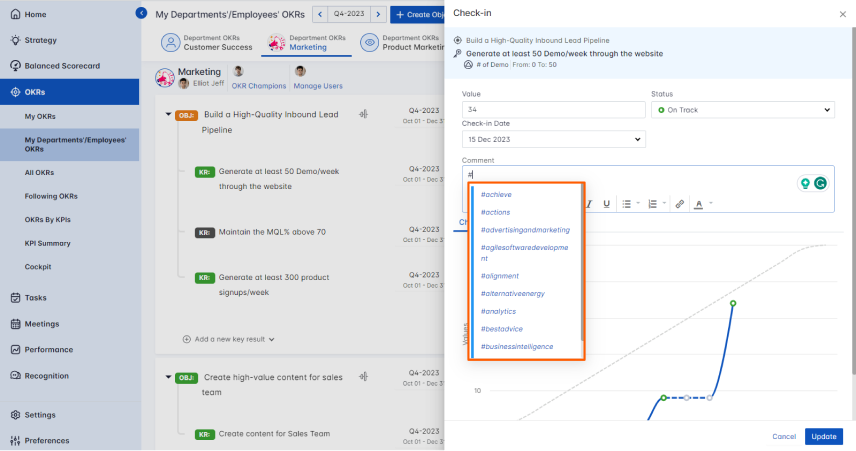
@ Mentions
You mention messages in the comment section to a group of employees using @ while doing check-ins for the Key result.

To learn more about this process, click here.
Follow OKRs
How do I stay on top of OKRs that are of interest to me?
One way to stay on top of specific OKRs is to use the “Follow” function in Profit. You can Follow any OKR that is of interest to you. To Follow an OKR, select the “OKR” tab on the left side of the page. Learn more on how to watch the OKRs of your subordinates.

OKR Reviews
OKR reviews are an additional way to check-in on your OKR progress. In Profit, you have the option to create general OKR reviews or you can create a review for a specific OKR.
OKR Reviews may need to be enabled by a superuser.
Learn how to conduct OKR reviews through Profit’s PPP (Progress, Plan, and Problems) methodology. This can also be customized based on your company’s needs and system.
Your superuser can change the terminology associated with OKR reviews based on your organization’s needs.
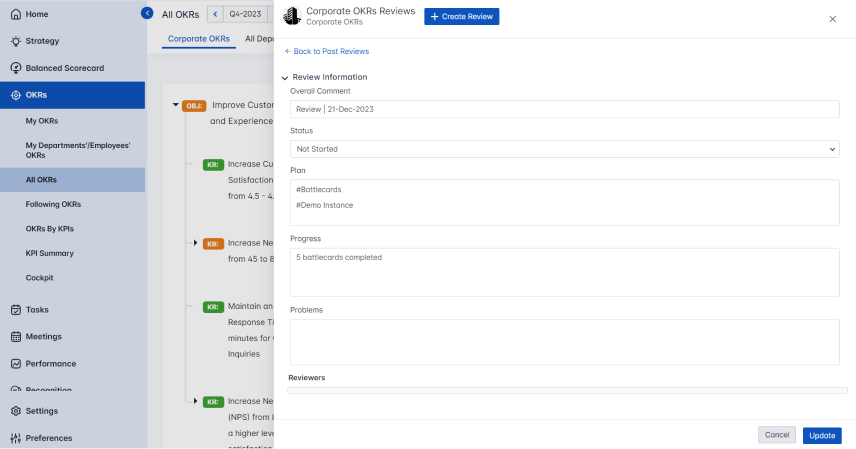
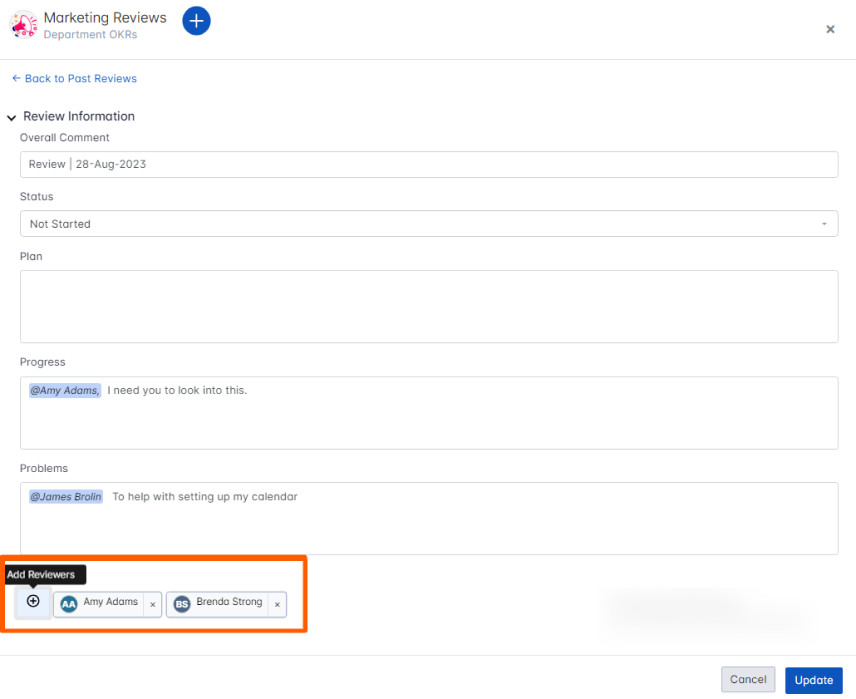
You can use the text boxes to comment on the progress that you’ve made with your OKRs, the plans you have moving forward, and the problems that you’ve encountered. You can also review an individual OKR, by selecting it from the “All My OKRs” page.
Add Reviewers to PPP Review
Add reviewers to your PPP OKR Review in Profit.co. By conducting an OKR review you can go through your progress and performance by working and eliminating the issues.
Delete OKR Review
The users can delete the OKR PPP review.
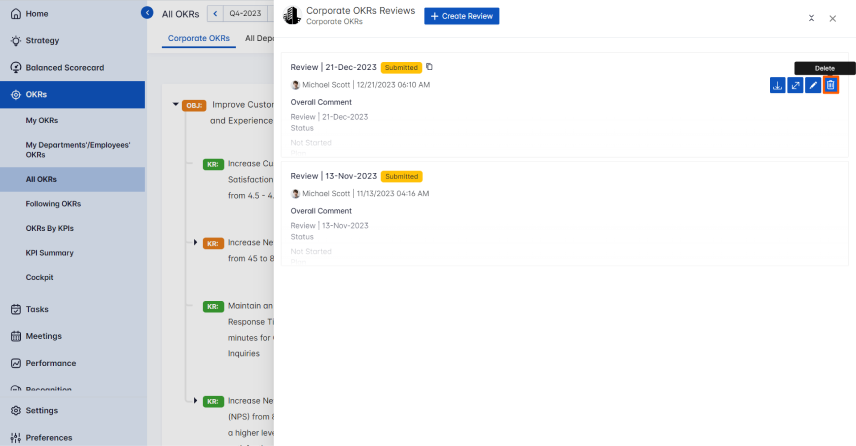
To learn more about this process, click here
Meetings
Meetings
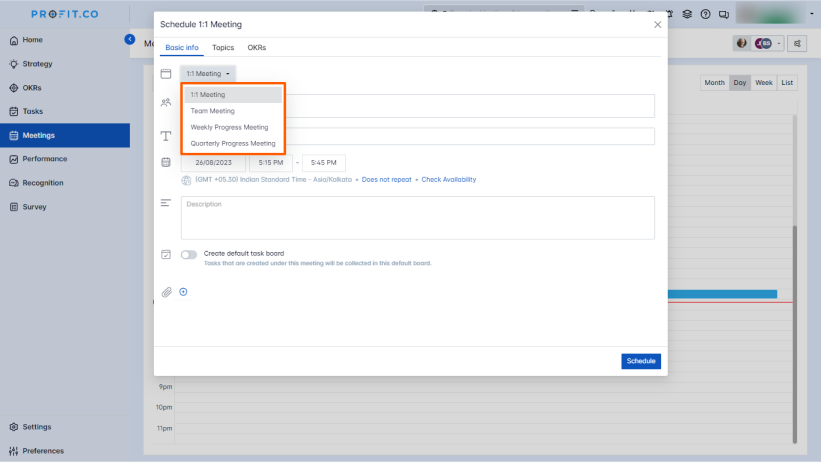
You can schedule OKR meetings to discuss the progress of the Team, Weekly and quarterly OKRs in Profit.co. You can schedule following meetings in Profit.co.
- 1:1 meetings
- Team meetings
- Weekly progress meetings
- Quarterly progress meetings
You can also reschedule a meeting that is missed, skipped or postponed for any reasons or create a recurring meeting which will happen every week/month.

You can also assign tasks boards directly from your meetings page while you schedule a meeting.
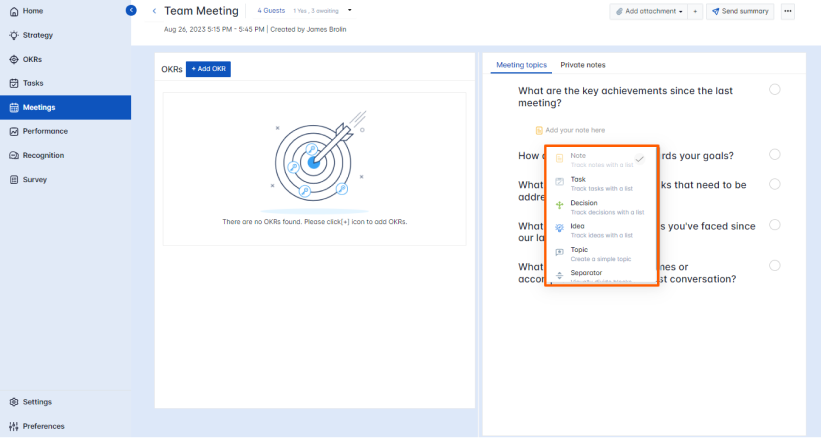
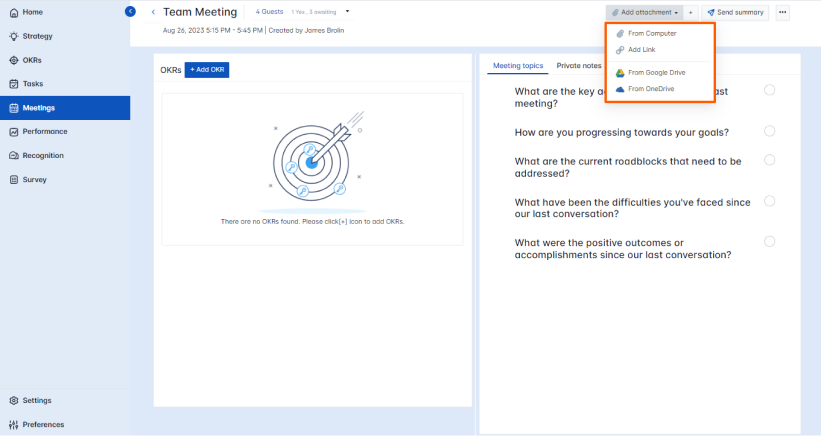
You can also add attachments to the meetings using the options shown below.
Performance Management
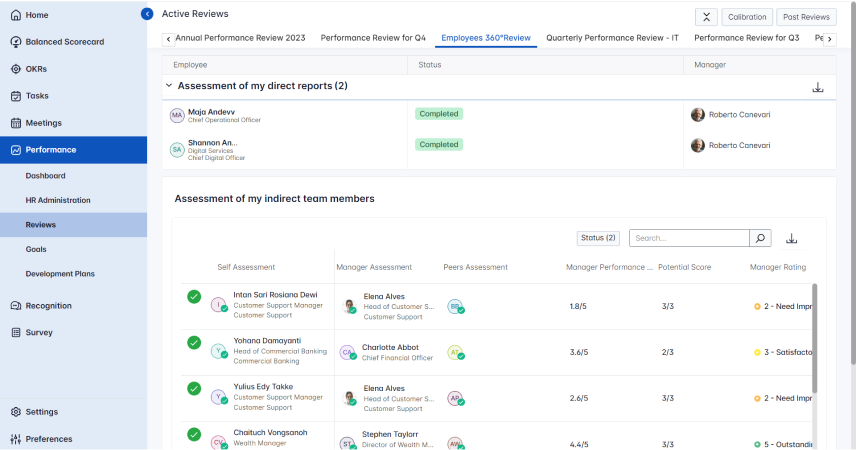
Employees can complete self-evaluations and add peers to assess their performance using the performance management system, and managers can conduct one-on-one employee reviews.
Navigate to Performance → Reviews from the left navigation panel to access assigned reviews.
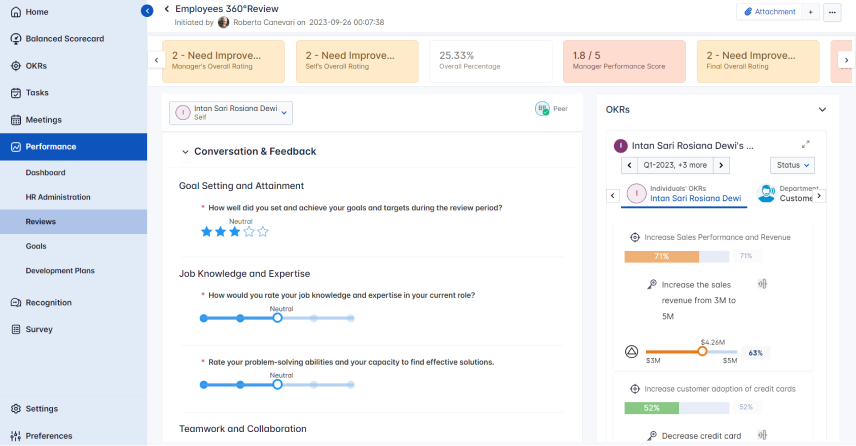
Self-Assessments
The self-assessment is the first step of the review process. This provides an opportunity for all employees to showcase their achievements, strengths, weaknesses, and strategies for the future. Learn more.
- Initiators can start employee performance reviews, and the users can perform their Self-Assessment.
- Every user can do their self-assessment under My Reviews
- This will enable employees to self-assess their work before the management and peers begin their assessment.
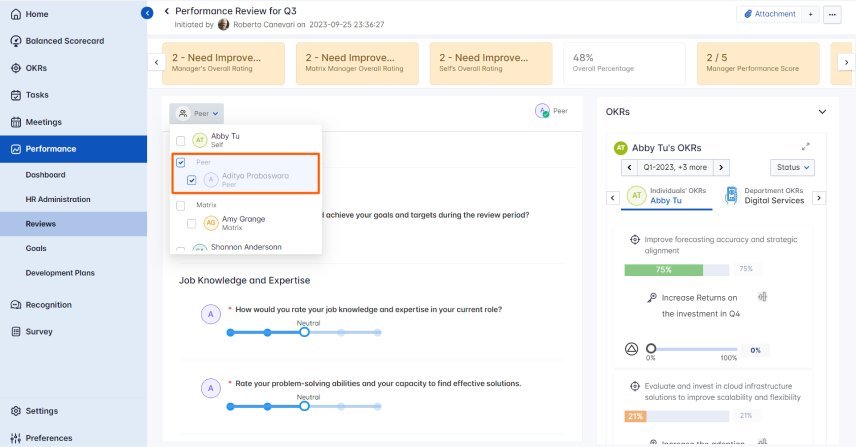
Peer Assessments
A peer assessment can help employees in an organization to reflect on their performance and areas where they can improve. Peers can give feedback and constructive criticism, which enables the employees to identify skill gaps and focus on learning them.
Users can add Peer Reviewers to review their performance apart from their Manager.
While performing self-assessment, click on the Add Peers button and select employees from the drop-down menu, and finally click on Add.
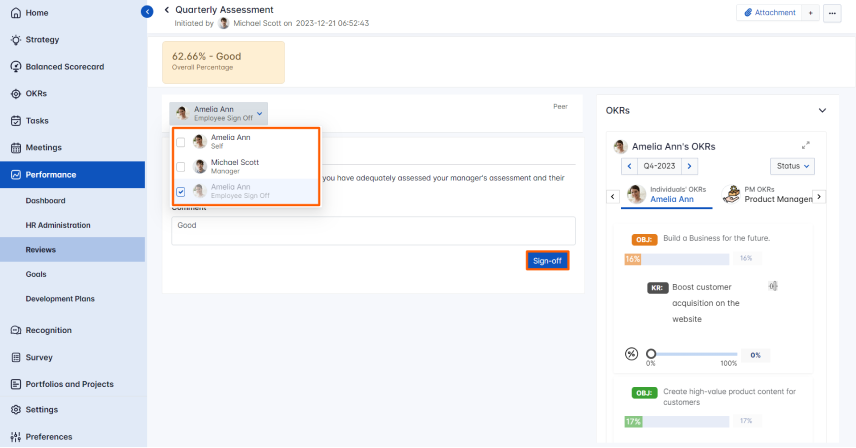
Employee Sign-off
Employee Sign-off indicates the acceptance of the review. This feature helps the employee to acknowledge the assessment and aid in improving their performance and skill set. Users can now perform employee sign-off action, once they agree with the assessed review. This can be done once the self, peers, managers, and secondary reviewers’ assessment has been submitted. Learn more.
The employee sign-off icon will be present at the end of your assessment.
Goals
The goals are a part of performance management that helps to develop individuals. Setting professional and developmental Goals is an important part for any individual or professional, regardless of what your career or, whether you have leadership or performance goals you wish to improve.
Navigate to Performance → Goals from the left navigation panel to access goal management.
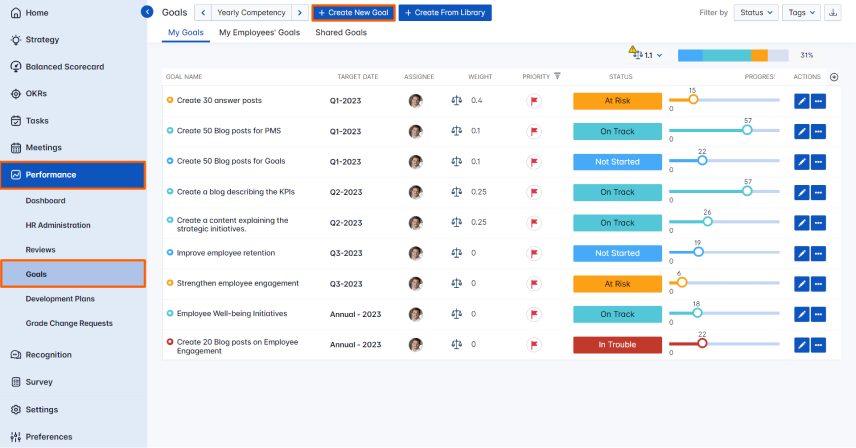
Create Goals
Users can create Goals under the Performance management module. Learn more.
Navigate to Performance → Goals → My Goals from the left navigation panel to create goals.
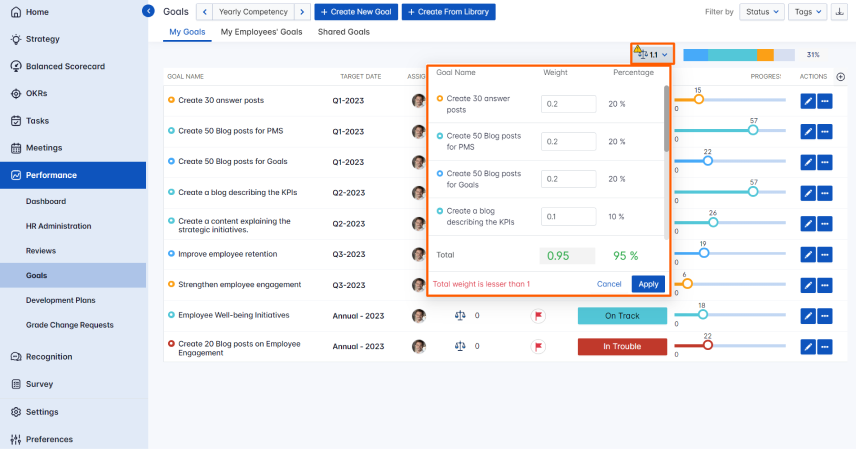
Set Weight for Goals
Users can now set weights for each goal in order to distribute the weightage to the number of goals created, this helps you to know your progress based on the weightage calculation. Learn more.
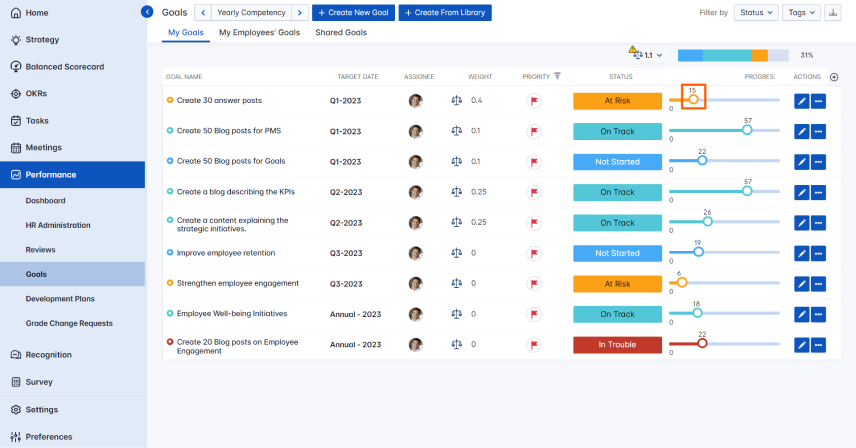
Goals Check-in
Users can check-in for their Goals once they accomplish and make progress toward their goals.
Audit Trail
Using the Audit trial option, users can also maintain a record of all the check-ins made to the goals. Learn more.

Add Notes in Goals
Users can now add notes to their Goals. This helps users to add additional information like instructions, comments, target date, review date, etc as notes to the goals. These notes will help the employee in scheduling and executing their goals. Learn more.

Share Goals
Users can now share goals with other employees in the case where two or more employees work towards the same goal. Users can also track the percentage of goals tracked by the check-ins made by them. The shared users can track the progress under shared goals in their user accounts. Learn more.
Navigate to Performance → Goals → Shared Goals from the left navigation panel to view shared goals.

Export Goals
Users can export the data from My Goals, My Org Goals, Pending Goals, and Shared Goals. They can download their goals progress data in a .CSV or XLS format. Learn more.

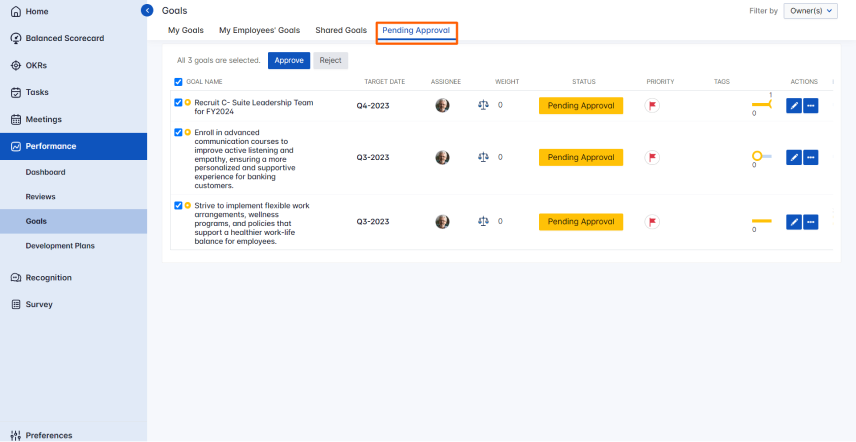
Pending Approval
Users can access their goals with pending approvals from their peers and managers from the Goal Pending Approval window.
Navigate to Performance → Goals → Pending Approval from the left navigation panel.
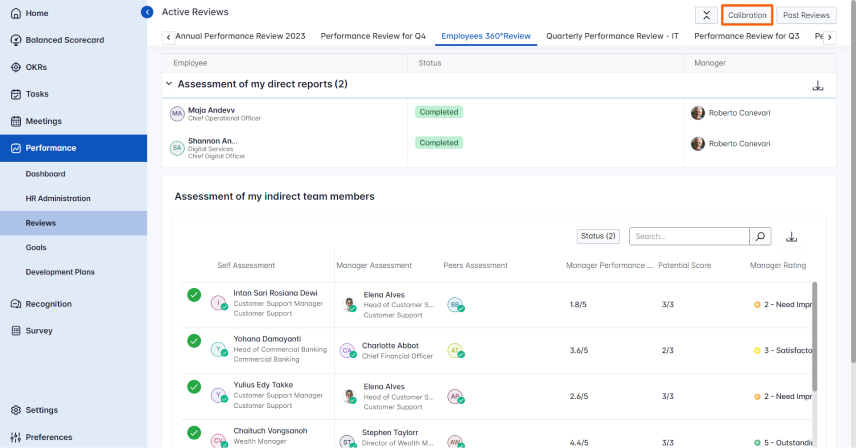
Calibration
Calibration is a process of determining and re-evaluating the scores in performance reviews. The calibrated members are those in higher management who reevaluate the ratings given to employees by their managers.
Navigate to Performance → Review → Calibration from the left navigation menu.
Note: Only Super Users and HR Administrators can choose a calibration group for the assessment process Learn more.
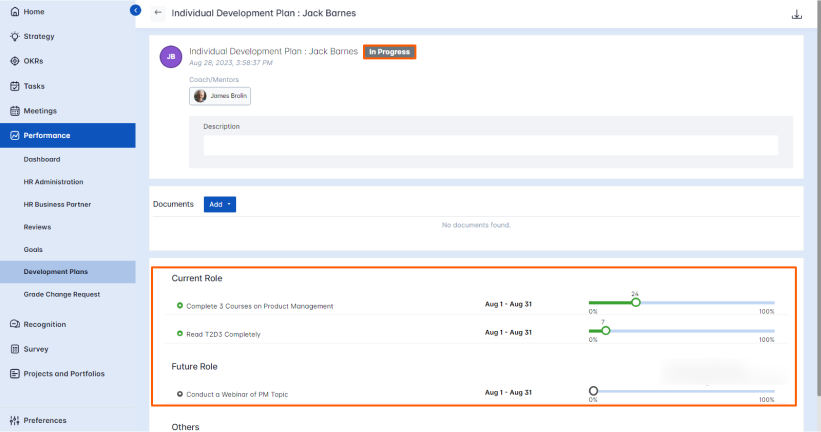
Individual Development Plan (IDP)
Individual Development Plans (IDP) help to improve the performance of high-performing employees in the organization. Users can now track their progress in the Individual Development Plan.
Navigate to Performance → Development Plan → Individual Development Plan–> My IDPs to view assigned IDPs.
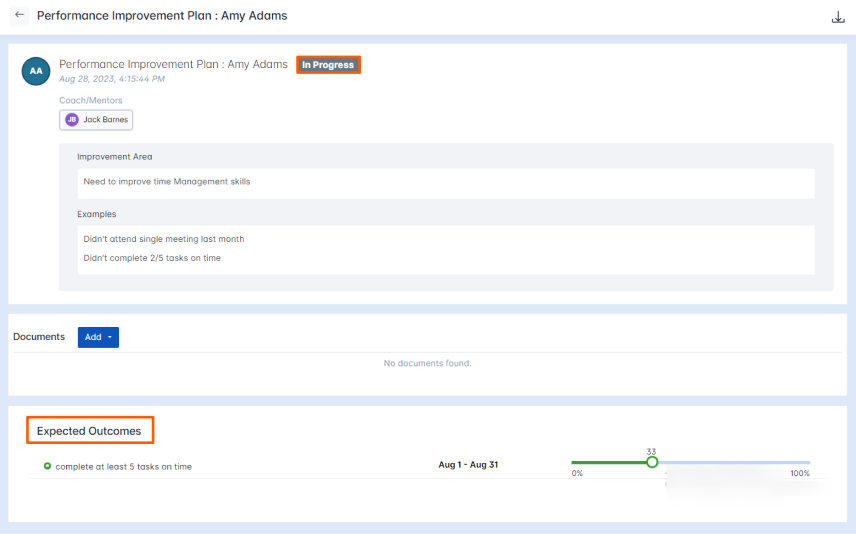
Performance Improvement Plan (PIP)
Performance Improvement plans or PIPs help organizations to identify and address current potential employees and fill the position of key roles within the organization. Users can now show progress in the performance improvement plan (PIP) Navigate to Performance → Development Plan → Performance Improvement Plan → My PIPs to view assigned PIPs.
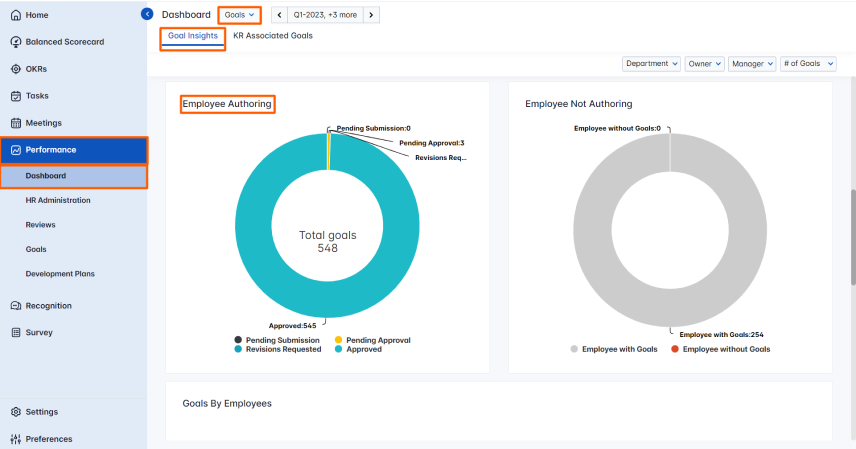
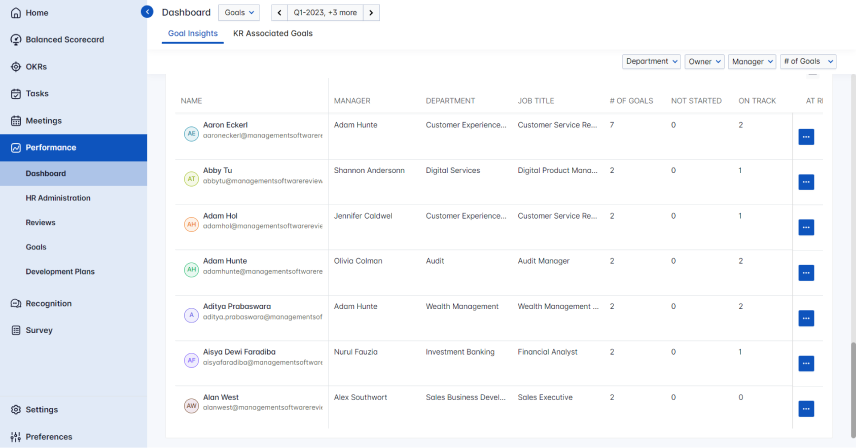
Goal Authoring Status
Goal Authoring Status is an option where you can see how many Goals are assigned to each user. Learn more.
Navigate to Performance → Dashboard and select the Goals from the dropdown. Under the Goal insights we have Goal Authoring Status.
Learn
Conversations and News Feed
Newsfeed is a place where we can share ideas and news about the specific OKRs or sharing achievements and appreciations. We can track the updates done on the specific OKR like editing, recent check-ins, adding weightage, comments and alignment histories.

Hashtagged Conversations
Profit.co allows you to engage and review your OKRs using hashtags. Also, you can give answers using hashtags when you write your reviews on OKRs or adding comments to your check-ins.
Moving forward
Reflect/Reset
This feature allows you to Reflect/Reset the important and successful OKRs from the preceding quarters. You can also carry forward the OKRs without any change or you can also modify them based on your requirements.
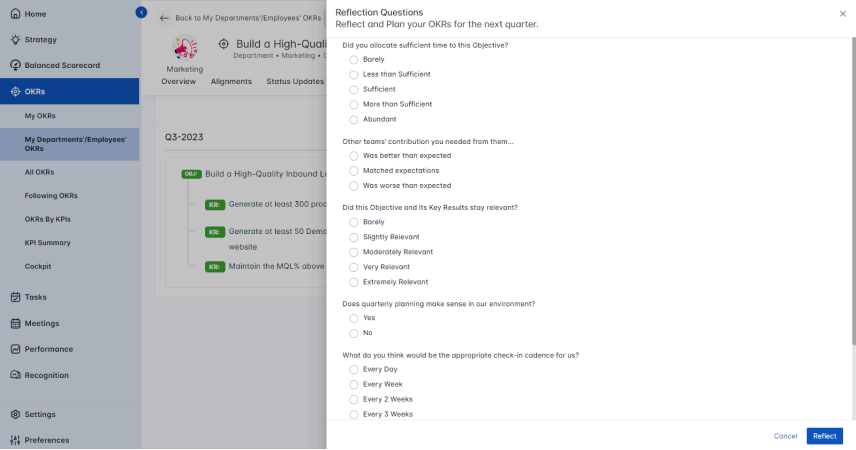
Reflect
Reflect on your OKRs at the end of the quarter based on your experience, The reflection process is pretty simple. You have a standard set of questions that you answer as part of your assessment. Learn more on how to reflect/reset your OKRs.
Reset
Before you start thinking about resetting your OKR, you should really look at the objective itself. Is the objective relevant enough to be continued into the next quarter. If the answer is yes, then you start looking at the key results.

At the end of your quarter, your key result’s progress is either Complete or Incomplete. Depending on business conditions, you can either Continue with the key result or Do not continue with the key result.
Based on these two decisions, you can decide the appropriate course of action for the key result:
1. Extend as is
The key result is not complete, but is still relevant. So, you continue with the key result as is. For example, you wanted to establish a retail location in Manhattan, but you are just 40% of the way there. This key result is still relevant, but there is no need to modify the target and hence we just extend this key result as is.
2. Add to Backlog
The key result is not complete, but is not relevant in this upcoming quarter.
3. Reset & Continue
The key result is complete, but you want to modify the numbers and continue because the key result is still relevant. For example, you wanted to solve 40 issues in the product and you ended up solving 30 issues. Now, this key result continues to be relevant. So, you can start with the 30 you’ve already fixed and reset your target to be 70 or something around there to get you going in the next quarter.
4. Complete and Close
The key result is complete, and hence can be closed. #Celebrate
General
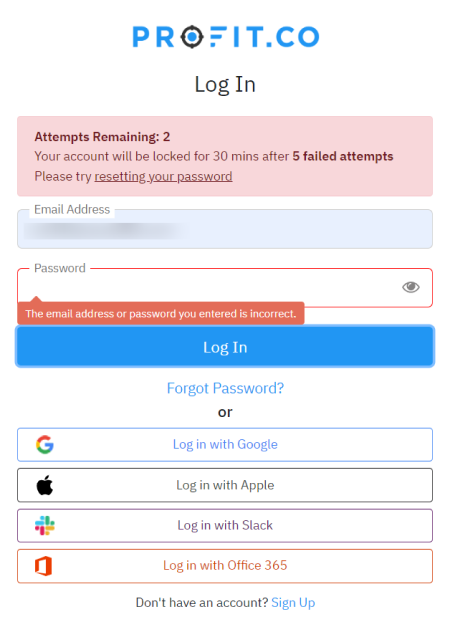
Password policy in Profit.co
Profit.co allows five consecutive failed attempts before locking the user for 30 minutes. You can also reset the password if you forget it.
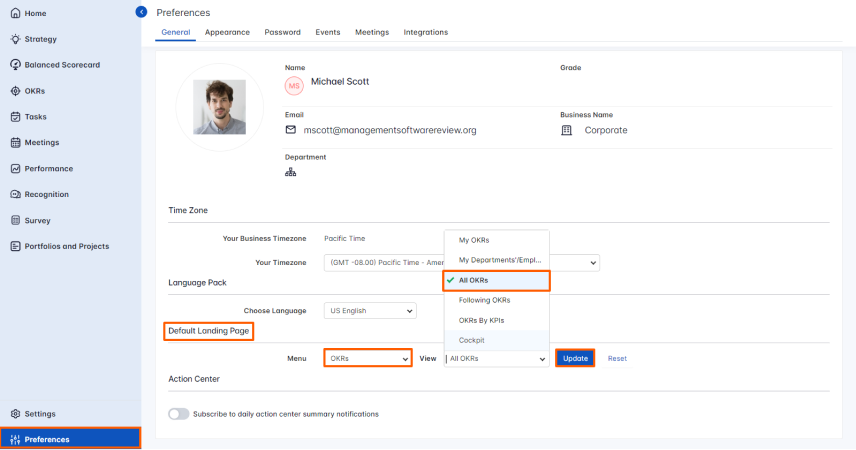
Set default landing page
You can easily navigate to the page that you frequently visit by setting the default landing page. Every time you log in, you will be taken to the predetermined landing page. Clicking on the company’s logo will take you to the landing page as well.
Change timezone
Profit.co allows users to change their time zone according to their business location.

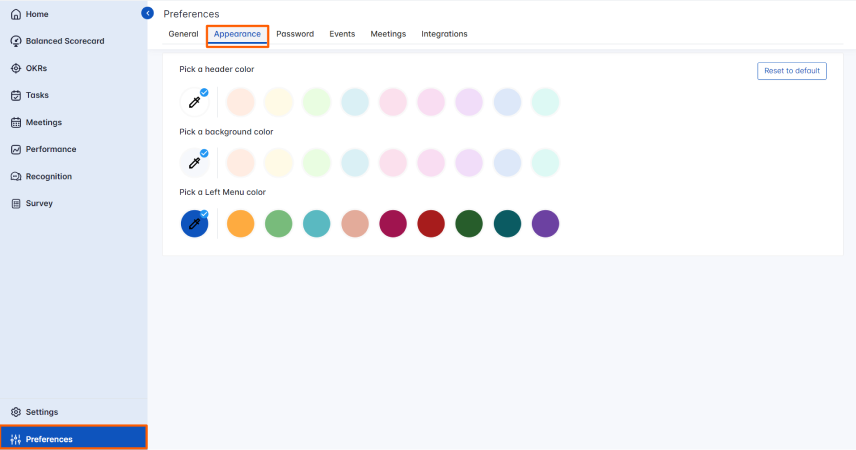
Change Appearance
Profit.co allows you to change the appearance of Profit.co. You can customize the header color, background color, and left menu color.