


This guide is specifically designed for the super users of the Profit.co software. As the super user is open to special privileges to administer and maintain the system of the organization, this guide helps them to learn the functions and understand their key role better. This guide will foster the responsibility and the managing competency of the super user.
As the super user’s enjoy super access to system administration and the software management, it is vital that they know their role better, instead of diving into the account without having any prior orientation about the product. This super user guide is chiseled in such a way that all the salient and the key functions of the Profit.co software are highlighted in a coherent order. Just go through the super user guide and learn how to enjoy a hassle free access to accounts in your administration. Starting from managing OKRs modules, Task, Engagement and Performance the key settings part is handled by the admin and you can know it all under a single roof.
Profit.co mainly focuses on establishing a customer friendly product that will be accessed from anywhere anytime at ease. So being a super user is more like managing the freedom of the fellow employees, so learn it better and manage it efficiently as you’re going to run the success story of your organization through your management skills.
GENERAL
Apps
Profit.co has 8 different applications, Each module can be customized according to your needs. Profit.co Modules help you to control and manage the most significant functions in Profit.co. Modules are those which appear on the left navigation panel.
Enable/Disable Apps
From the left navigation panel, select Settings → General → Apps. You will be directed to the Apps page. Here you can enable or disable the applications.

You can also add or remove features from those corresponding applications in the left navigation panel.

Action Center
Action Center is a centralized place where you can view action items that need your attention for check-ins and approvals.
You can also configure every single notification you receive from Profit.co by navigating to Settings → General → Action Center.

Send notifications of pending actions as a daily summary
You can enable the option to receive email notification for pending actions on a regular basis. You can enable the email summary notification through Settings.

Business information
Business Details
The Business information in Profit.co records the significant information related to the industry. You can also find the information of the account holder. You can also edit the business information
To edit the information, Navigate to Settings → General → Business Information → Business Details

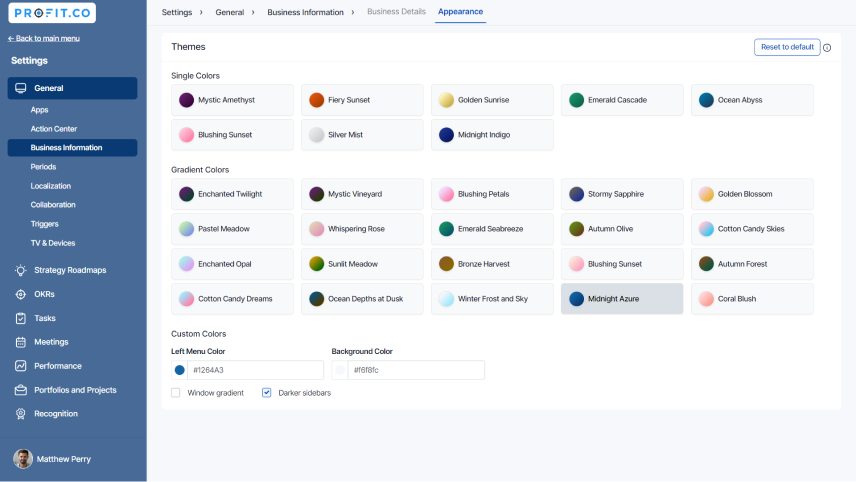
Appearance
Profit.co allows you to customize the header color, background color, and left menu color. This will help you and your organization to use the user account with the color of your choice.
To customize Navigate to Settings → General → Business Information → Appearance
You can also Reset the appearance to default if you wish.
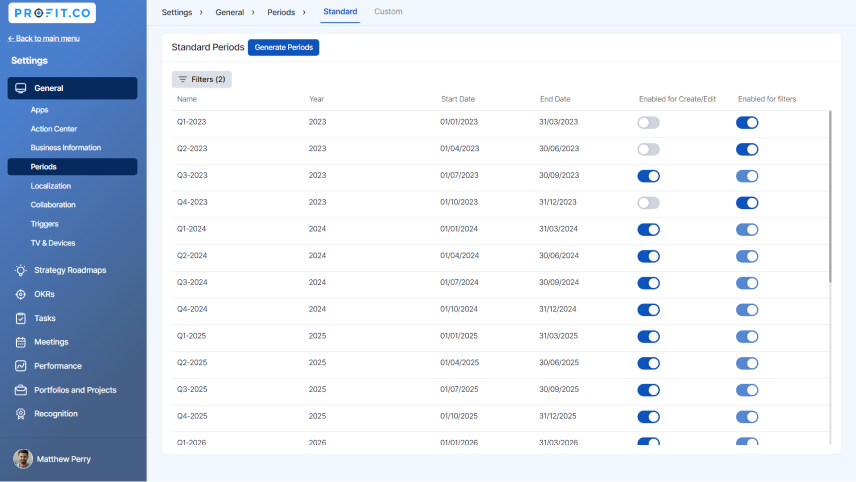
Periods
Periods can be used to create time periods for your OKRs. Periods allow you to set the start and end dates of each quarter, which makes it easier for you to manage the quarters and monitor your OKR progress each quarter as it has been set. Click here to learn more about generating periods.
Localization
Profit.co supports more international languages and nurtures the usability of the software. You can use our top-notch multilingual option to access Profit.co with your choice of language. This Localization strategy helps to augment your OKR performance and goals without any language restrictions so that you can attain your target efficiently. It also allows you to customize and rename the functionality at your convenience.

Collaboration
Documents
Users can attach documents across all applications from different sources and this will be configured by superusers through Settings. Click here to know more about it.

Notes
The Notes feature allows the users to set Notes Visibility and sync them.

Tags
The tag feature enables the user to link the objective to a specific section. Click here to learn how to create tags.

Hashtagged Conversations
Hashtagged Conversations helps you to communicate and converse with others throughout the organization. You can enable the feature by navigating to Settings → General → Collaboration → Hashtagged Conversations

Triggers
Profit.co provides an option named Triggers with webhook actions to automate the process of OKRs. By using this feature you can set defined criteria by which the actions can be done automatically without user intervention.

TV and Devices
The superuser can set up the Profit.co app in their Apple TV and monitor the progress of their organizational goals. The installation and set up procedure is very simple. By using the app on other devices, the user can manage the OKRs of his organization from other locations like home. The display monitor of the TV can even be set up in other premises of the office for observation and analysis.


STRATEGY ROADMAPS
Profit.co Strategy Roadmaps facilitate the planning, management, and tracking of initiatives aligned with business strategy, enhancing decision-making and strategic alignment through structured organizational approaches. To know more, Click here.
Strategy Roadmaps
Navigate to Settings → Strategy Roadmaps for effortless configuration and to ensure streamlined management processes.

Profit.co allows you to customize the Master Layout of the Initiatives according to your specific preferences and needs.

Who can link Initiatives to OKRs
This field allows you to choose either the Initiative Owner or employees from associated departments to link the initiatives to OKRs.

OKRs
OKRs help you to have synchronized and orchestrated goal management systems that allow a business to execute strategy with precision based on their Objectives and targeted Key results. Click here,to learn more about OKRs.
Authoring
General
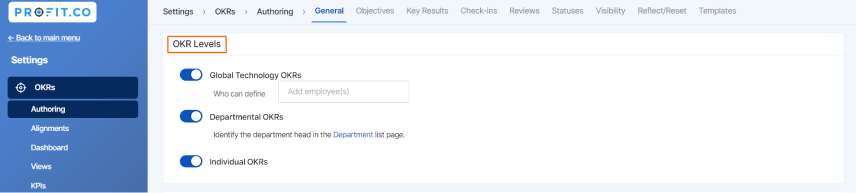
OKR Levels
Every company will have multiple departments, and sometimes companies will have cross-functional departments that work towards solving a particular problem.
Profit.co allows you to create OKRs at four levels.
- Navigate to Settings → OKRs → Authoring → General from the left navigation menu.
- Enable the Toggle keys.
- Super users can enable Corporate, Departmental, Team and Individual OKRs.
- The Authorized users can create OKRs under the respective levels.
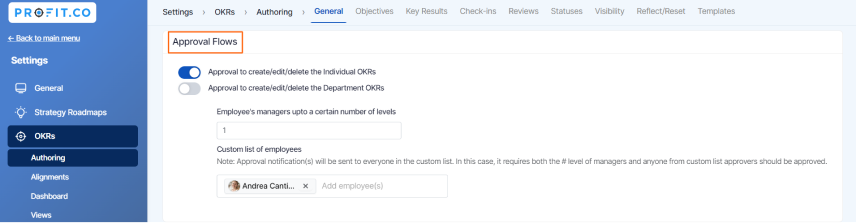
Approval Flows
The superuser must enable the toggle in order to configure approval flows. By default, there would be 1 employee manager level authorized to approve OKR. But, this setting can be extended to any number. The user would be able to see the approval status under the “pending OKR approvals” menu. You can also set any custom list of employees as approval manager.
To learn more about how to restrict users from creating OKRs, click here. To learn more about approval flows, click here
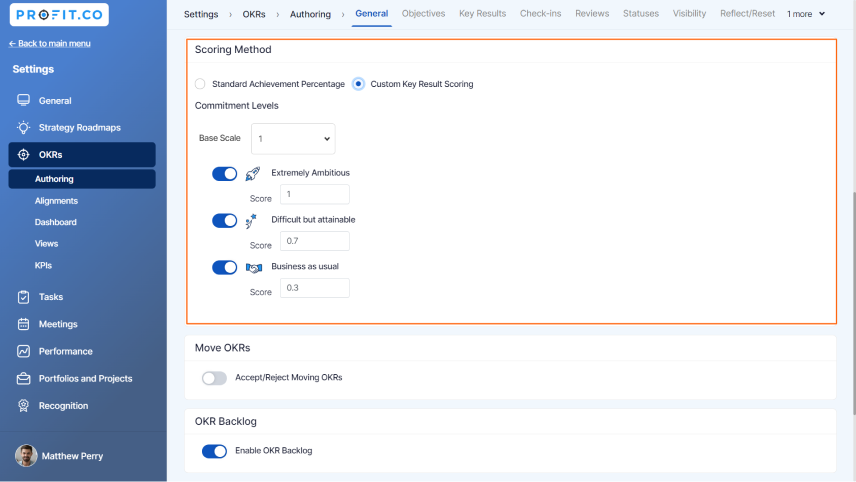
Scoring Method
Profit.co allows you to customize your Key Result scoring. You can set your scoring as Standard Achievement Percentage or you can Customize your Key result scoring according to the company’s preference.
Standard Achievement Percentage – The Key Results will be tracked customarily.
Custom Key Result Scoring – You can customize the Commitment Levels for the Key Results. The Base scale is your groundline for check-ins and scores may vary correspondingly
Move OKRs
Profit.co allows the users to Move the OKRs from one level to another.
Note:If there is a visibility restriction to the OKR, it cannot be moved.

OKR Backlog
OKR backlog acts as a repository where you can store your Objectives and Key Results that you might be wanting to use in the future.

OKR Authoring Time Frame
The Superuser will have the ability to set the time period for creating OKR. The toggle to establish the time frame for objectives can be enabled by the superuser if he wants to limit the time frame for OKR creation.
The window’s start and end times are set by default to be 10 days before and 30 days after the start of a quarter, respectively. These settings can be changed as necessary by the superuser.
Additionally, the superuser can enable approval processes for the users to create and modify their own OKRs.
Note: Super users will not be restricted to create OKRs even if the time frame is set.

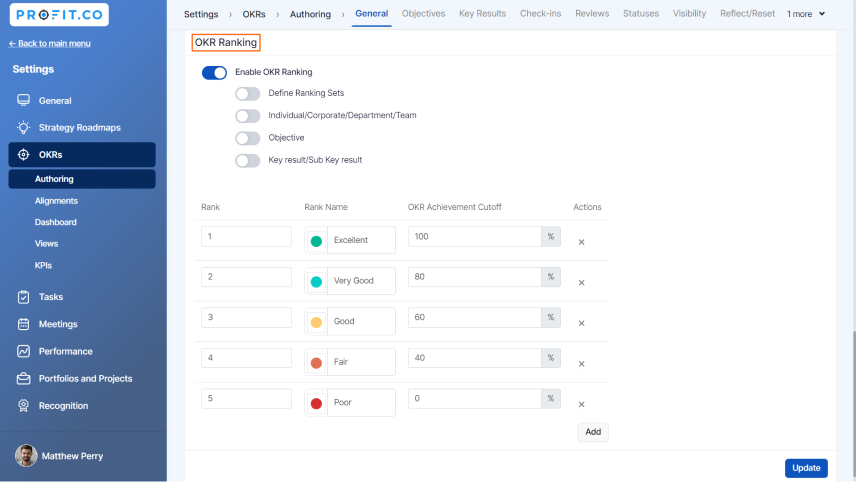
OKR Ranking
Ranking the OKRs based on the progress is possible with Profit.co. Employee OKR achievement can now be ranked, and OKR ranking can be used to reward employees who achieve high achievement levels.
The superuser can create custom Ranking sets
Check out the complete steps on how to enable and customize OKR Ranking
Objectives
Create Objective Options
In Profit.co, you can opt for various Objective creation methods, including Quick Create, Using Forms, and Step-by-Step Guide approaches. You can also add new fields in the creation page of Objectives and Key Results by configuring them in the Master Layout.
Weighted OKRs
The superuser can also assign weightage to each objective to set the priority. The assigned weightage will affect the total average score for the objective and key result. To learn more about how to define weights for objectives, click here
OKRs Dependencies
Profit.co allows you to add dependencies to your OKRs. Users can include any OKRs as dependencies to progress their OKRs. It helps to streamline goal alignment and collaboration across teams, enhancing accountability, synergy, and overall organizational performance with dependent OKRs.

Key Results
Key Result Creating Options
In Profit.co, you can opt for various Key Result creation methods, including Quick Create, Using Forms, and Step-by-Step Guide, Workspace/board options.

Key Result Types
Profit.co offers 6 types of key results. Click here to know more about which key result type to choose.
Navigate to Settings → OKRs → Authoring → Key Results from the left navigation panel.
You can Enable/Disable Key Results based on your requirements, and you can also choose the default key result creation type.
You can set a custom percentage to cap the progress of your main result types in Profit.co.Click hereto learn more about how to cap key result progress.
Profit.co also allows users to stretch goals or progress key results beyond 100%. Click here to learn more.

Stretch Target
Stretch targets can be the perfect motivation for a team that’s in need of productivity. Stretch targets are often ambitious because they’re directly linked to your company’s mission.
Weighted KRs
The superuser can also assign weightage to each Key Result to set the priority. The assigned weightage will affect the total average score for the objective and key result. To learn more about the idea behind creating the key result weightages click here
Milestone Sequence
In Profit.co a milestone tracked key result is non-measurable. We can create a new milestone sequence while creating a new key result. The milestone sequence you create will be saved under the My Templates category.
Navigate to Settings → OKRs → Authoring → Key Results to open the Milestone Sequence page.
Click here to learn more about how to create a Milestone Sequence.

KRs Dependencies
In Profit.co, you can enable and add dependencies to your Key Result. Users can include any key results as dependencies while creating their key results. This feature allows you to create a dependent key result to manage the dependencies with other departments/teams. With this feature, you can effectively monitor the OKR’s progress without any delegations because of the dependency factor.

Check-ins
Frequencies
Profit.co provides the option to set up a custom check-in frequency for Key Results. This feature enables the user to customize the frequency to perform check-ins for the Key Results. Subsequently, you can manage the frequency of your check-ins according to your needs.

Synchronization of Score
the Authoring option, you can allow users to decide to enable/disable sync the check-in progress from sub key results by default.
To learn more about this process, click here.
Check-ins
You can also enable/disable the toggle to allow users to override check-ins at the parent key result level.
Propagate automated Check-ins
In the Authoring option, you can allow users to check-in automatically to the preferred check-in date. You can propagate check-ins to the previous check-in date or to the next check-in date, so the progress falls accordingly.
To learn more about this process, click here.

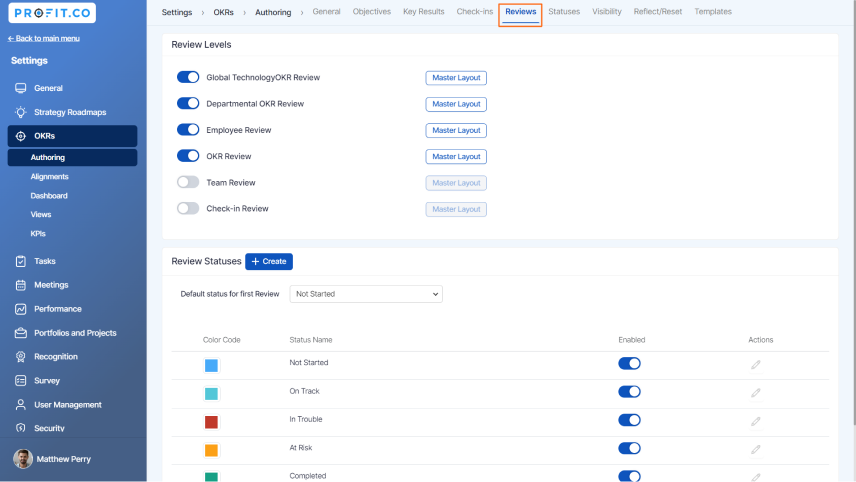
Reviews
Profit.co allows you to customize the Master Layout of the My Organization and My Department OKR. My Team, Employee Reviews with the help of OKR Reviews. Click here to learn more about how to enable and conduct OKR Reviews on Profit.co
You can also customize the status of the first review.
By setting a conditional attribute, you can track the reason why the users have made changes while doing the check-ins.
To learn more about the process of setting attributes,click here.
Statuses
OKR Status has a unique color code and an achievement score based on which you can validate the progress of the key results. Click here to learn more about how to create statuses and set color codes for the statuses in Profit.co. The sub-key result progress can be chosen to reflect or not to reflect in the objective or parent key result in the statuses option.
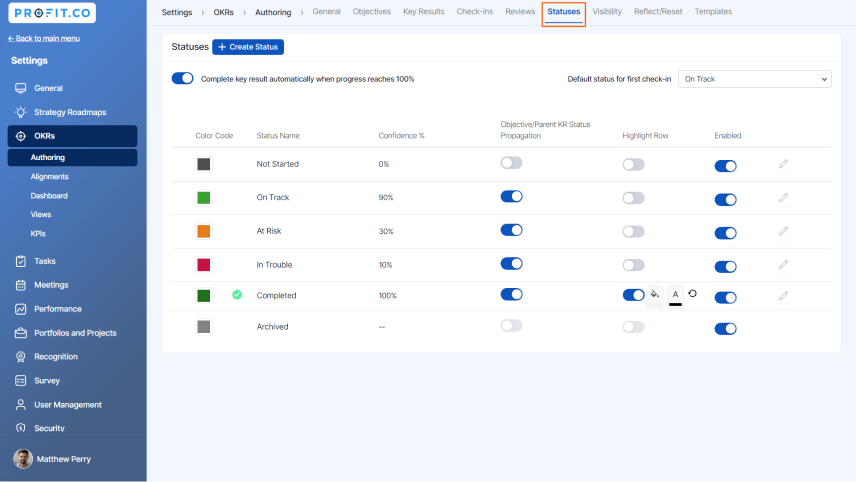
To learn more about this process, click here.
Visibility
OKRs enhance transparency and should ideally be company-visible, though circumstances might create restrictions. Superusers can control visibility, customizing access from management to all employees.
To learn more about how to set OKR visibility,click here.
You can modify the settings for the access list and department OKR visibility. To learn more about how to control visibility, click here
An access list is a list of users to whom the superuser can grant access to the OKRs. They are not required to belong on the team. To learn more about how to set team visibility and access list, click here.
Profit.co allows you to change the visibility settings of the OKRs after you check in the key results. Click here to learn more about it.

Reflect and Reset
Profit.co allows you to Reflect/Reset the important and successful OKRs from the preceding quarters. You can also carry forward the OKRs without any change, or you can also modify them based on your requirements. The Superuser can enable Reflect/Reset in the settings menu from the Navigation panel on the left side. Click here to learn how to enable Reflect and Reset.
To learn more about how to Reflect/Reset OKRs with Sub KRs Click here

Templates
By using OKR templates, users can quickly choose an OKR that closely resembles their goals. They can use the objective’s key results as-is or modify them to fit their objectives. Click here to learn more about how to create templates in Profit.co

Alignments
Alignments provide a hierarchical view of how your team’s objectives are aligned with other objectives and key results.
How to Access the Alignments page of OKRs?
- Navigate to Settings→ OKRs → Alignments from the left navigation panel.
- The Alignments Page will open. Here you can manage Alignments via this page.
To read more about Top down and Bottom up alignment, click here
Top-Down Alignment
In top-down alignment, you can align your OKRs in Profit.co by assigning your Key Result as an Objective, or, as a Key Result. This way, the assignee will receive that Objective or Key Result as a priority.
- Enable multiple owners
- Accept/Reject Assignments
- Copy KRs to Individuals as Objectives or KRs when assigned from the Corporate, Department or Team OKRs
- Allow user to add assigned key result into their OKR

A user can assign a key result and sub key result to multiple assignees.
To learn more about this, click here.
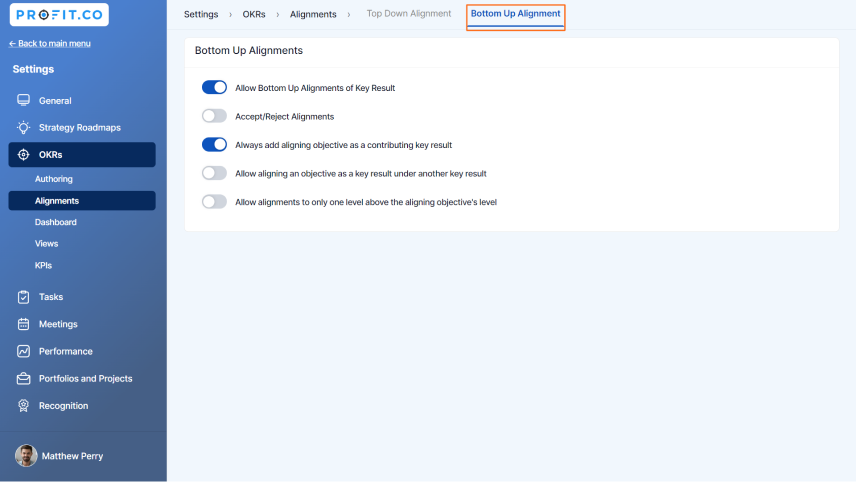
Bottom-up Alignment
In the bottom-up alignment of OKRs, you can select the OKR you want to align with while creating OKRs and view the OKRs from the bottom-up alignment. A good alignment will ensure that your employees focus on Tasks and Key Results that matter to the organization
- Allow Bottom Up Alignments for Key Results.
- Accept/Reject Alignments
- Always add aligning objective as a contributing key result
- Allow aligning an objective as a key result under another key result
- Allow alignments to only one level above the aligning objective’s level
Dashboards
A c-level or Director-level view that typically provides a real-time snapshot of the overall development of your organization and permits historical comparison by applying a time period filter. Pie charts based on OKR status, bar graphs for OKR by department, and additional configurable views are all available. Each graph is interactive as well, where you can dive deeper into specific OKRs.
Profit.co offers an improved user experience via department heatmaps, enabling customers to access reports for in-depth analysis of departmental OKR progress and outcomes.
Profit also provides filters and export files from the company dashboard. To learn more, click here

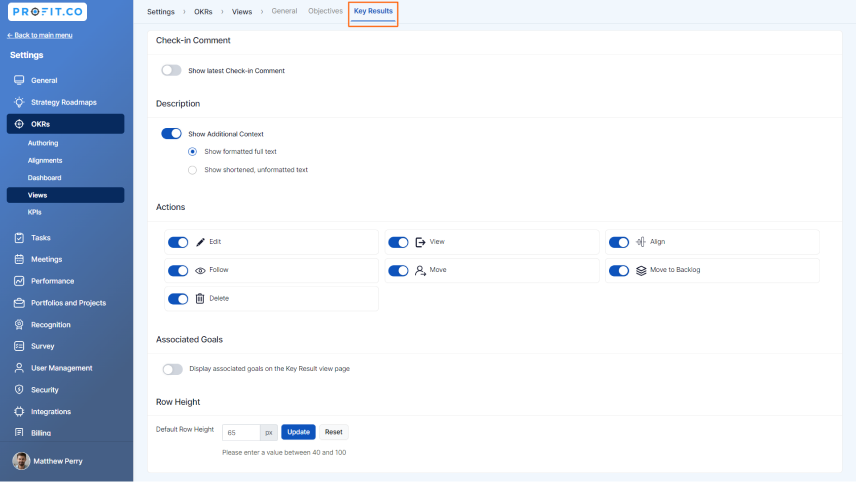
Views
Profit.co allows you to customize the OKR List page by adding the necessary features. Click here to learn more. You can also customize the assignee’s name and image icon in All my OKRs Page, Dashboard view and Objective/Key Result Indicator. Profit.co allows you to download your OKR progress report for the week or quarter periods with a single click, instead of preparing it manually for a meeting. Click here to learn more.


KPIs
Categories
KPIs(Key Performance Indicators) are critical metrics that businesses use to measure and evaluate their performance in achieving strategic goals and objectives.
This feature helps you to customize the KPIs by Category by Enabling/Disabling the toggles in the category list based on your requirement.

KPIs by Category
KPI Categories help the users identify the KPIs that they will use while creating the OKRs for the respective departments. A bundle of KPIs can be found in each category by default which helps users save time and give a clear view of what the KPIs need to work on. You can also create KPI category in Profit.co.
Click here to learn more about who can create KPI and How to create.

KPI Boards
KPI boards help the users identify the KPIs that they will use while creating the OKRs for the respective departments. A bundle of KPIs can be found in each board by default which helps users save time and give a clear view of what the KPIs need to work on.
To learn more about KPI Boards, click here.

Tasks
Profit.co provides a robust task management system that allows you to create, prioritize, and keep track of tasks. You can link tasks to key results, use Kanbans to visualize workflow, assign tasks to other people, and view the tasks for the department. Click here to learn more about how to create a new task.
General
Under General, the superuser can enable the toggle for Task Assignment, Tasks Visibility, Task Controls, Restrict Task Assignment that is to decide the tasks to be assigned to any employee or Assign Task to employees reporting to the logged in user (logged in users’ org).
Task Assignment
Profit.co allows you to Accept/Reject the tasks which are assigned to you and allows you to assign tasks to multiple users by enabling the toggle under security. Click here to learn more about how to assign tasks to others.
Tasks Visibility
Profit gives you the flexibility to set the visibility of tasks. All employees can view the tasks of other employees by enabling task visibility. You can also restrict visibility if you wish to. Click here to learn more about how to set the visibility of tasks in Profit.co
Task Controls
Profit.co allows the owners to edit the assigned tasks. A Sub Tasks is a smaller, more specific task that is part of a larger project or goal. Click here to learn more about creating sub tasks. You will also have the option to assign the sub-tasks to anyone.
A Task Checklist helps reduce failures in task completion. It also helps to ensure consistency and completeness in carrying out a task. Click here to learn more about creating checklists for a task.
Email to Task feature allows you to create a task under a workspace/board directly through email.
It will eliminate the time taken to create a task by logging into the Profit account and navigating to any workspace/board. Click here to learn more about assigning tasks through email.
Restrict Task Assignment
Profit.co allows users the option to assign tasks to anyone, in addition to restricting the task assignment to the employees who report to them. Click here to learn more about task assignment.

Statuses
Profit.co enables status creation with descriptions. Statuses in tasks enhance clarity, track progress, and aid communication. They streamline workflow, highlight priorities, and facilitate efficient collaboration among team members, ensuring effective task management. Click here to learn how to edit task status.

Priorities
Profit.co allows you to customize the priority status for your tasks. By giving each task a priority value, you can prioritize them using this feature. These priorities help users in assigning tasks according to priority. Click here to learn how to add a new priority status to tasks.

Sprints
A Sprint is a short-term period in Task Management within which a team focuses on a particular set of Tasks. Profit.co provides the option to create a predefined sprint planner to add it while creating a new task.
To enable Sprint, Navigate to Settings → Tasks → Sprints from the left navigation panel.

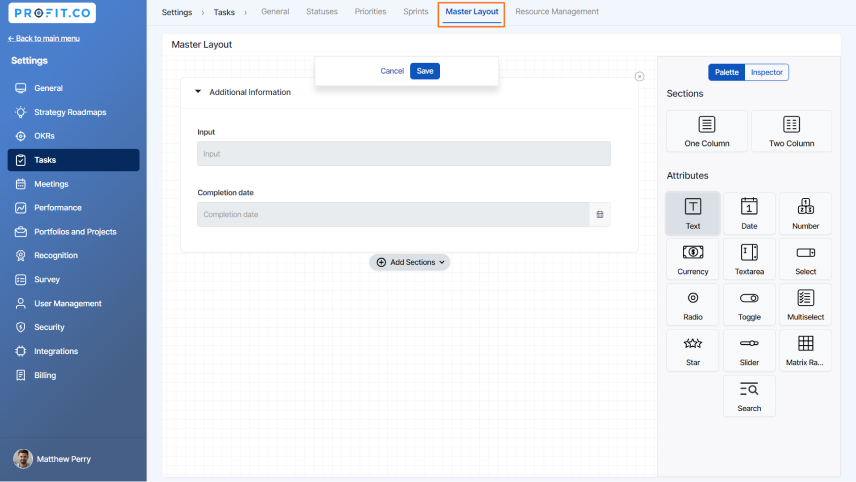
Master Layout
Navigate to Settings → Tasks → Master Layout to edit the layout. By default, a section will be available. You can edit the names of the sections in the Inspector tab. From the Palette section, you can also add the sections and attributes by dragging and dropping them into the layout. After adding the sections and attributes, users can fill in the additional information while creating tasks.
Meetings
Profit.co’s standout feature is the ability to schedule meetings, giving teams and departments a venue for communication and regular meetings.
General
Profit.co allows users to sync the meeting scheduled with Google Calendar. This feature provides an option for users to sync their Google calendar and can access their calendar directly. By using this feature there is no need to switch between platforms to check time availability on the calendar, instead, you can stay at Profit.co and access your Google calendar. To know more, Click here.

Navigate to Settings → Meetings and you can enable the toggle for Google calendar and Outlook calendar Sync
Click here to learn more about scheduling meetings.
Click here to learn more about 1:1 meetings.
Click here to learn the process of enabling auto-generated links for meetings.
Templates
Profit.co provides the option to create a new template while scheduling a new meeting. In these predefined templates, you can add topics, which helps in creating a structured agenda.

Performance Management
Reviews
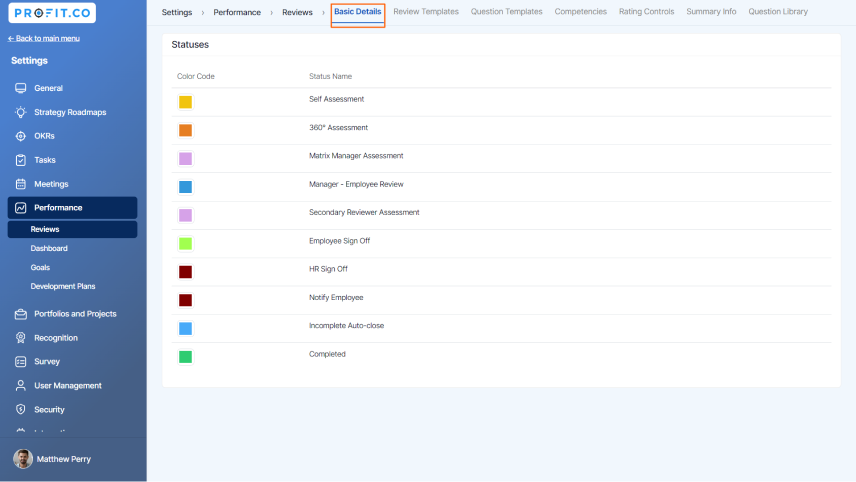
Basic Details
Initiators can initiate a new review to the employees and allows users to specify performance assessment initiators for the employees in the organization. Learn more.
- Initiators are the people who can Initiate Performance Reviews.
- Super Users can assign Review Initiators.
- Initiators can monitor the review process in the HR Dashboard and once the process is complete, reviewers can close the review process.
Statuses
Statuses denote the status of the assessment and the color code of the performance review in the HR Dashboard.
Review Templates
Review templates in Profit.co offer predefined evaluation criteria and questions related to specific goals and objectives. They provide a standardized structure for performance reviews but are also customizable to align with an organization’s unique practices and objectives The review templates help users configure and save templates that can be saved and used in the future. Users can create multiple templates for Q1, Q2, Q3, and Q4 for various review process setups.
Navigate to Settings → Performance → Reviews → Review Templates from the left navigation panel. On the Review Template page, click on the + Create Review Template icon to create new templates. Learn more

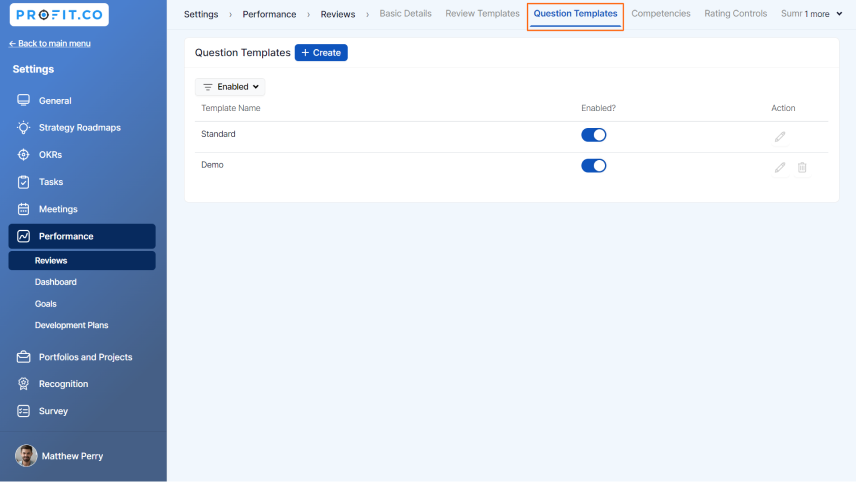
Question Templates
Q&A templates can be created for questionnaires in the initiated performance reviews. This enables users to create and group questions in a Q&A template and use it. These Q&A templates can be added to different types of Performance Reviews. Learn more

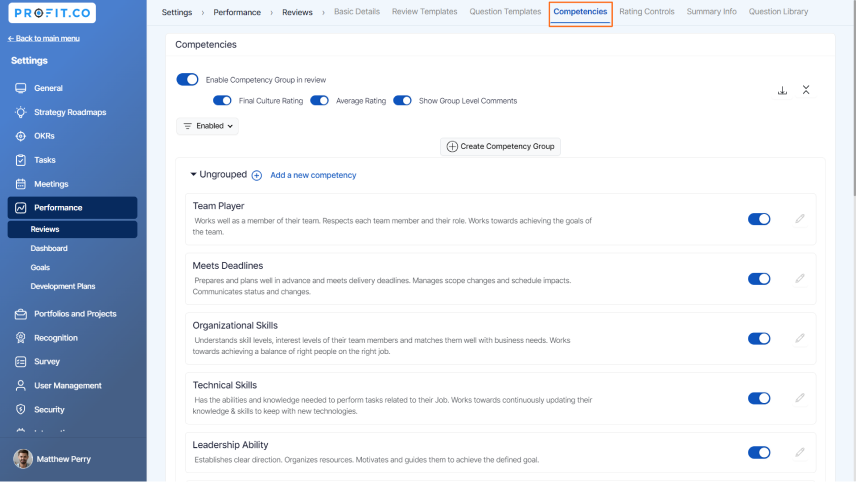
Competencies
Competencies are measurable skills or abilities that an individual needs to perform their job roles successfully in an organization. Based on their competencies, the employees are given scores that reflect their overall performance in the organization. Learn more.
Users can enable competency groups in performance reviews. This feature allows users to evaluate competencies as a group in performance assessments. On the Reviews page, select the Competencies tab and enable the Competency Group in reviews toggle. Once it is enabled, the toggles for Final Culture Rating, Average Rating, and Show Group Level Comments appear. Based on your organizational needs enable the toggles. Learn more.
In the Create Competency side panel, enter the Competency Name, Group Name, and Description. You can also enable the toggles for Evaluators of Who can Rate the competency ratings of employees in the performance reviews.

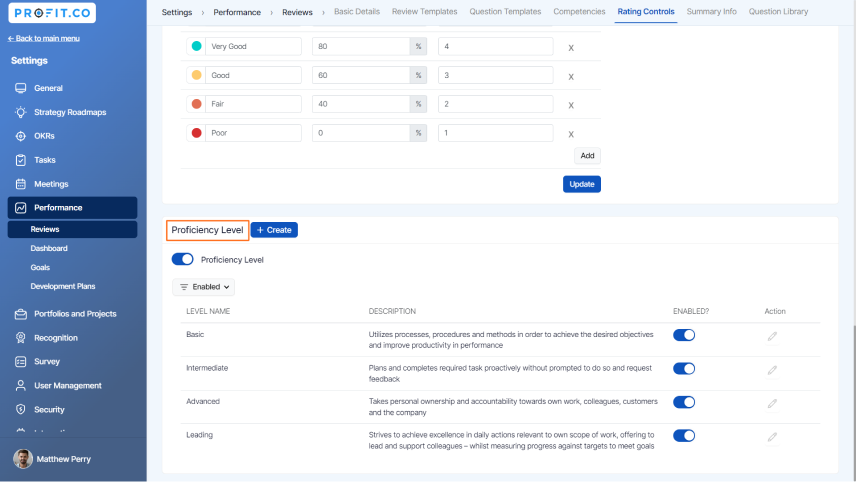
Rating Controls
Ratings are used in performance reviews to indicate an employee’s level of performance or achievement. During performance evaluations, users can provide ratings for employees. This enables the employee to identify and perform better in their weaker areas. Learn more.

Profit.co allows users to add ratings based on the performance of employees. To learn more click here.

Highlighting
Users can highlight competencies when the manager’s rating equals the employee’s rating. By using this feature, you can highlight competency in the performance review if the assessment ratings are equal. Learn more
Rating Appearance
Rating appearances like Numeric, Star, Emoji Ratings, and Progress Percentage Slider have been introduced, to gauge employee performance. Based on your requirement, you can choose between what kind of rating scale appearance you need to use for employee review.Learn more

Rating Visibility
Rating visibility allows users to view rating scores and names for performance assessments.
Rating Groups
Profit.co allows users to create rating groups for performance reviews of employees in an organization. By using this feature, users can review the performance of the employees based on rating groups. Rating groups are classified according to the grades and enable users to analyze the performance of team members across various departments. To learn more, click here.
Performance Ranking
Performance reviews provide an option to rank individuals based on their Individual Performance Score. This feature allows you to rank the progress of the employees and reward them with achievement scores via Performance Ranking. These rankings will be reflected in the Review summary information of the employee. To learn more, click here.

Proficiency Level
Profit.co provides an option to create proficiency levels, and created proficiency can be associated with grades when creating a department.
Summary Info
Users can now customize the appearance of the Review summary information boxes based on organizational needs. Learn more

Question Library
The Question Library serves as a repository for any questions you might want to use in the future during performance reviews. Users can save the questions that they find valuable and directly move them from the questions library. To learn more, click here.

Dashboards
A dashboard is a visual representation of all of your data. Its prime objective is to exhibit data effectively to users. With the use of effective infographics, users may clearly articulate their data and make key strategic decisions.
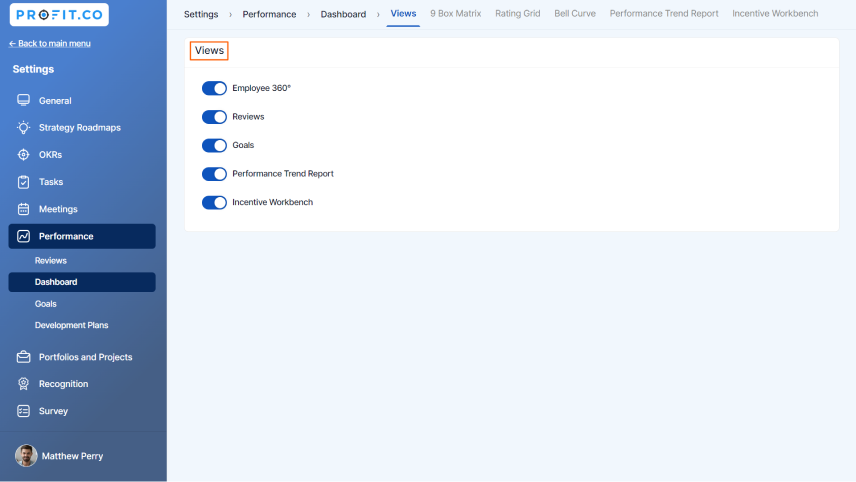
Navigate to Settings → Performance → Dashboard from the left navigation panel.
Views
Customize your Dashboard views by enabling or disabling the toggles for Employee 360°, Reviews, Goals, Performance Trend Report, and Incentive Workbench.
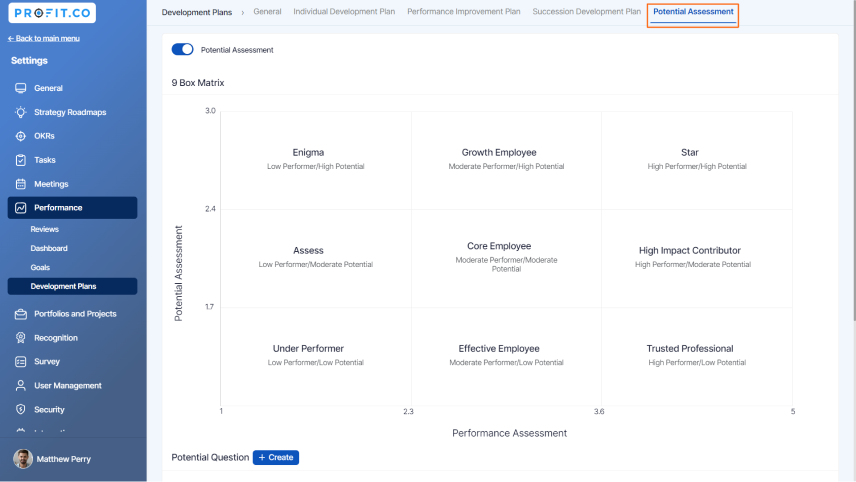
9 Box Matrix
The 9 box matrix evaluates and plots the organization’s talent pool based on two factors such as performance assessment and potential assessment. Both these factors are plotted in the X-axis (horizontal) and Y-axis (vertical). Let’s see how the 9 box matrices work in Profit.co.

You can now customize 9 box matrices in Profit.co and can evaluate the company’s talent pool. Learn more

Rating Grid
Just like the 9 Box matrix, Rating Grid can be used to evaluate the assessments, scores, and ratings. By using this rating grid, you can set your own matrix value by adding the attributes and plotting the values on X-axis and Y-Axis.

Users can customize the rating grid in Profit.co by setting values for the score and assessment grid. Learn more

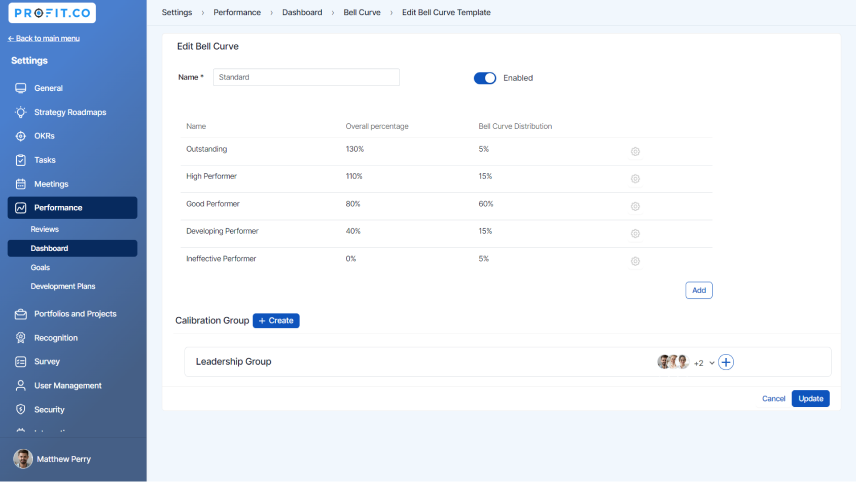
Bell Curve
The Bell Curve approach is applied in performance appraisals as a way of distinguishing elite performers from average performers, and further, segregating below-par employees from the overall average. While calculating the individual performance score, the bell curve helps the HR team review the employee’s performance with different curves. Learn more

Calibration Group
A calibration group refers to a subset of employees or individuals used as a reference for evaluating and adjusting performance ratings across the organization, ensuring fairness and consistency.
Performance Trend Report
In Profit.co Performance Trend Report feature is exclusively created for HR Admins to track the employee’s quarterly performance and the overall reviews they have received. The HR administrators calculate the average performance score of the employees based on their previous performance reviews, which then helps them to decide about employee promotions and increments in forthcoming years.
To learn more about the Performance Trend Report, click here.

Incentive Workbench
HR can set the incentive amount and for the admin to set the incentive frequency and target amount for a user. By setting the amount, the overall incentive will be calculated based on the overall rating and incentive target amount.

Goals
Goals can be created under the Performance management module. Setting professional development goals is an important part of growing as an individual in an organization.
Navigate to Settings → Performance → Goals from the left navigation panel.
General
Goals can be enabled/disabled under the settings menu. This feature allows you to customize the goals option in the navigation panel. When you have active goals to perform, you can enable the goals using settings. Learn more.
Set Weights for Goals
Users can set weights for each goal in order to distribute the weightage to the number of goals created, this helps you to know your progress based on the weightage calculation. In some cases, all Goals may not have an equal impact, so in such cases, applying weightage to goals will increase or decrease the focus on those goals based on the priorities. Learn more
Edit/Delete Past Goals
Users can edit or delete completed goals. This feature helps users to manage past goals efficiently by making the necessary changes and by deleting them you save more space for future goals. Learn more
Associated KRs
Users can view the Goals associated with any key results that are summarized to give you an overview. This feature enables users to access and monitor the status of the goals and the key result progress assigned to them. Users can also associate key results progress to goals.

Goal Cadence
Restrictions can be set for the users who create goals for a specific time period. By using this feature, Super Users can restrict Profit Users from creating new goals for a specific time period. Learn more.

Status and Priorities in Goals
Create a new status and a priorities for goals that allows you to prioritize and rank e your goals based on organizational needs. Learn more

Approval Flows
Profit.co provides an option to create a flow to approve the goals created/edited/deleted by the employees. By Using this workflow approval you can give privilege to the Managers or the team head to approve the goal created by the employees and allow them to use the assigned goals.

Master Layout
Profit.co provides an option to set custom fields for goals based on their business culture and organizational requirements. This feature allows the employees to customize the Goal creation and check-in page according to their needs. Users can also add the necessary attributes from the predefined set of attributes. To learn more, click here.

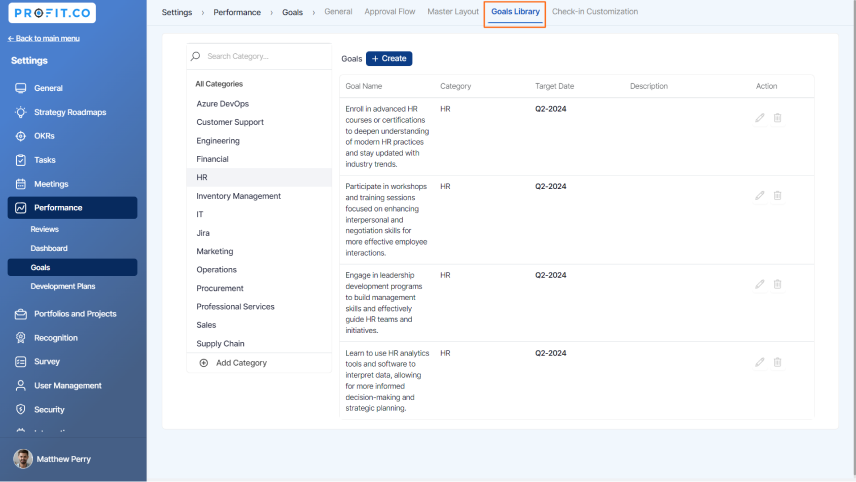
Goals Library
The Goals library serves as a repository for any goals you might want to use in the future. Users can save the Goals that they find valuable and directly move them from the Goals library while creating individual and organizational goals. T learn more about Goals Library, click here.
Development Plans
General
HRBPs can initiate development plans for employees by enabling the toggle.

Succession & Development
Customize layouts can be created for Individual Development Plans, Performance Improvement Plans, and Potential Assessments for the employees in the organization through the Succession and Development window. Learn more.
Navigate to Settings → Performance → Development Plans from the left navigation panel.
Individual Development Plan
Individual Development Plan or IDPs help organizations to identify and address distinct potential in employees individually and fill the position of key roles within the organization based on their capability in coping up with their professional goals. To learn more about IDP, click here.

Performance Improvement Plan
Performance Improvement Plan help organizations to identify and address current potential employees and fill the position of key roles within the organization. It helps employees to improve their job performance and achieve their career goals. This helps managers to collaborate with the most effective employees on action plans and activities that are beneficial for both employees as well as the business. To learn more about PIP, click here.

Potential Assessment
Potential Assessment is a process of evaluating employees’ capabilities, strengths, and development areas to align them with suitable roles, fostering growth and optimizing team performance.
Potential Ratings
Potential Ratings in Profit.co are performance indicators used to gauge employees’ likelihood to excel in higher roles. They help identify future leaders and guide development strategies for career advancement.

RECOGNITION
Rewards
In the Allowance section, you can specify the allocation of points that each employee receives monthly to recognize and reward their colleagues. You can also enable the toggle Points expires automatically at the end of the month to make the points expire by the end of the month.You can also enable the “Points per recognition” toggle to establish the points limit for rewarding others.

For instance, if you set the limit at 200 points, you’ll receive a notification if you attempt to reward an employee with more than 200 points, indicating “You can only give up to 200 points per employee/department/team”.
In the Gift Card section, you can enable the Gift Card Program and can determine the Exchange Rate.

Automate Post
You can enable the default Automate post with predefined messages to create and publish new announcements.

Gift Card Program
Gift cards serve as a tangible token of appreciation, recognizing employees for their hard work, dedication, and contributions. It helps boost morale and motivation among the workforce. Gift cards provide flexibility in terms of choice. Employees can use them to purchase items or experiences of their preference, which can be more meaningful than receiving a specific gift. You can create new gift cards, launch the program, fix exchange rates, and add money to the wallet.

SURVEY
Basic Details
Pulse Survey helps you to conduct surveys by giving them an opportunity to give their feedback on that. Pulse surveys are small and quick surveys that are strategically designed to measure employee engagement and collect employee feedback anonymously.
Click here to learn more about how to initiate a pulse survey.
Templates
Profit.co provides an option to create a new Pulse Survey template. Through crafting a fresh Pulse Survey template, you can establish customized survey inquiries and evaluate employee responses. Introducing novel questions in a new Pulse Survey using the template enables analysis of employee preferences, objectives, actions, and perspectives.

User Management
As long as your Profit.co account is active and subscribed to, you can always add new employees.
Users
Navigate to Settings → User Management → Active Users to add new users

Proxy for all users
Super users can proxy for all the users in their account by using the toggle user can proxy for all users in Profit Access Information.

Terminated users
When an employee leaves an organization, you may consider removing the employee’s profile from Profit. Click here to learn how to terminate/ revoke users from Profit.co.


Number Generation
You can now set a manual user ID/Employee ID while adding the user in Profit.co instead of auto generating a number for the user.

Departments
You can add departments/ sub departments and functions which are in your organization and add department heads and later users to the respective departments.

Job Titles
You can also add Job titles too the users and add it to their directory

Teams
You can add teams / sub teams which are in your organization and can add Team Leads and Team Members.

Grades
Organizations use employee grades to categorize positions and identify the level of complexity, decision-making, and skills needed for each position.
Creating Grades
Navigate to Settings —> User Management —> Grades and click on + Create Grade to create a grade.

Enter Grade code, Grade Name, and Validation cutoff to advance to the next grade level, also validation cutoff to be promoted into this grade. You can also add competencies to employee grades to get employees reviewed for the particular grade level.

Roles
Profit.co has five different user roles, that users can use to access, manage, and carry out different job functions, each with its own associated features and modules. Based on their designation, each employee of an organization can be given a suitable role. Profit.co also provides an option to create Add-on Roles for users to provide access or privileges to view certain modules.
Standard Roles
| Name | Description |
|---|---|
| Super User | Super User can access all the modules |
| Profit Manager | Has access to create, view, update, delete objectives & key results and access and create KPI |
| Profit User | Has access to create, view, update, delete objectives and key results |
| Profit Read Only | Has access to view only |
| Task User | Has access only for the task |

SECURITY
API Access
Using the API Access key, the superuser can connect the Profit.co app with other applications. This cutting-edge feature is exclusive to the enterprise plan subscription. The user also has the choice to regenerate the access code or key whenever necessary.

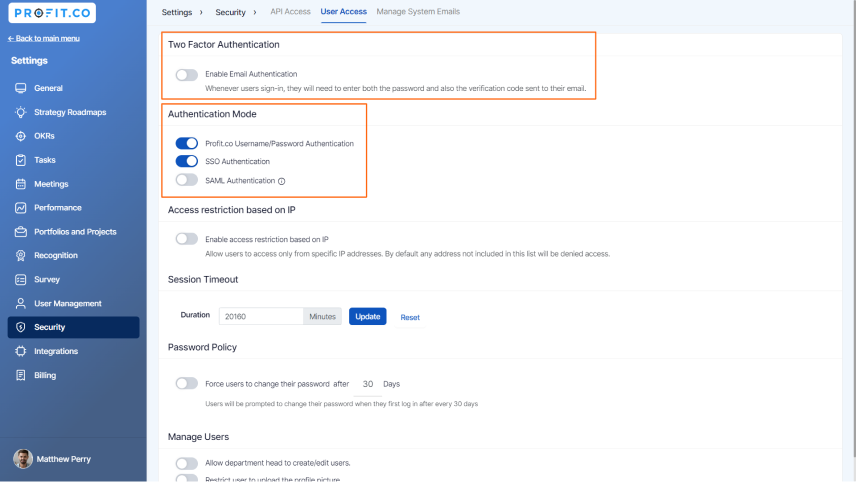
User Access
Navigate to Settings → Security → User Access from the left navigation panel.
Profit.co defines a session timeout as a passive period during which the user is inactive on the application for a predetermined amount of time as determined by the server. In addition to this, you can also force the user to change the password for specific periods regularly.

Profit.co also provides authentication codes for security breaches like unauthorized access and also you can restrict users from logging in through Profit.co username/ password.
INTEGRATIONS
Profit.co allows you to integrateyour account with 70+ independently designed work, project, tasks, dashboards, and system apps and manage your OKRs.

BILLING
You can manage billing and upgrade your license via the Billing option in Settings. Know our pricing plans and how to upgrade your account. Also, know how to repurchase plans that expiredand purchase new licenses in Profit.co.

Delete Account
You can delete your Profit.co Account at any time via Settings. Deleting your account stops the email notification as well. Deleting your account will delete all your data and information from Profit.co database. Once deleted, your data cannot be restored.
