Install Profit.co OKR Software app in Jira software
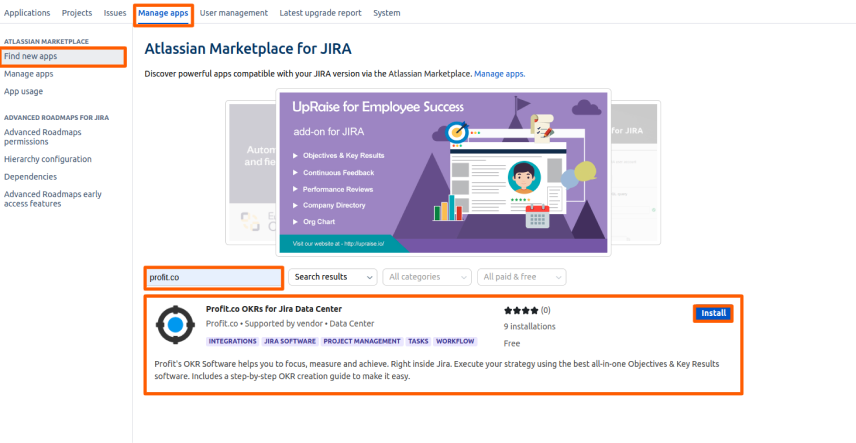
To install the Jira Data Center Plugin, click on the Manage Apps button.
Under Manage Apps, enter Profit.co OKRs for Jira Data Center in the Find new Apps search bar. Then click on the Install button.
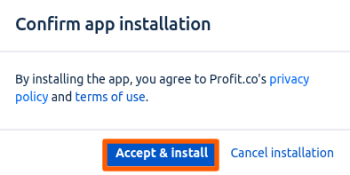
Click on the Accept & Install button
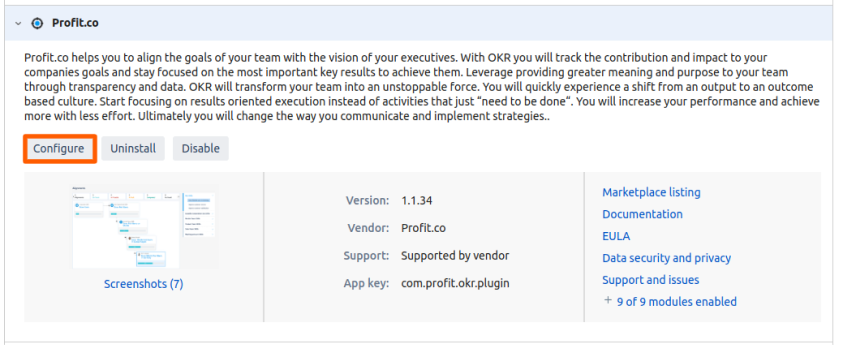
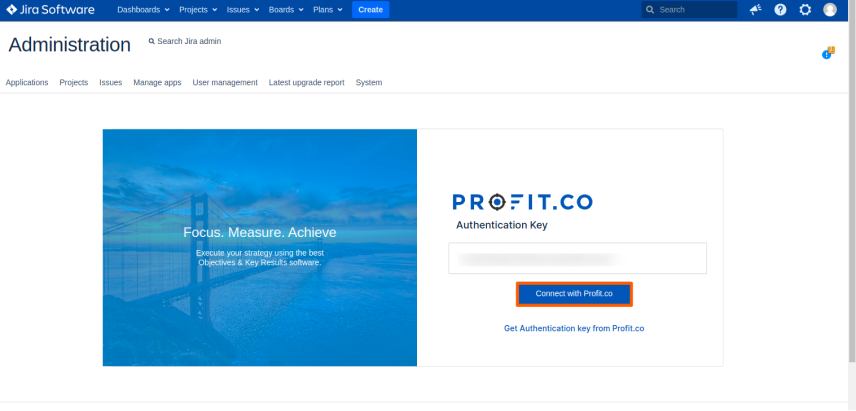
Click on the Configure button and enter the Authentication key.
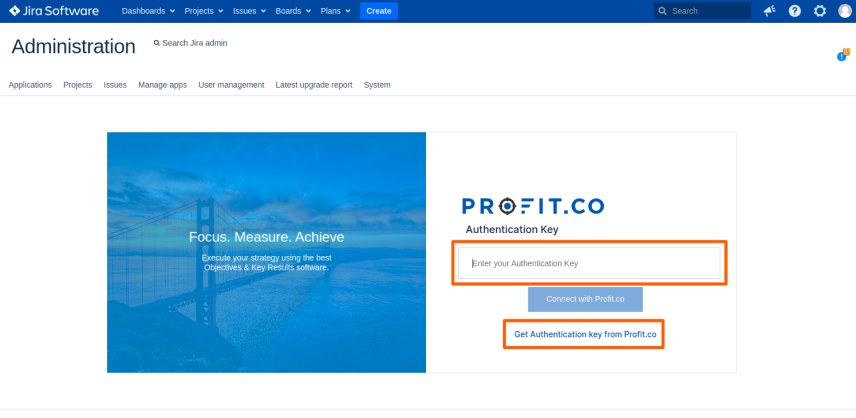
To get the Authentication Key follow the below Steps:
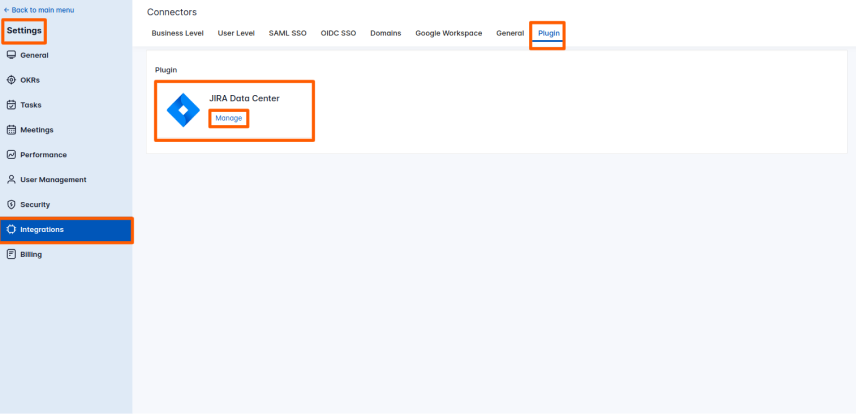
Navigate to Settings → Integrations from the left navigation panel. On the Integrations page, Click on the Plugin bar. Then, click the Manage button for Jira Data Center on the plugin page.
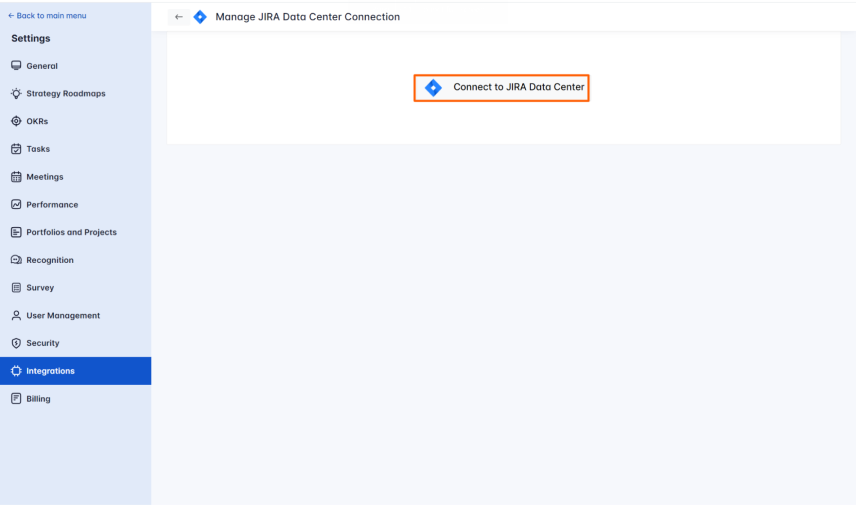
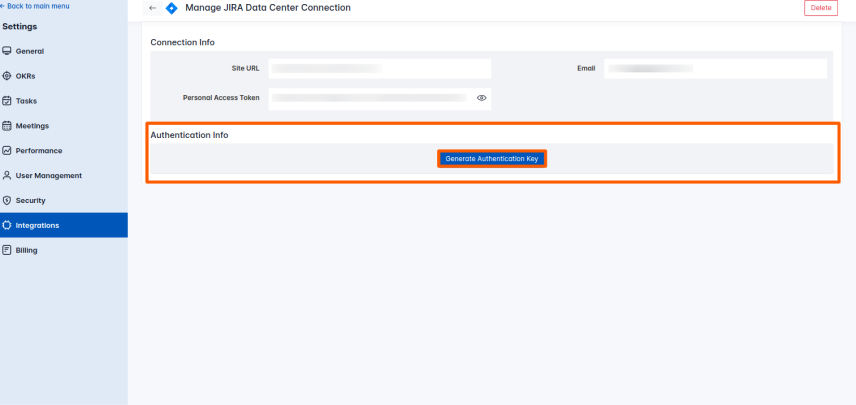
Then, Click the Connect to Jira Datacenter button
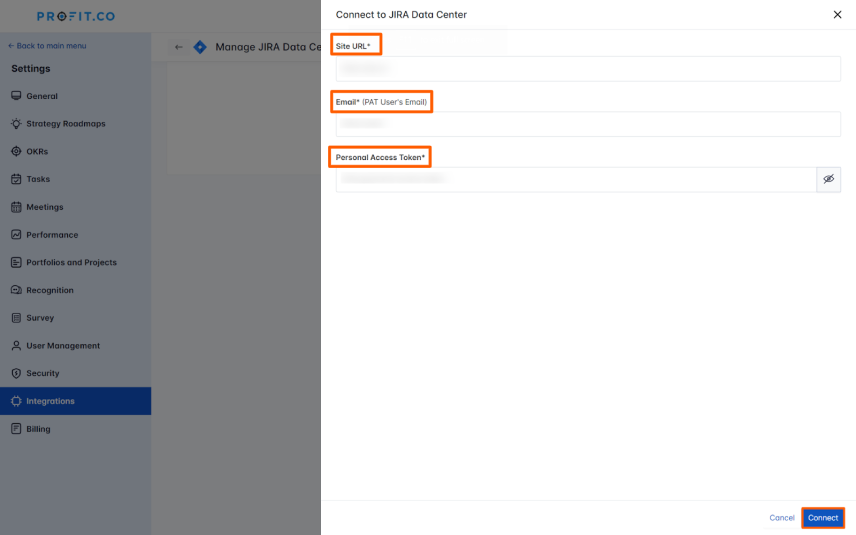
Note: To set up the Site URL, switch to your Jira Datacenter instance and copy the URL. For the Personal Access Token, go to Jira DC, click on your Profile, select Personal Access Token, and then click the Create Token button. Copy the token and paste it into the Profit.co Connect page for the Jira Data Center.
Once Connected, Click on the Generate Authentication Key button.
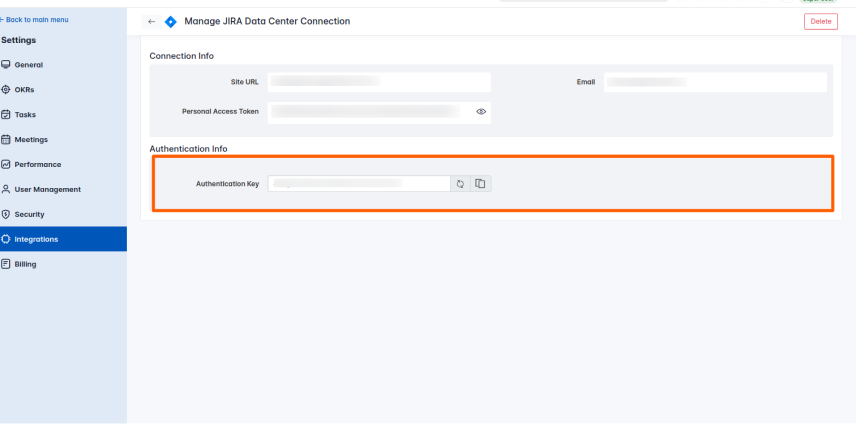
After obtaining the Authentication Key, paste the key and click the Connect with Profit.co button.
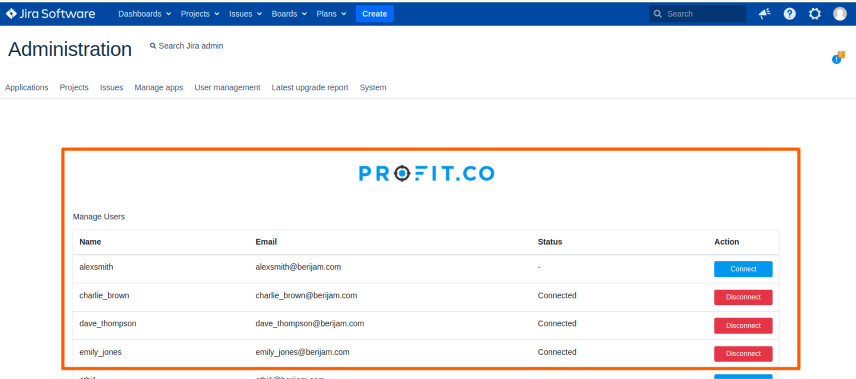
Note: Only users who are listed in both the Profit.co account and Jira will be displayed here. Once connected, you will be able to see the plugin.
Why are we using webhook?
Jira epics are created as key results in Profit.co. In order to track the epic progress, you need to create a webhook listener that can track events such as Issues created, updated, and deleted.
By calling these webhook listeners, profit can track the epic progress and update the key result/task linked to it.
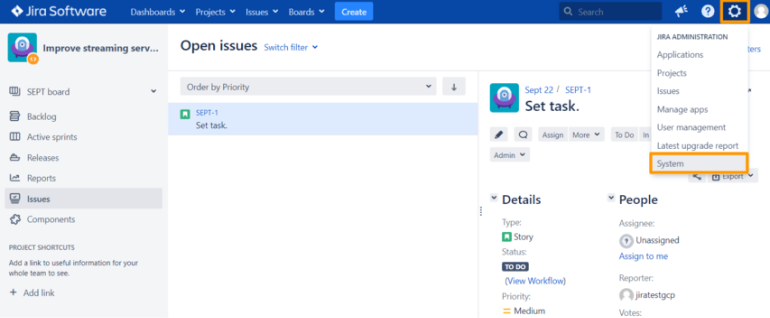
Click on the Settings icon on the top right corner of your screen and choose System.
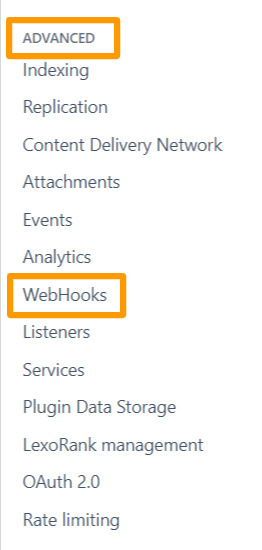
Select Advanced → Webhooks in the left menu to open the Webhooks page, which shows a list of all existing webhooks.
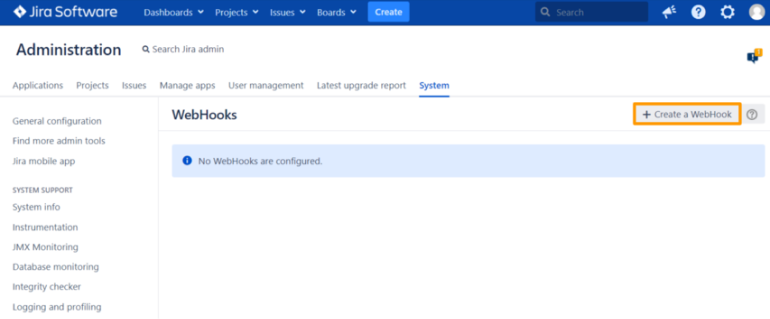
Click the Create a WebHook button to create a new webhook listener for Profit.co application.
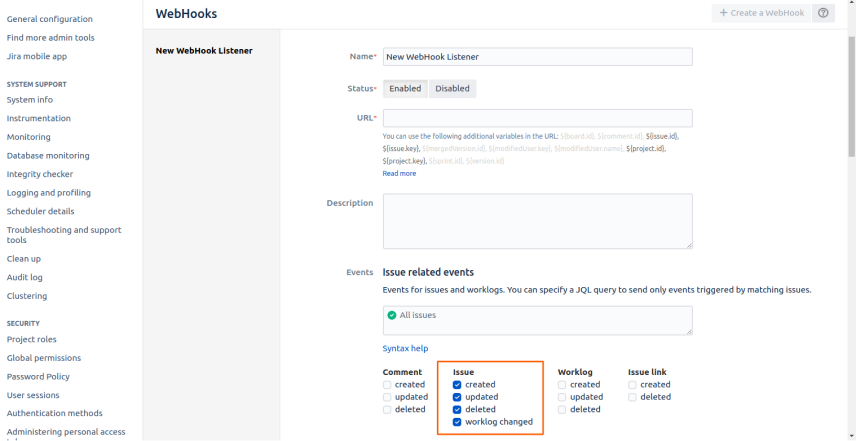
Once you click the Create a WebHook button, you can see the form submission. Enter the Name in the Name column and Enter the below URL in the URL column.
In below you need to select the Issue type under the Issue column and click the Create button to save your changes.
Create JIRA Epic as a key Result in Profit.co
Profit.co for Jira plug-in allows you to automatically create your Jira epic as a key result under any of your OKRs in Profit.co.
You can track the progress of the linked OKR in your Jira epic.
Step 1
Login to the Jira and view the epic from the list. Navigate to the detail page of the Epic you want to create as a key result in Profit.co OKR software.
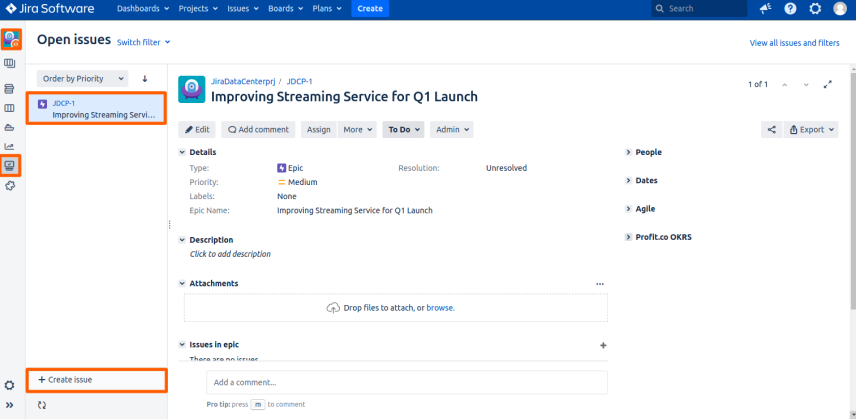
Once you click on the Profit.co OKRs Plugin you will get the Click to view all/ linked OKRs.
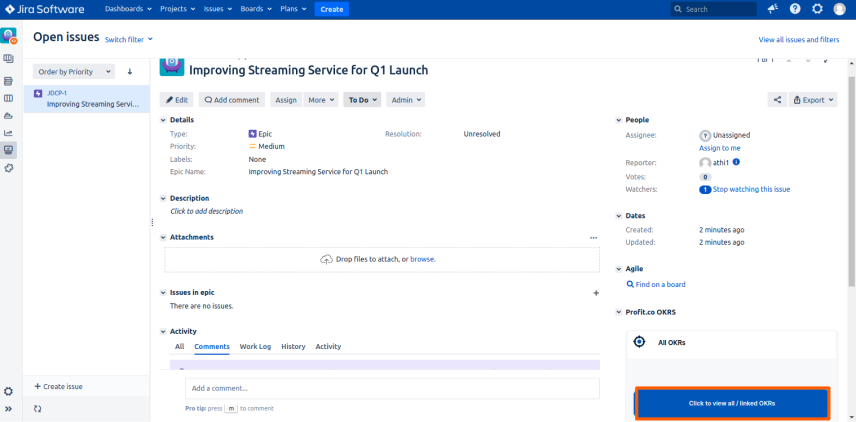
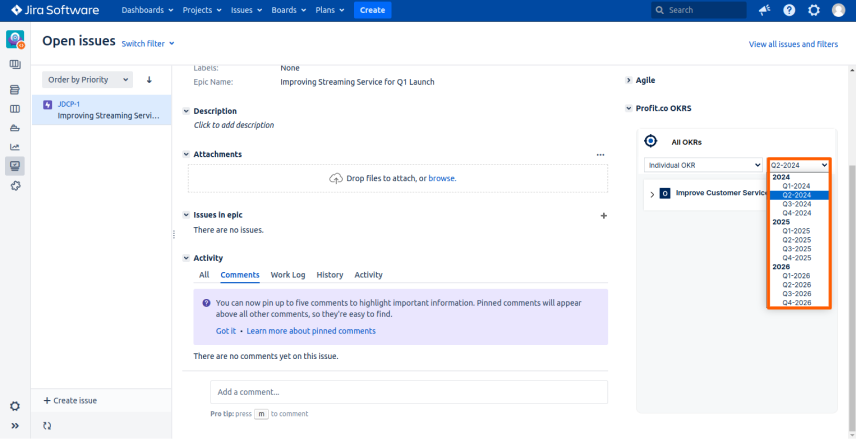
>Step 2
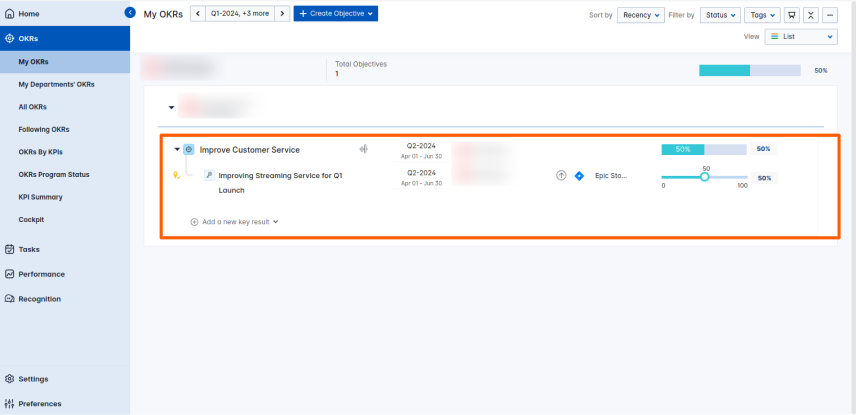
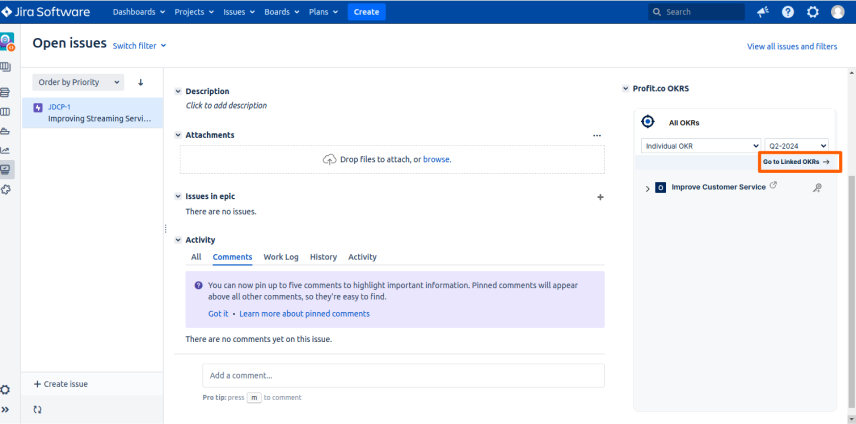
While clicking on the Click to view all/linked OKRs, it will display the title All My OKRs And the Target period of your OKRs.
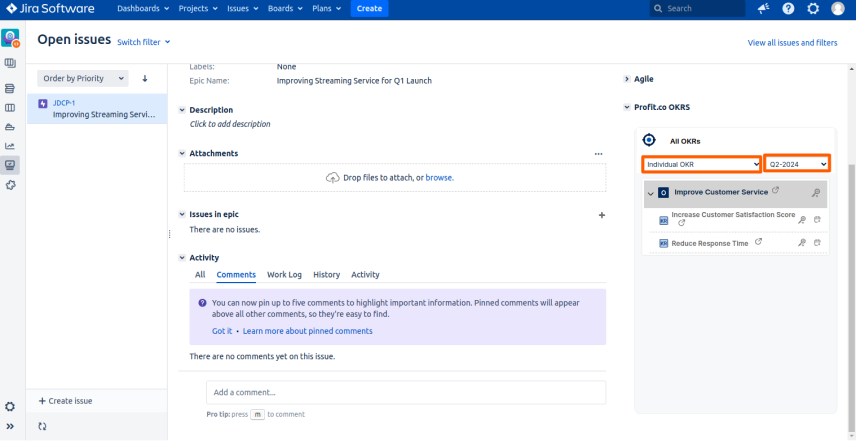
Step 3
Below the title “All My OKRs”, the OKRs level dropdown will be displayed
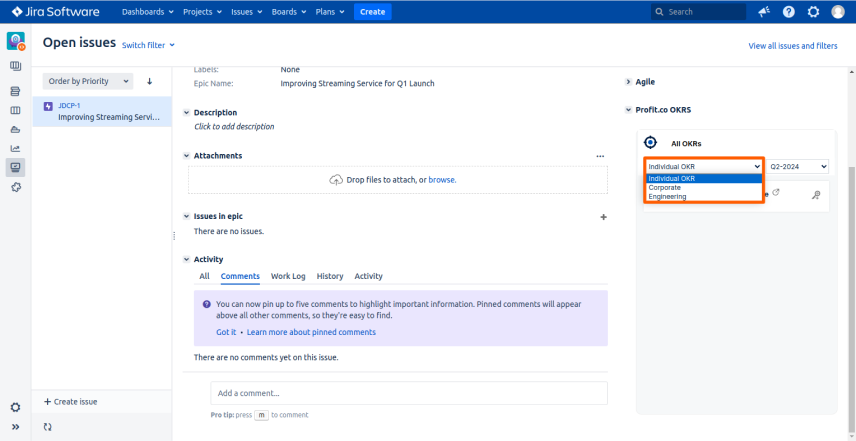
Below the title “Period drop-down,” the target period for your OKRs will be displayed.
Step 4
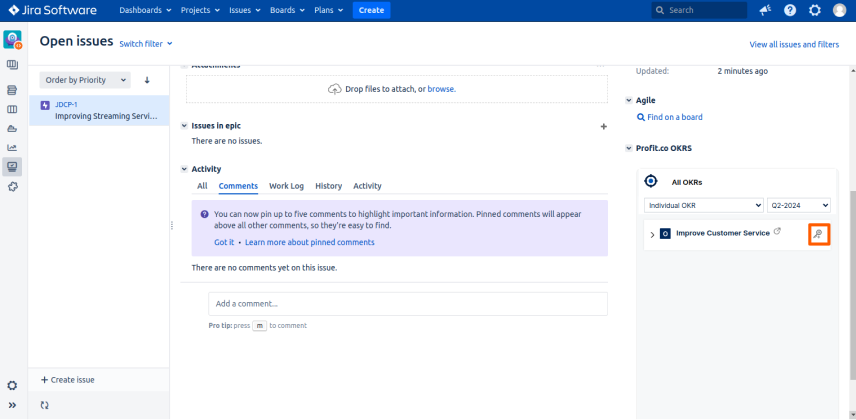
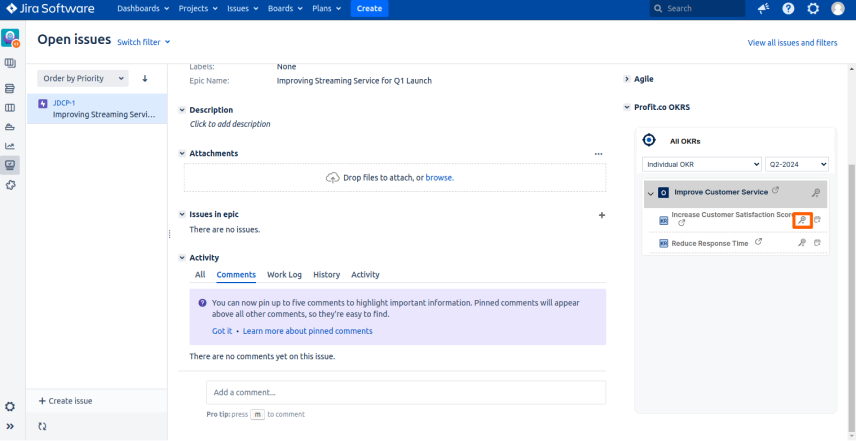
In the OKRs list, users can see the Key icon which is displayed next to the Objective name
Step 5
Clicking on the Key icon will display all the KPIs below the Objective name
Note: The user who has access to create OKRs in that particular OKR level can view this Key icon
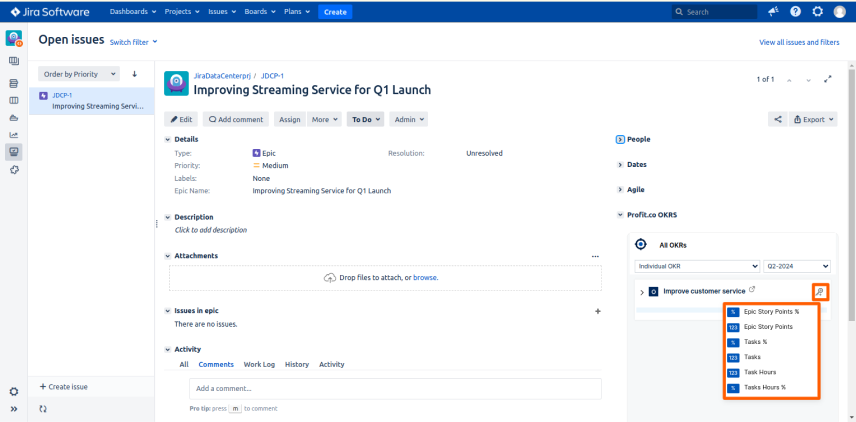
Step 6
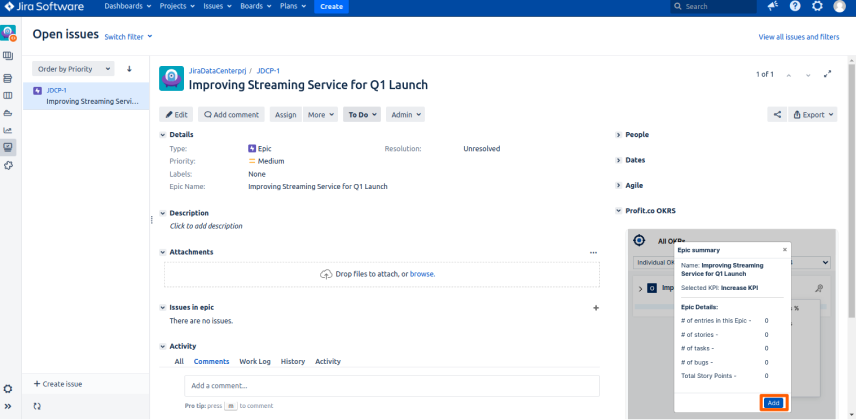
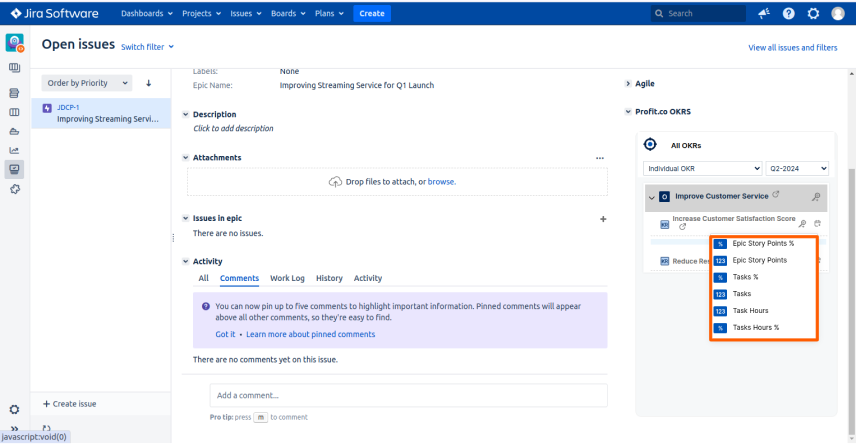
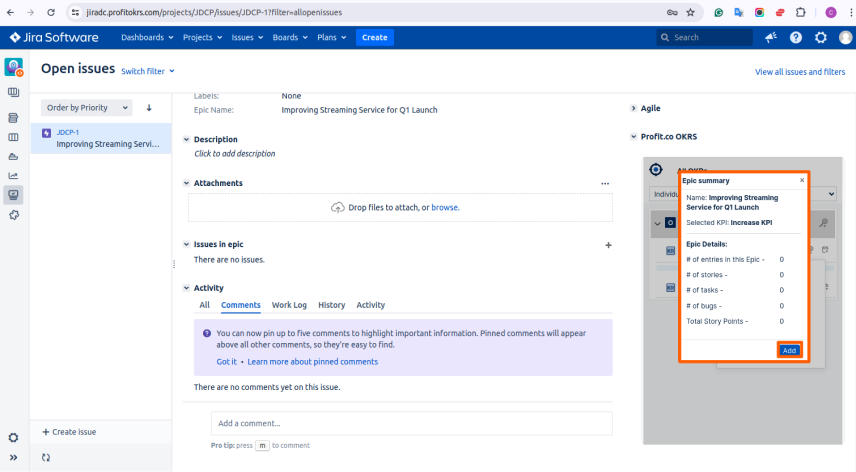
Once you click on the KPI name, it will display the summary of the selected KPI
Step 7
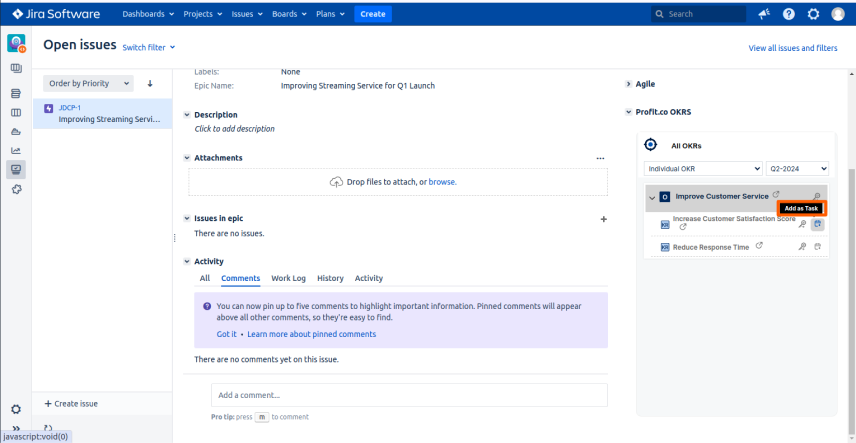
If the user wants to link these KPIs with the Objective, they can click on the Add button
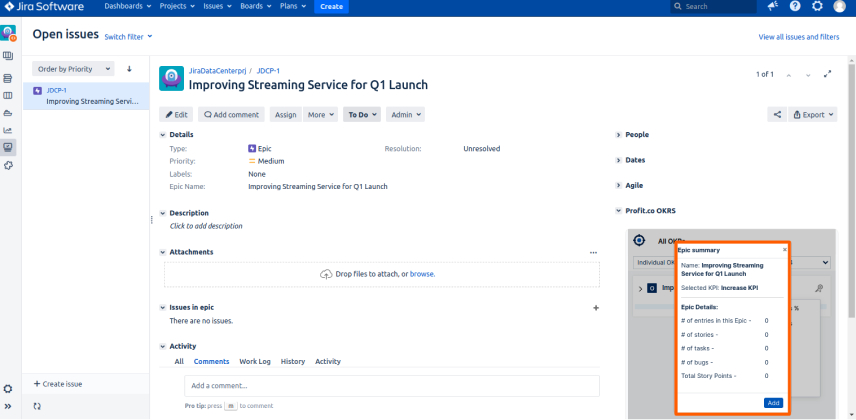
Step 8
Once the user links any KPI with the Objective, the details of the Key Result which is linked with the KPI will be displayed.
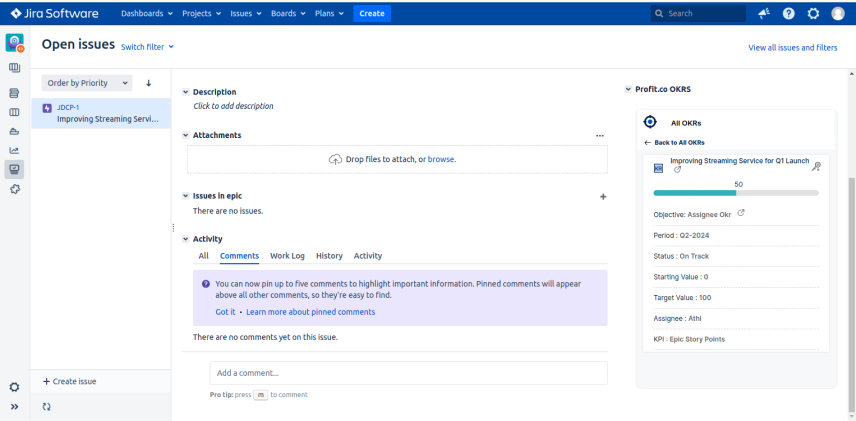
It will be reflected in the corresponding user’s Profit.co firm too
Step 9
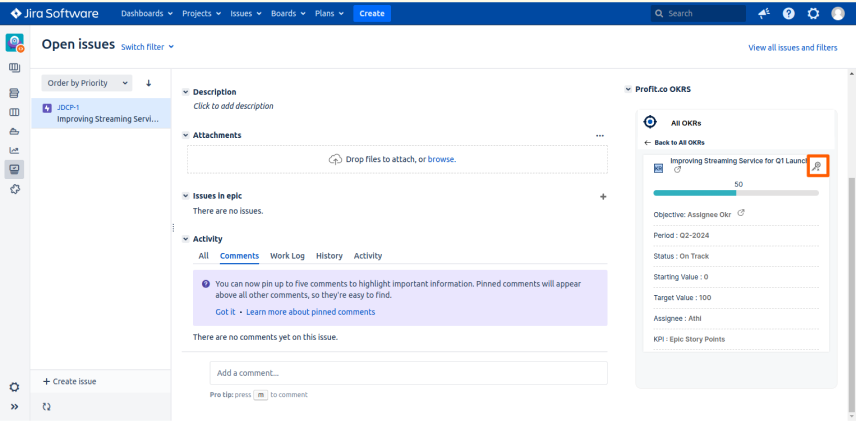
If the user wants to unlink the selected KPI from the Objective, they can click on the “Unlink” icon which is displayed next to the Objective name
It will be reflected in the corresponding user’s Profit.co firm too
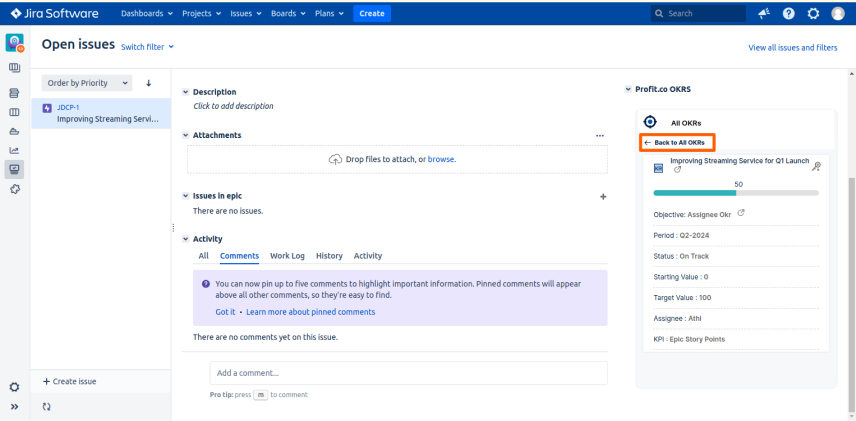
Step 10
If the user wants to go back to All My OKRs, they can click on the “Back to All My OKRs” option which is displayed with the “<-” on the top of the detailed page
Step 11
After clicking on the Back option, the OKR list page will be displayed. The Key icon will not be displayed in the Objective, once it is linked with any KPIs
Create a Jira Epic as a Sub-Key Result
Follow the same steps as given above for the process of creating key results.
To create a subkey result choose the Key Result that you want.
In Jira, select the dropdown and click the Key icon on the key result to add the sub key result.
You’ll be getting the KPI to select for the sub key result.
For instance, let’s add the KPI Tasks in Numeric. Finally, click on Add.
The sub-key result will be shown in Jira.

Also, you can see the subkey result with the updated progress in Profit.co
Note: The information from the Task Due date and Assignee fields in the Jira plugin will also appear in Profit.co.This option is not applicable for associated Key results.
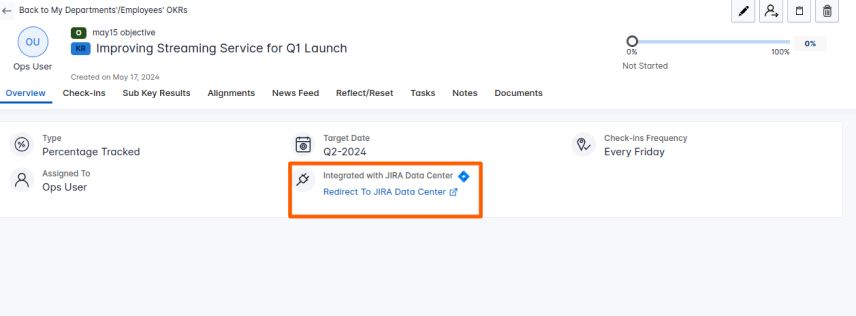
Clicking on the Redirect to Jira button will take you directly to Jira.
Note: Clicking on the Profit.co hyperlink button will lead to redirection to the Jira account.
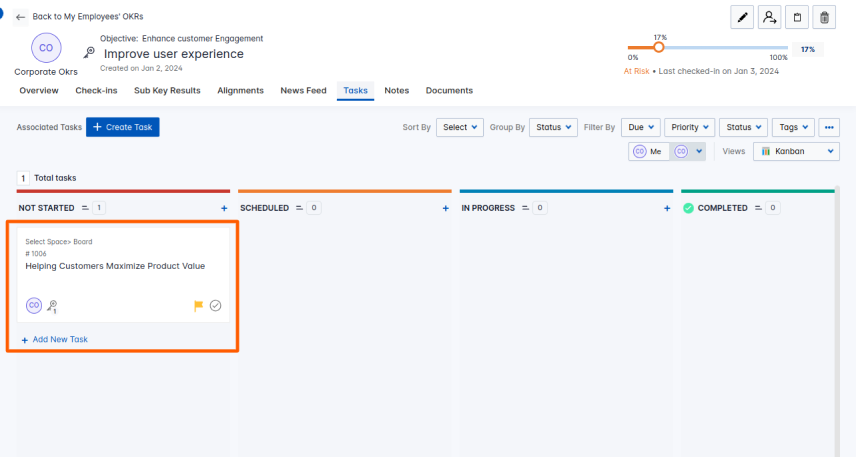
Create a Jira Epic as a Task
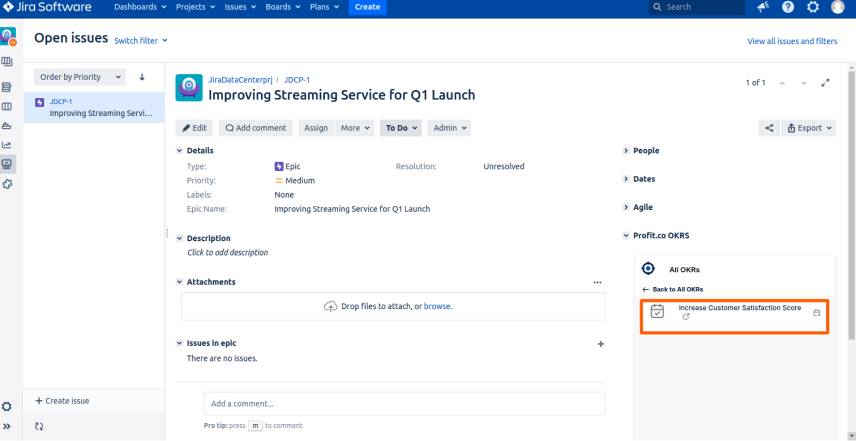
To create a task in Profit.co, click on the Dropdown menu of the selected Objective and click on the task icon to add it as a Task.
Finally in Jira, it’ll be added as a task.
Note: If you want to unlink the task click on the same task icon.
In Profit.co you will be able to see the task associated with the key result.
Note: If the epic status reaches the Done stage, it will be indicated as the Completed status for tasks in Profit.co