


Ping Identity is an identity and access management software used to securely manage and protect digital identities. It is used to protect customer data, maintain secure access to resources, and securely manage customer accounts.
- Configure Ping Identity SSO for Profit.co
- Configure Ping Identity User Provisioning for Profit.co
Configure Ping Identity SSO for Profit.co
Here’s a walk-through of setting up PingIdentity as your SAML identity provider for Profit.co
Step 1:
Log in to your Ping Identity account using your credentials.
Step 2:
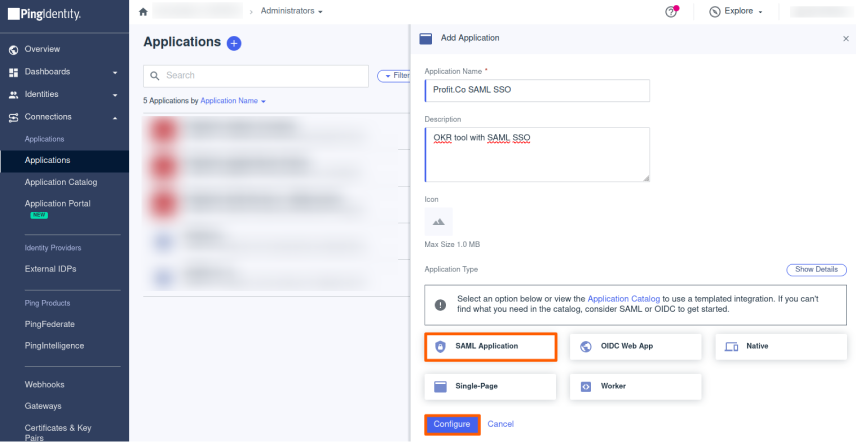
Click on Connections and go to Applications. Click on the + button to add an Application

Step 3:
Enter the Application name, Description. Select the SAML application box and click on Configure
Step 4:
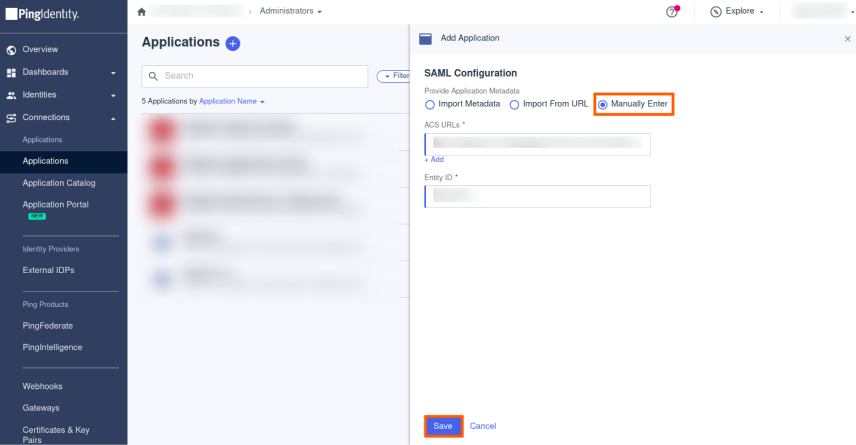
Click on “Manually Enter” and provide the ACS URL and the Entity ID and click on Save.
| Assertion Consumer Service Url |  |
| ACS URL |
US region (or)EU region |
|---|---|
| Entity id | User’s choice |
Step 5:
After configuring the application, Enable the toggle in the top right corner of the application and go to the Attribute Mappings page and click on edit attributes and set the attributes.
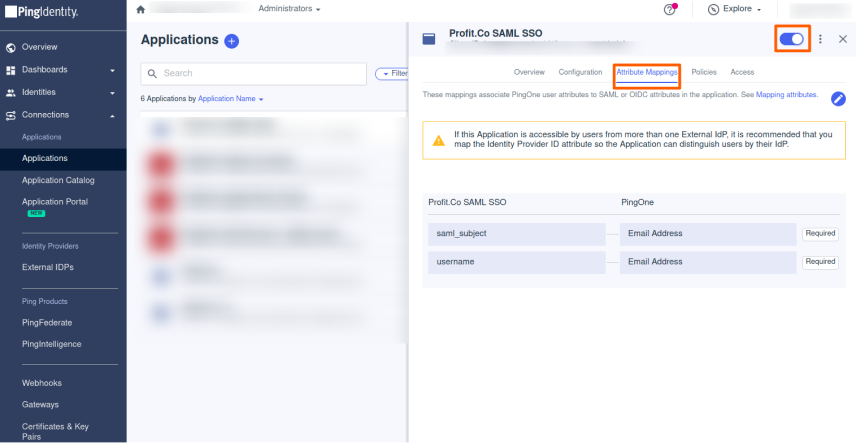
Click the Save button after mapping the attributes as shown below.
| Application attribute | Identity Bridge Attribute |
| Username | Email Address |
| saml_subject | Email Address |

Step 6:
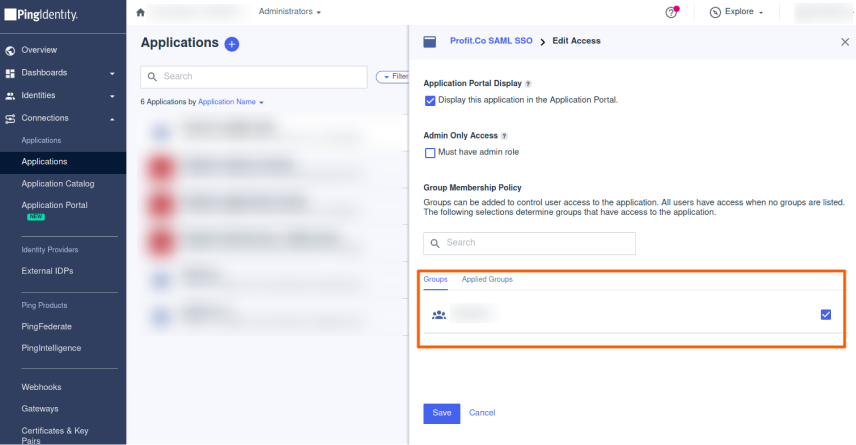
Add the Groups to the Access page and then click Save.
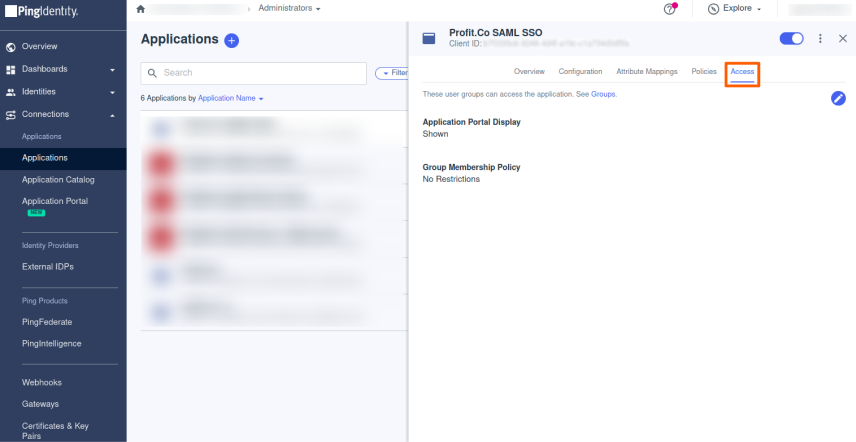
Step 7:
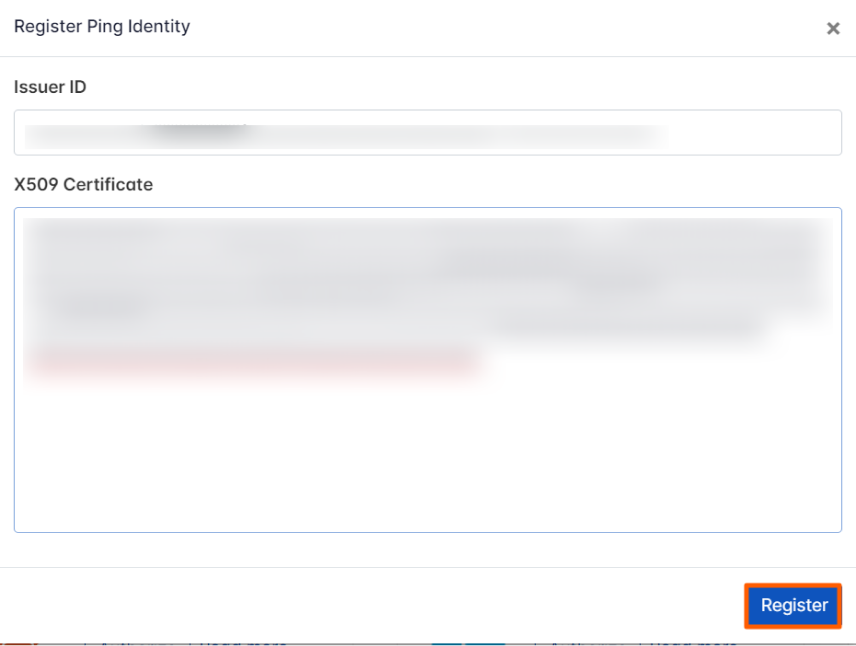
After adding the access group, navigate to Configuration and copy the Issue ID. You can get the X509 Certificate by clicking on “Download Metadata” and register the Ping ID in Profit.co.

To register Ping Id in Profit.co navigate to the Settings → Integrations from the left navigation panel. Switch to the SAML SSO tab and click on the Ping Identity Authorize button.

Step 8:
Once the configuration is completed. Copy the Initiate SSO URL and open the profit application to initiate the SSO.

Configure Ping Identity User Provisioning for Profit.co
The following provisioning features are supported:
- Create Users – Users assigned to the Profit.co App will be created in Profit.co User Management.
- Update Users – Updates made to the user’s profile in Ping Identity will be pushed to Profit.co User Management.
- Deactivate Users – Suspending the user in Ping Identity or removing the user from the User Group of Profit.co App will deactivate the user in Profit.co User Management.
- Reactivate Users – User accounts can be reactivated in Profit.co by assigning the removed users back to Profit.co User Group in Ping Identity.
Requirements
You need Admin account access in Profit.co to get the API Key and SCIM Key to form the SCIM Token key.
Step 1:
Login to your PingID account
Navigate to the Provisioning menu from the left navigation panel and click on the + symbol. On the Create a new Connection page, choose the required Connection type (Identity Store).


Step 2:
Search for SCIM, select the SCIM Outbound connector, and click on Next.

Enter the Application Name, Description and click on Next.

Step 3:
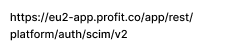
Enter the SCIM Base URL, select the authentication type as OAuth 2 Bearer Token, and paste the OAuth Access Token
SCIM base URL should be either


(or)

OAuth Access token can be found on your Profit.Co account
Navigate to Settings -> Security -> Copy the Api Key and the SCIM Key and use them in the following format API_KEY:SCIM_KEY
After entering the above details click on Test Connection.

Once the test connection is successful click on Next.
On the next page remove the User filter Expression and set the User Identifier as work email

Update the actions according to your preference, click on finish, and enable the toggle on the next page.

Note: If you don’t have a PingOne Directory set up already, it will be created automatically.
Step 4:
Switch back to the provisioning menu, click on + again, and click on New Rule -> Create Rule after entering the name and description.

On the next page select your target application(the application created in steps 1-3) and select the source as your PingOne Directory and click on Save.


Step 5:
In the next step click on Edit User filter and set the condition as Attribute -> Group names Operator -> Contains Value -> The group name for which you need User Provisioning(user groups are created on the groups section in the Identity section in the left menu)


After setting the condition click on Save.
Step 6:
On the configurations page -> Attribute mapping the supported attributes will be displayed.

Click on the edit attributes and set: -> Email Address -> userName -> userName -> workEmail. To sync the job titles from PingID select +Add and set the PingOne Directory mapping to Title and Profit.co mapping to title Once done, click on Save.

Step 7:
Click on the enable toggle in the top right corner and SCIM user provisioning will start.


- The supported attributes are,
- Given name
- Family name
- Email Address
- Active Status
- Job title
To learn more about best practices for integrating third-party apps with Profit.co, click here