
Overview
Cisco Duo is an identity management service that eliminates the username and password struggle. Duo authenticates your users using existing on-premises or cloud-based directory credentials and prompts for two-factor authentication before permitting access. Single Sign-On (SSO) from Duo provides users with an easy and consistent login experience for any and every application, whether it’s on-premises or cloud-based.
The Cisco Duo SSO integration in Profit.co uses SAML authentication to allow users to log in to Profit.co securely through Duo, with centralized identity verification and optional two-factor authentication.
What This Integration Supports
With the Cisco Duo SSO integration, you can:
- Enable SAML-based Single Sign-On for Profit.co
- Authenticate users via Duo using existing directory credentials
- Provision users from Cisco Duo to Profit.co User Management via SCIM
- Automatically deactivate or remove users in Profit.co when removed from a Duo group
- Enforce two-factor authentication (2FA) before granting access
- Manage user enrollment and device verification from the Duo Admin Panel
- Support multiple Profit.co regions (US, EU, ME, SA)
Prerequisites
Before starting, ensure the following requirements are met:
- You have a valid Cisco Duo admin account
- You are logged in as a Super User in Profit.co
- Users have valid email addresses configured in Duo
- The Profit.co application is accessible from your environment
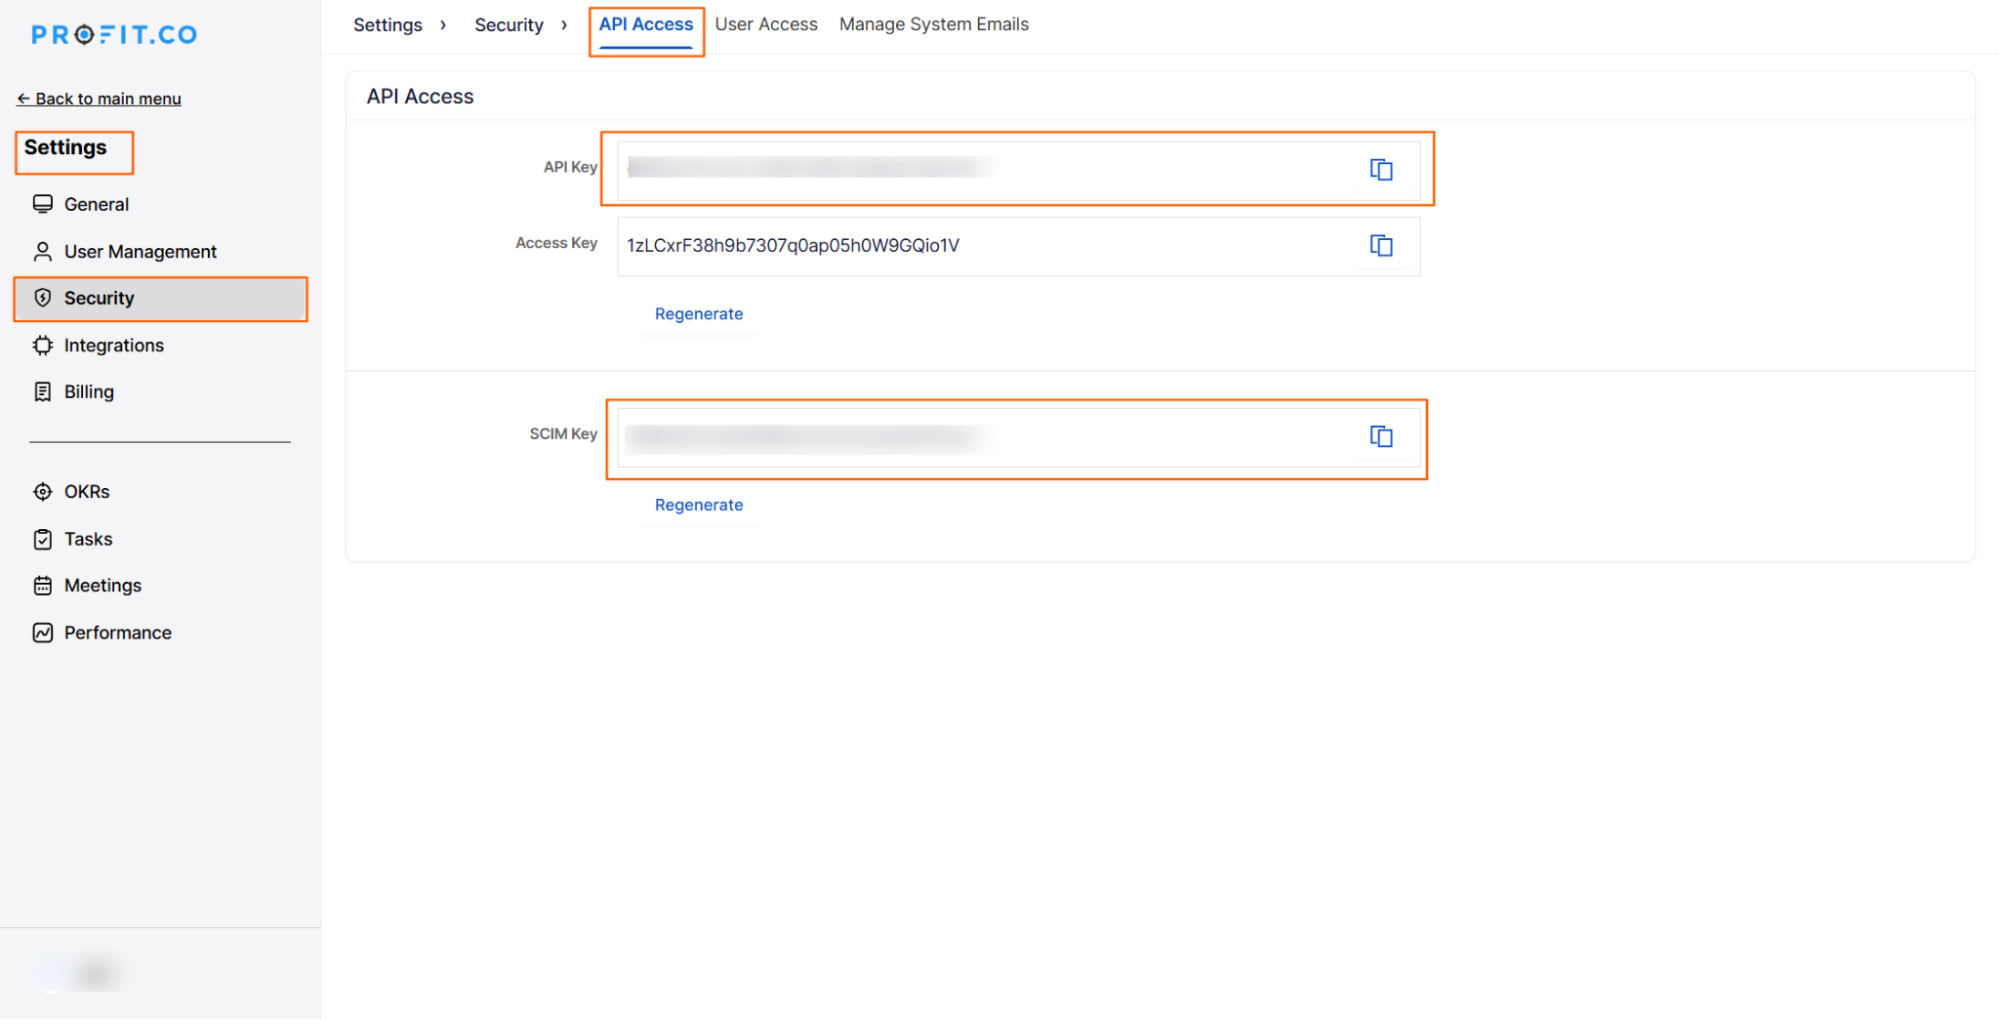
- For user provisioning: You have the API Key and SCIM Key from Profit.co Settings -> Security -> API Access
Note: Only Super Users can configure SSO integrations in Profit.co.
Configure Cisco Duo SSO
Step 1:
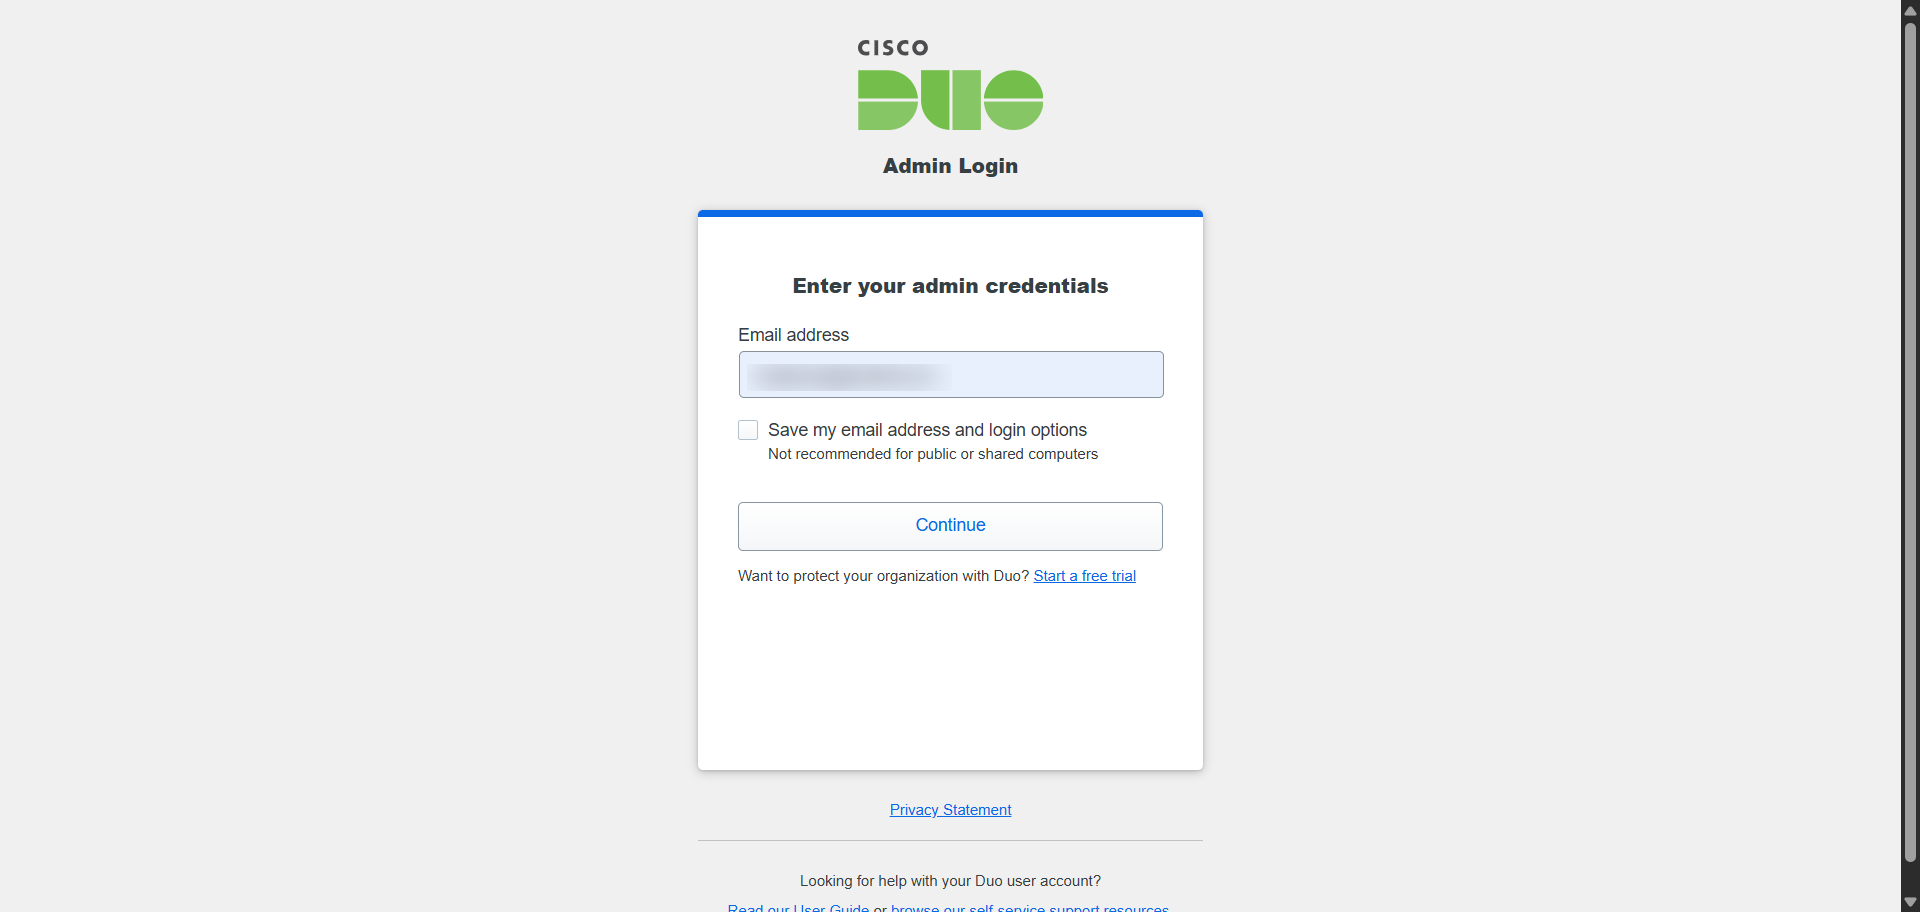
Log in to your Duo account as an admin or register at https://admin.duosecurity.com/.
Enter your admin credentials and click Continue to proceed.
Step 2:
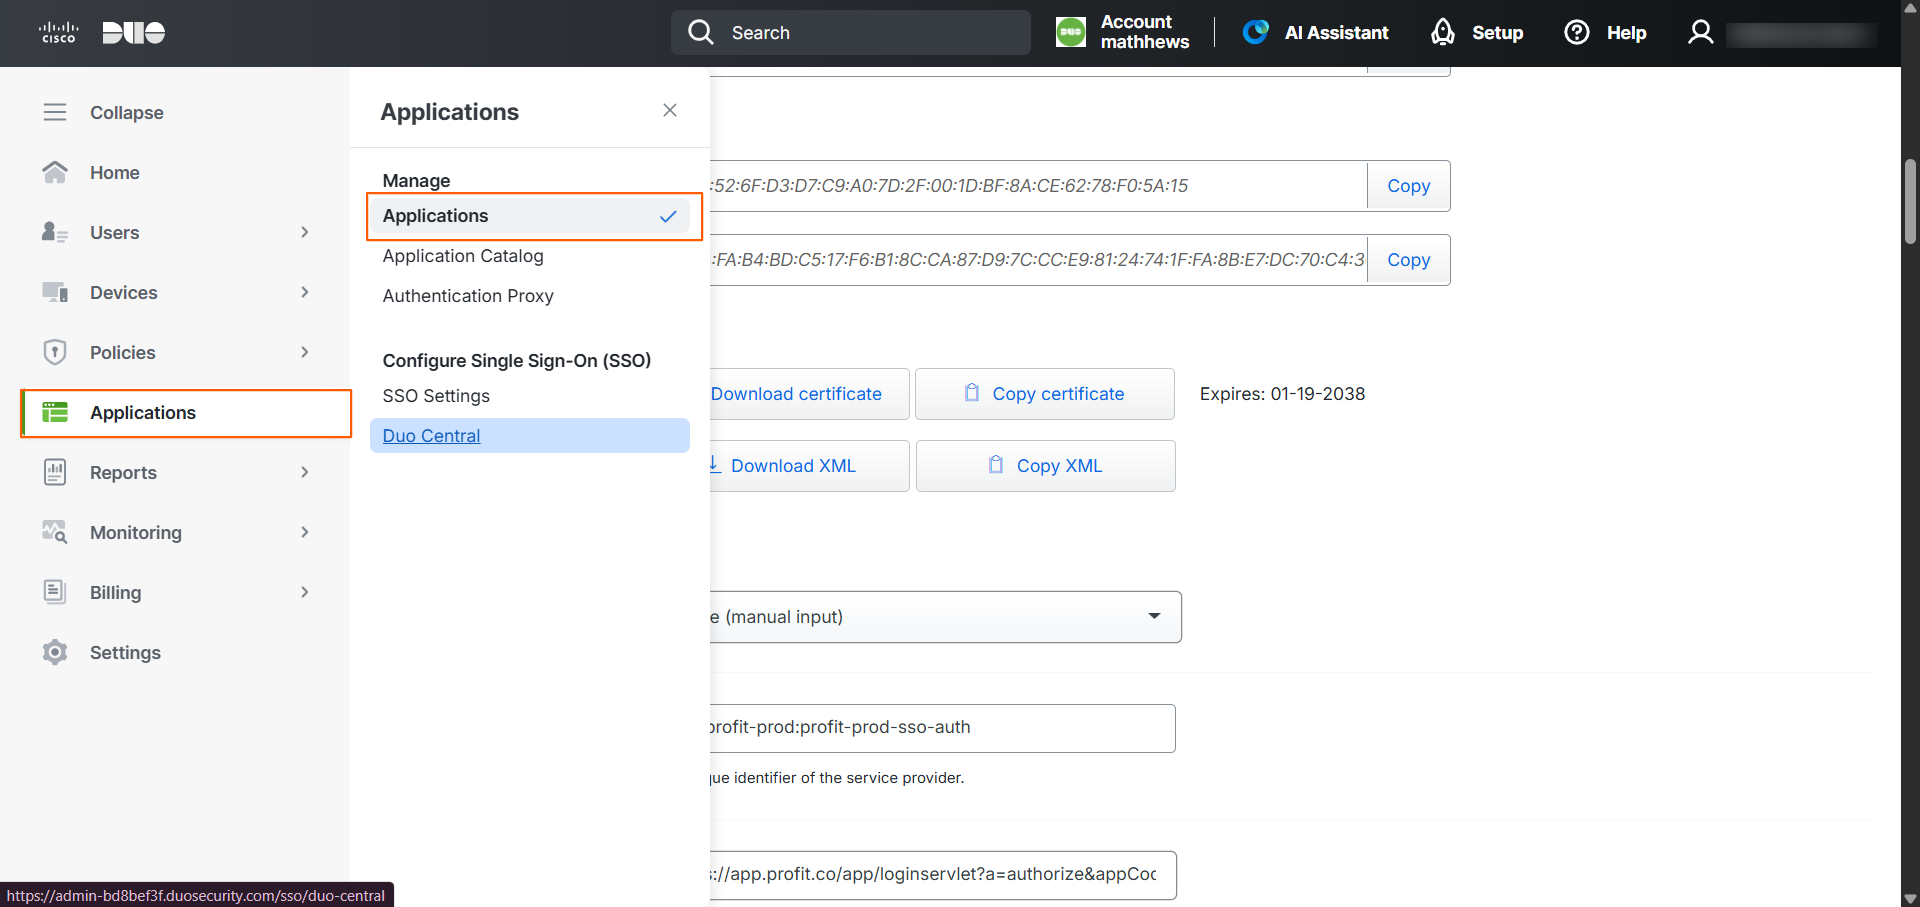
Navigate to the Applications tab and select Application in the panel.
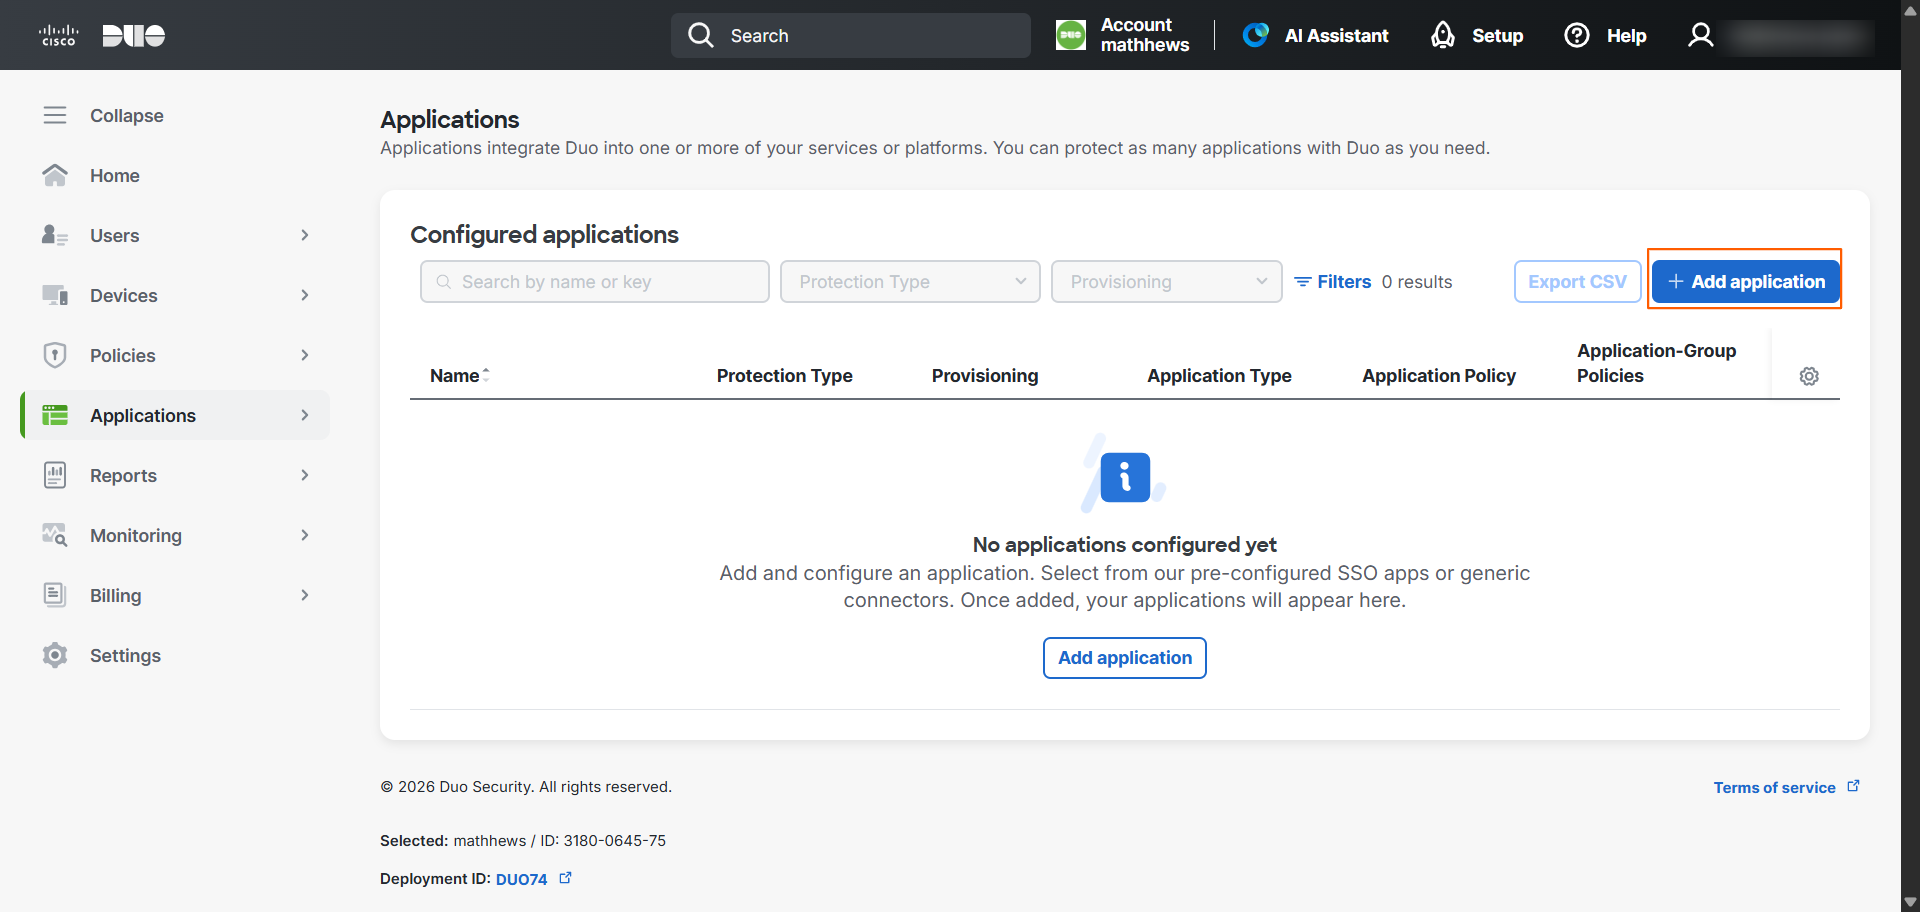
Click the + Add Application button to open the application catalog.
Step 3:
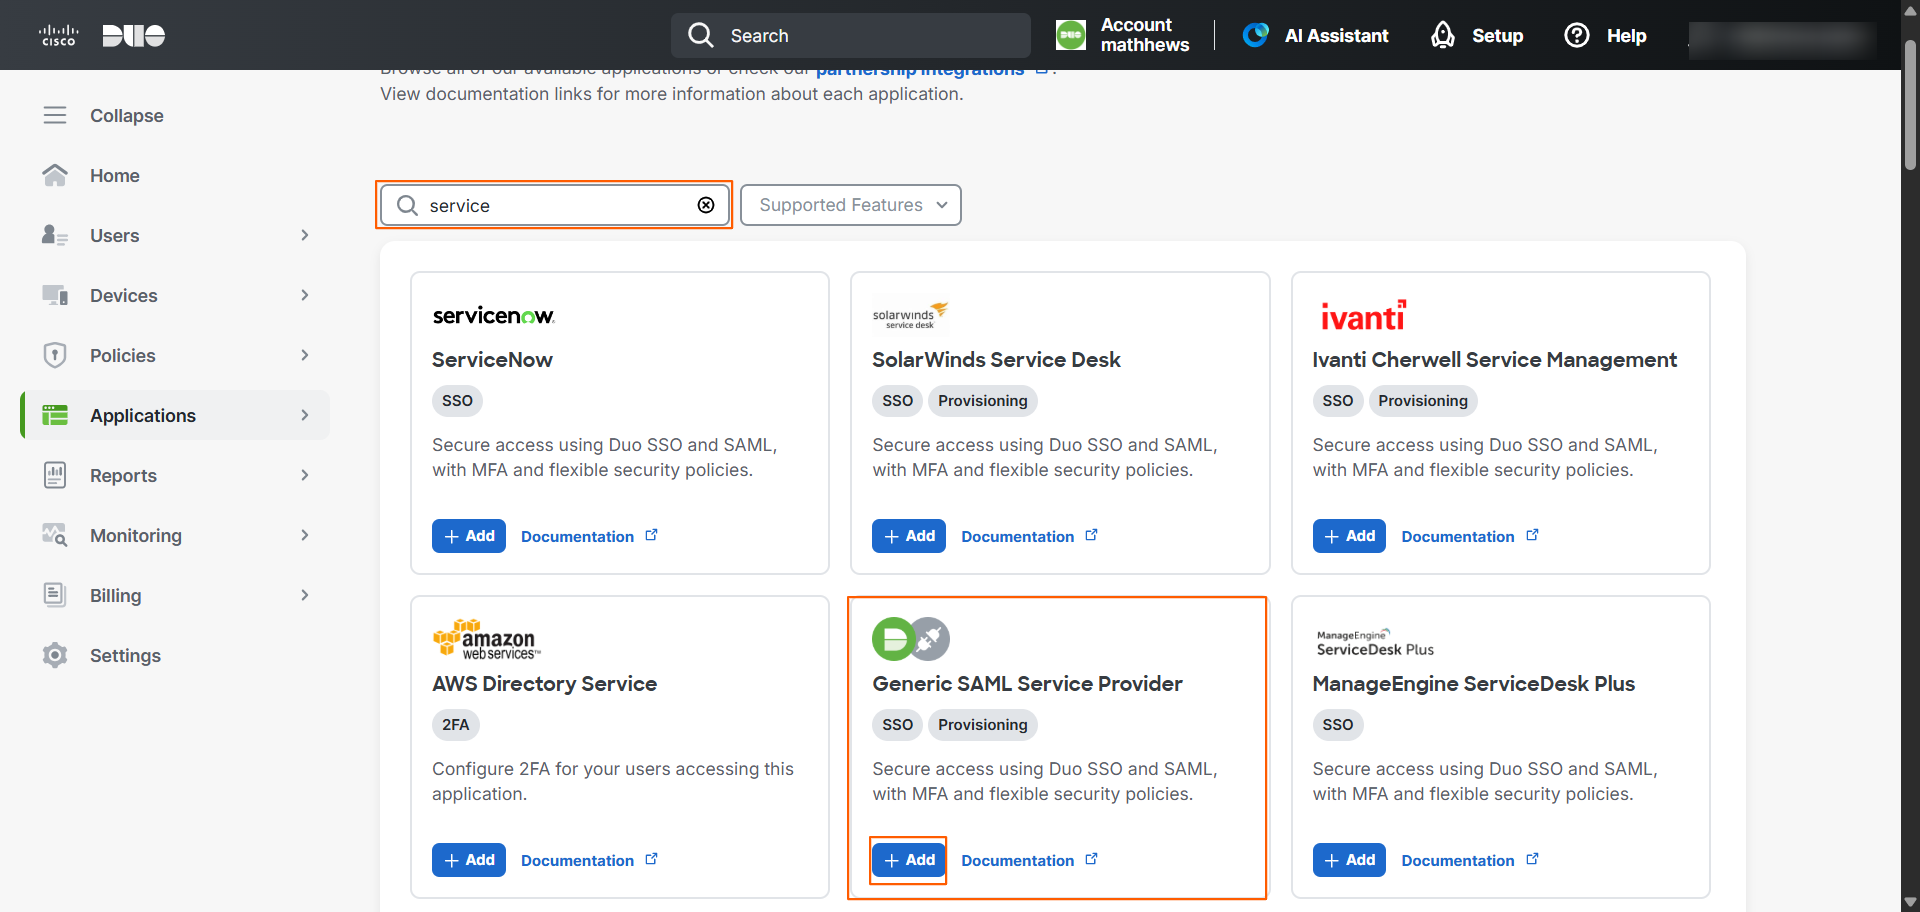
In the application catalog search bar, select Generic SAML Service Provider from the list, then click + Add.
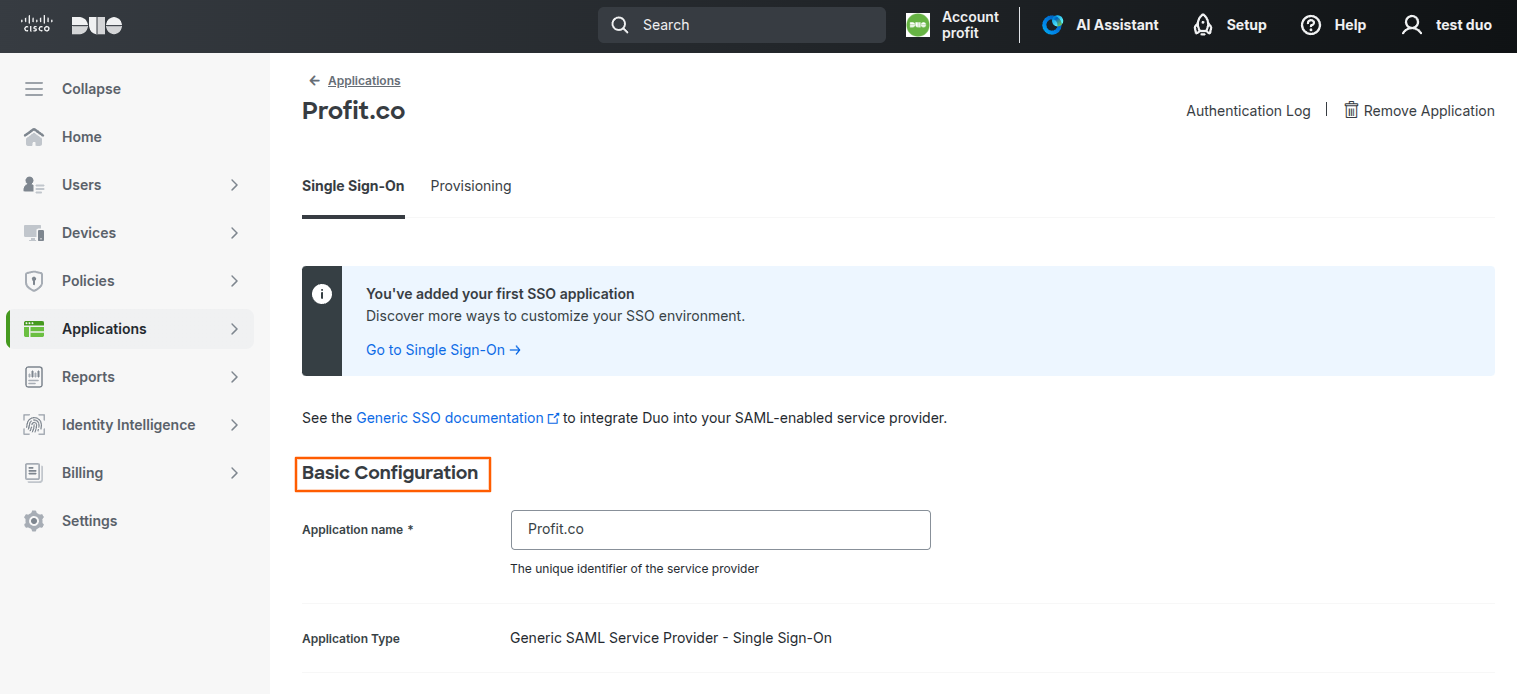
Enter the Application Name under Basic Configuration. Enter a name based on your preference (e.g. Profit.co).
Step 4:
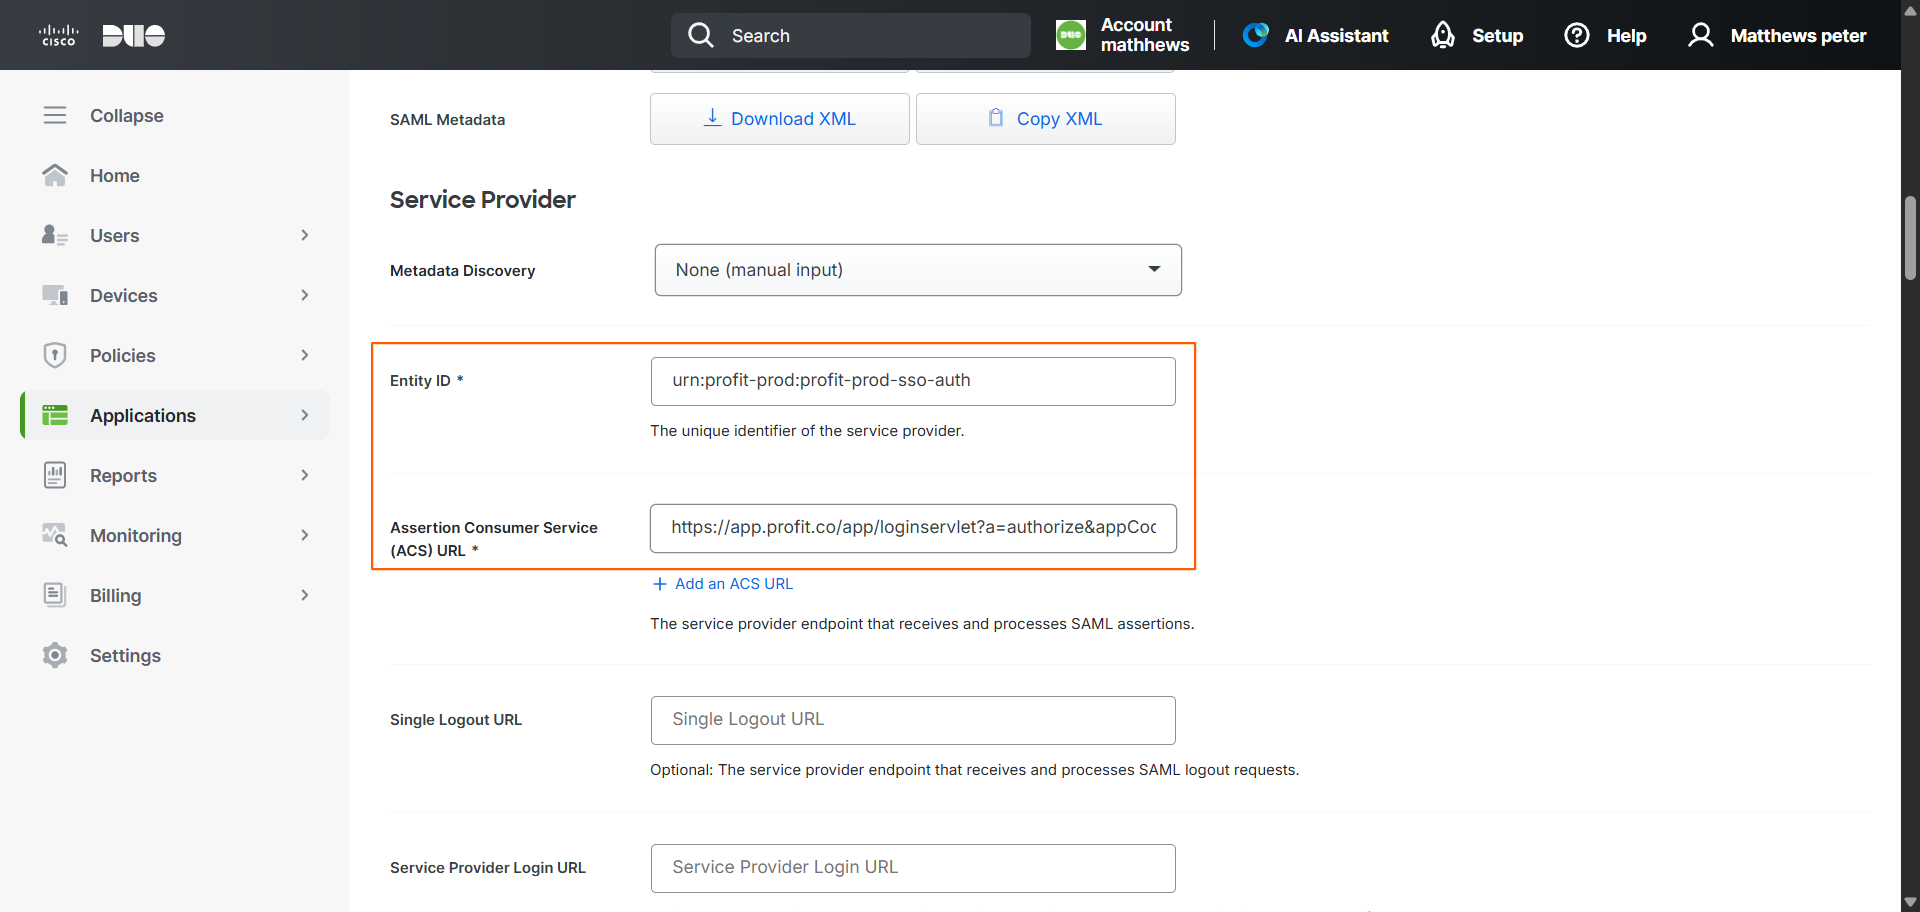
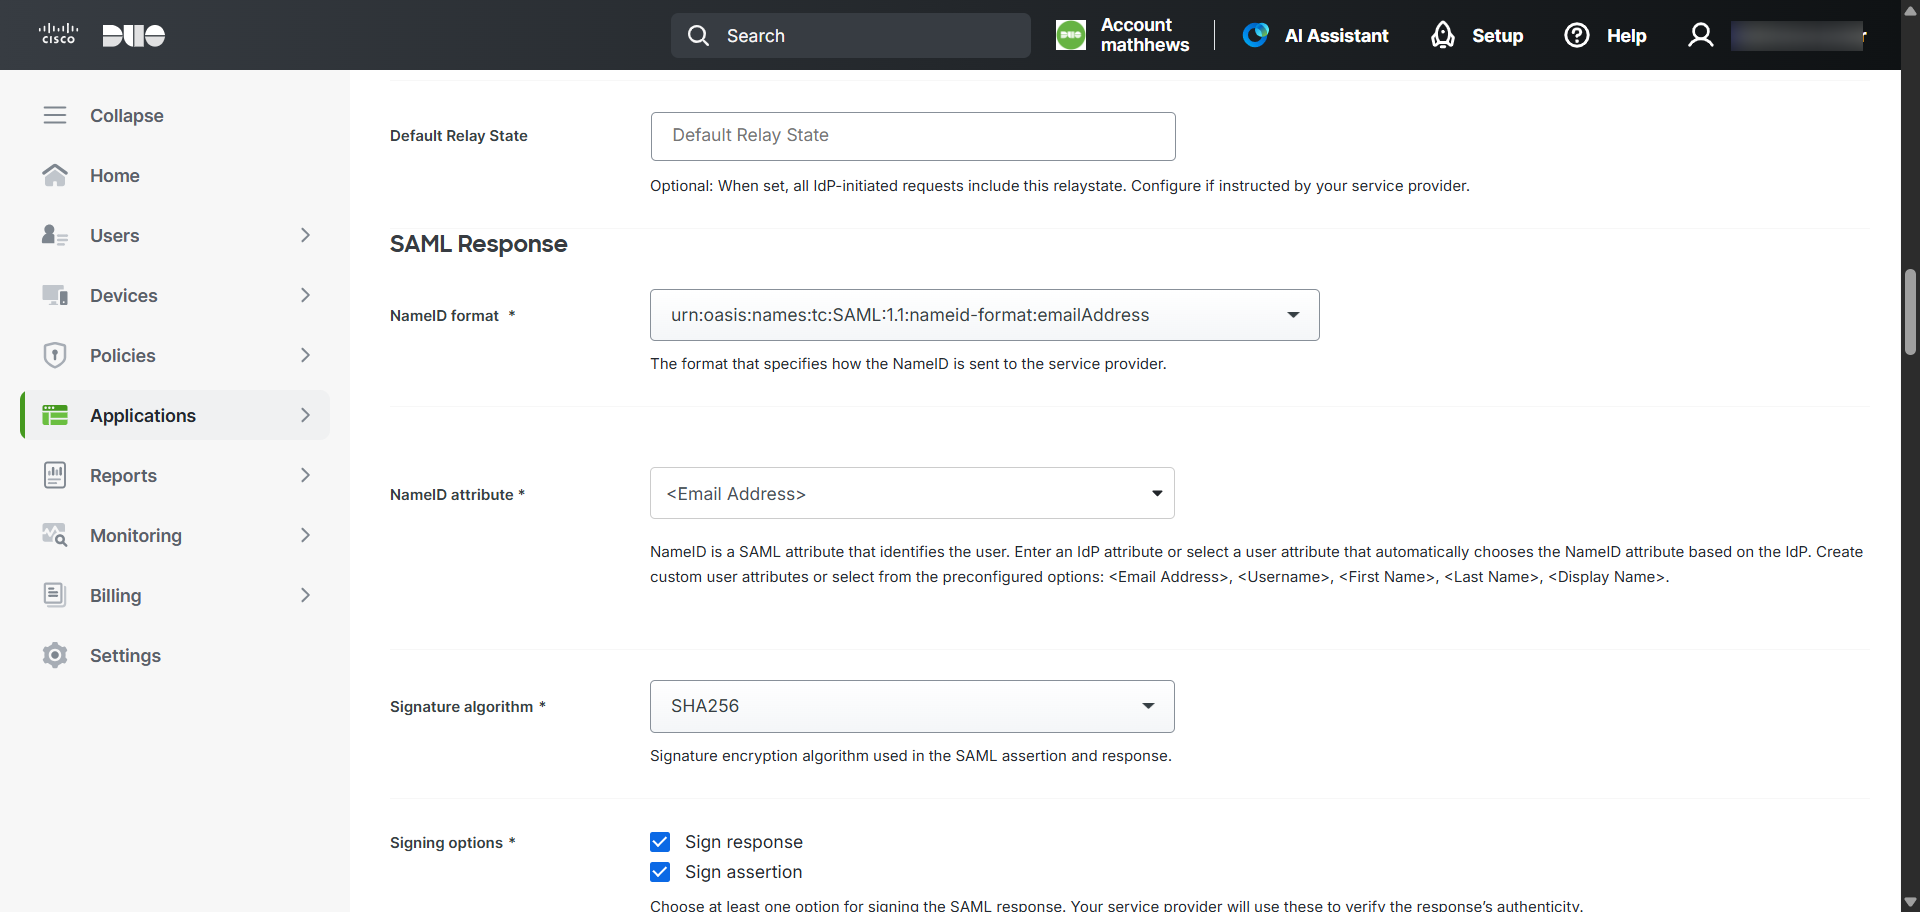
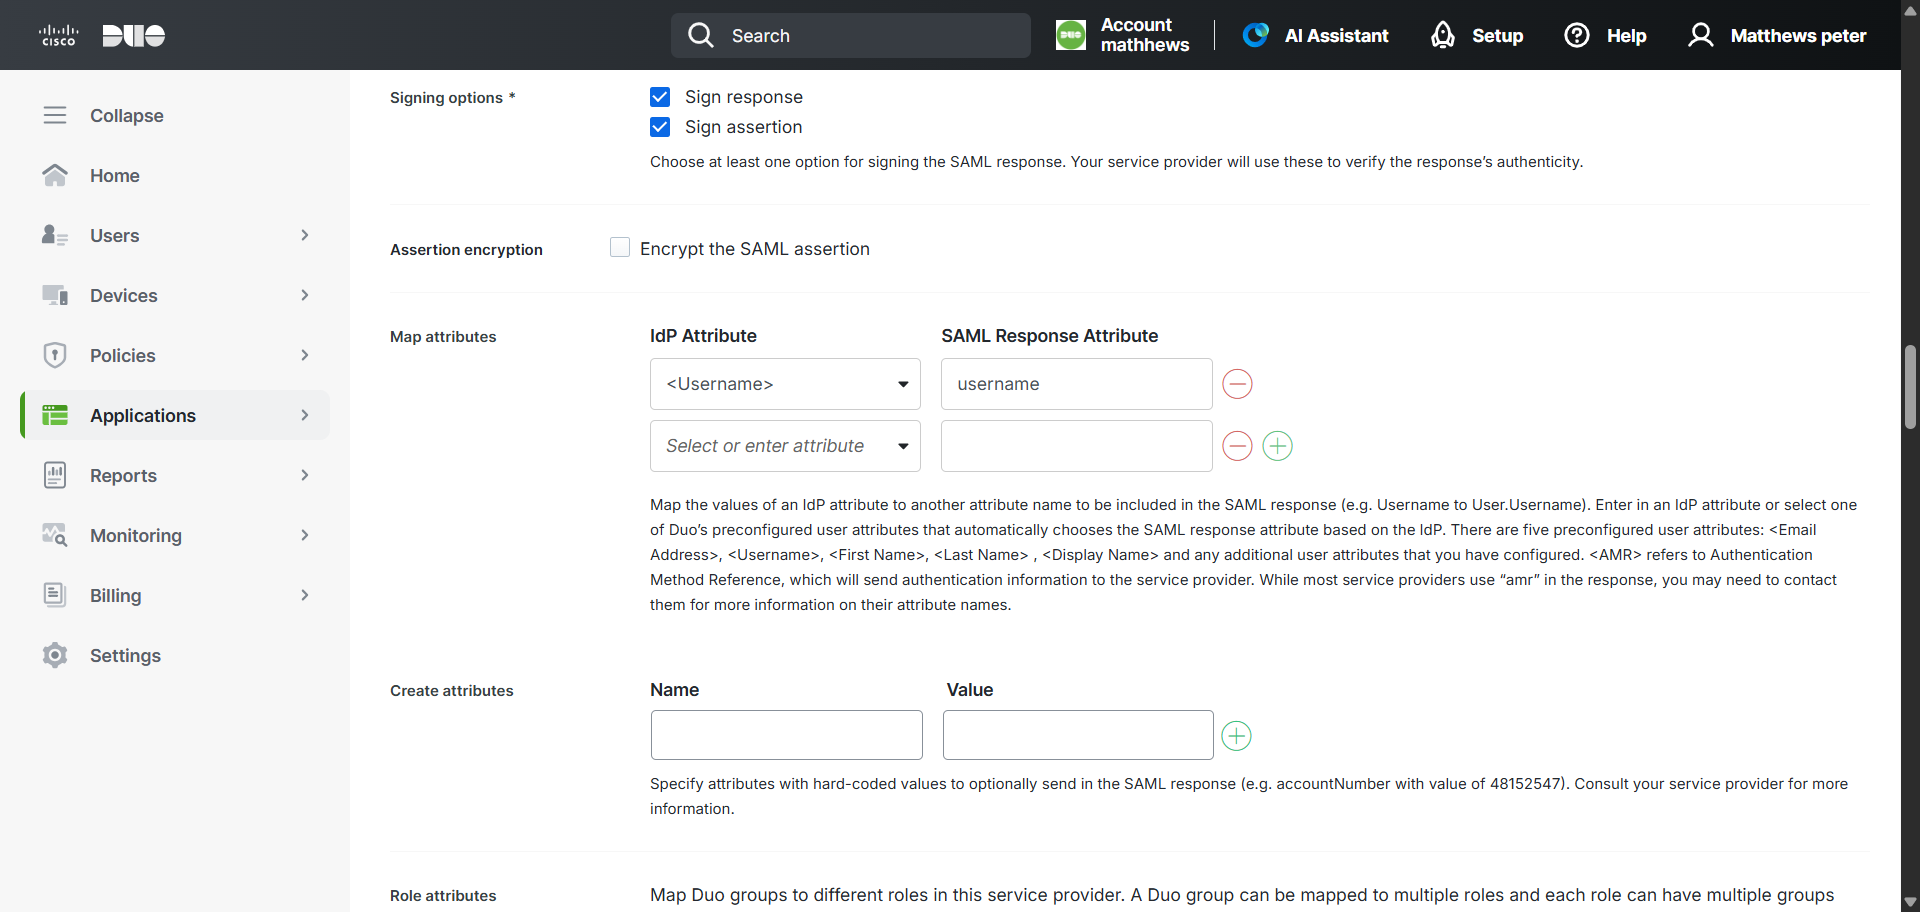
Enter the following information.
Field Value NameID format urn:oasis:names:tc:SAML:1.1:nameid-format:emailaddress
NameID Attribute <Email Address> as G Suite AuthN Source
ACS URL US region
https://app.profit.co/app/loginservlet?a=authorize&appCode=profit&integrationCode=CISCO_DUO_GATEWAYEU region
https://eu2-app.profit.co/app/loginservlet?a=authorize&appCode=profit&integrationCode=CISCO_DUO_GATEWAYME region
https://me1-app.profit.co/app/loginservlet?a=authorize&appCode=profit&integrationCode=CISCO_DUO_GATEWAYSA region
https://sa1-app.profit.co/app/loginservlet?a=authorize&appCode=profit&integrationCode=CISCO_DUO_GATEWAYSignature Algorithm SHA-256
Signing Options Sign assertion
Map Attributes IdP Attribute: <usernames> SAML Response Attribute: username
Click + Add an ACS URL under the Service Provider section to enter the region URL.
Step 5:
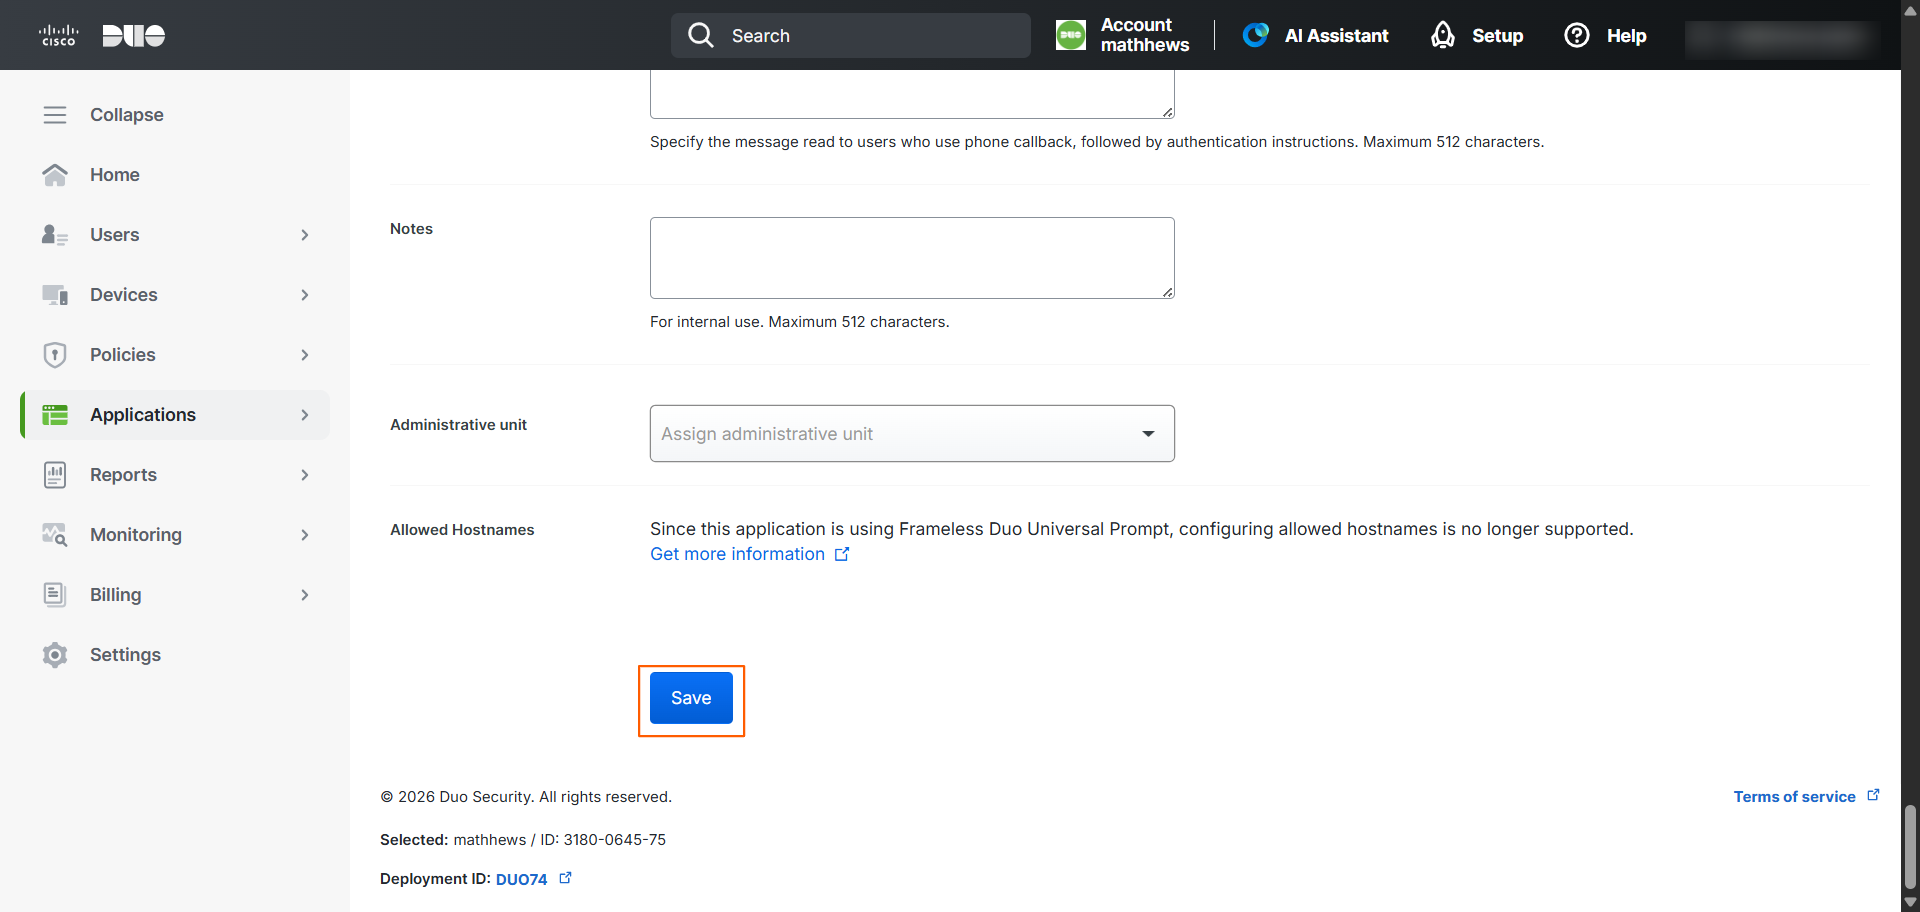
Click Save to update the configuration.
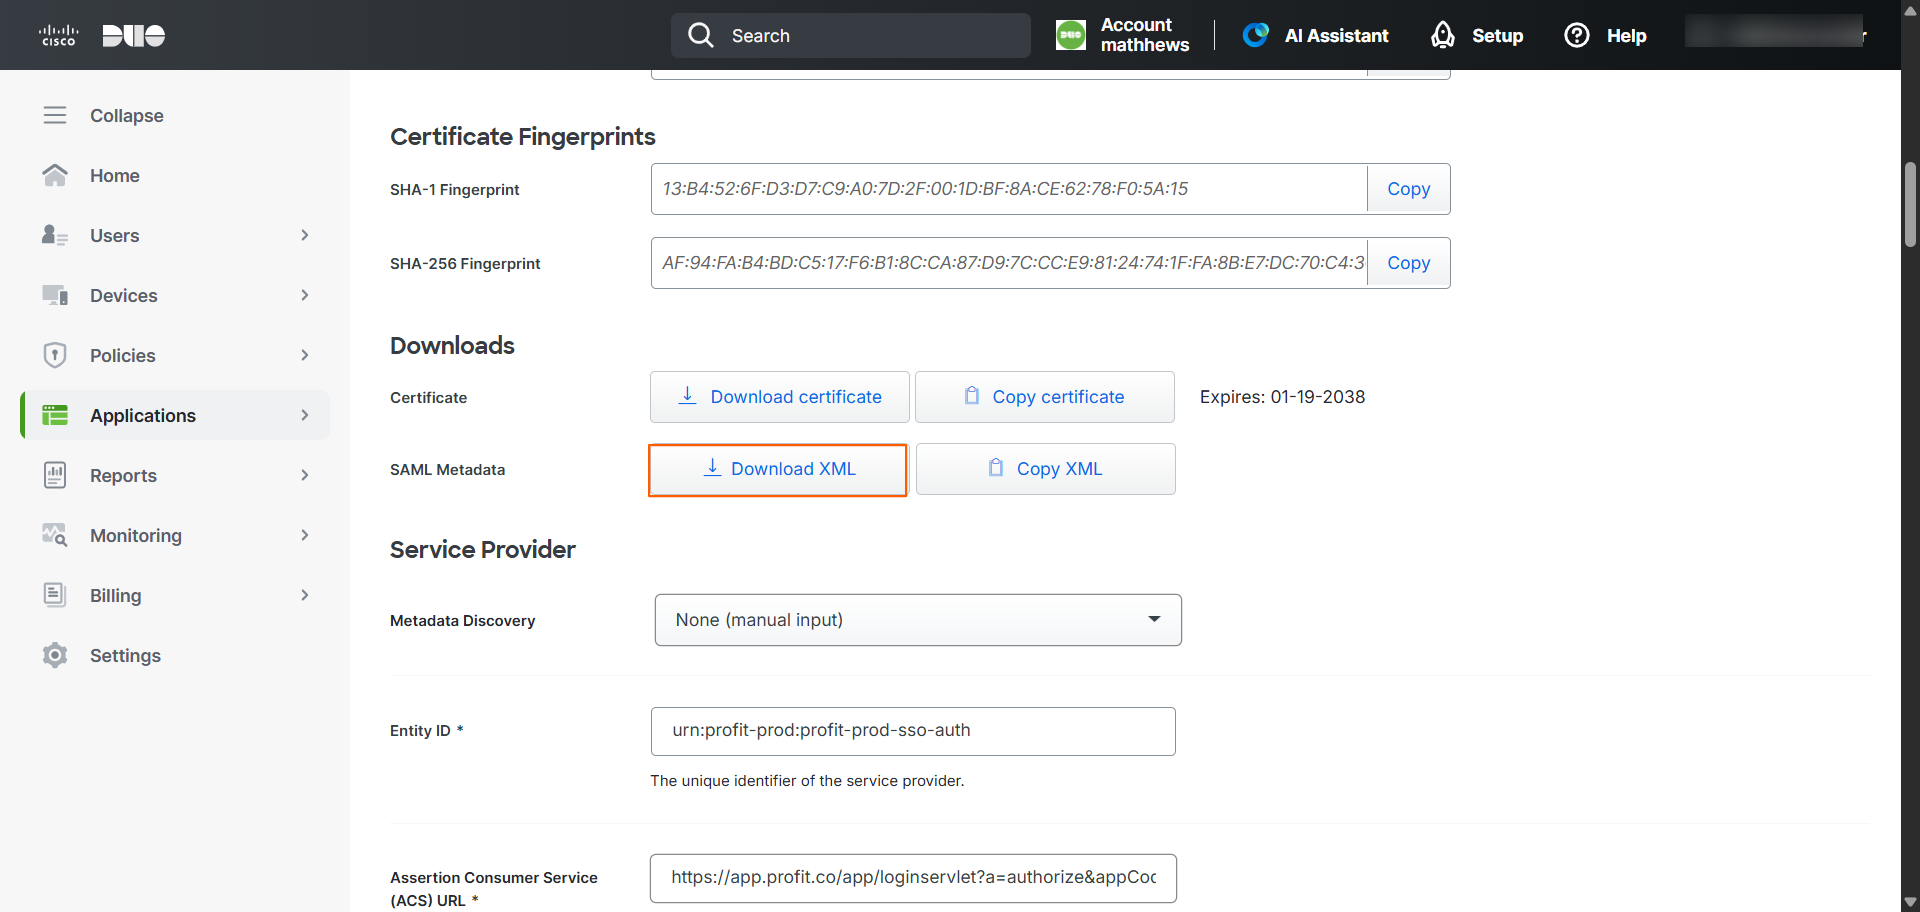
After saving, click Download XML under the Downloads section to obtain the Issuer ID and X509 Certificate. You will need these values in a later step.
Step 6:
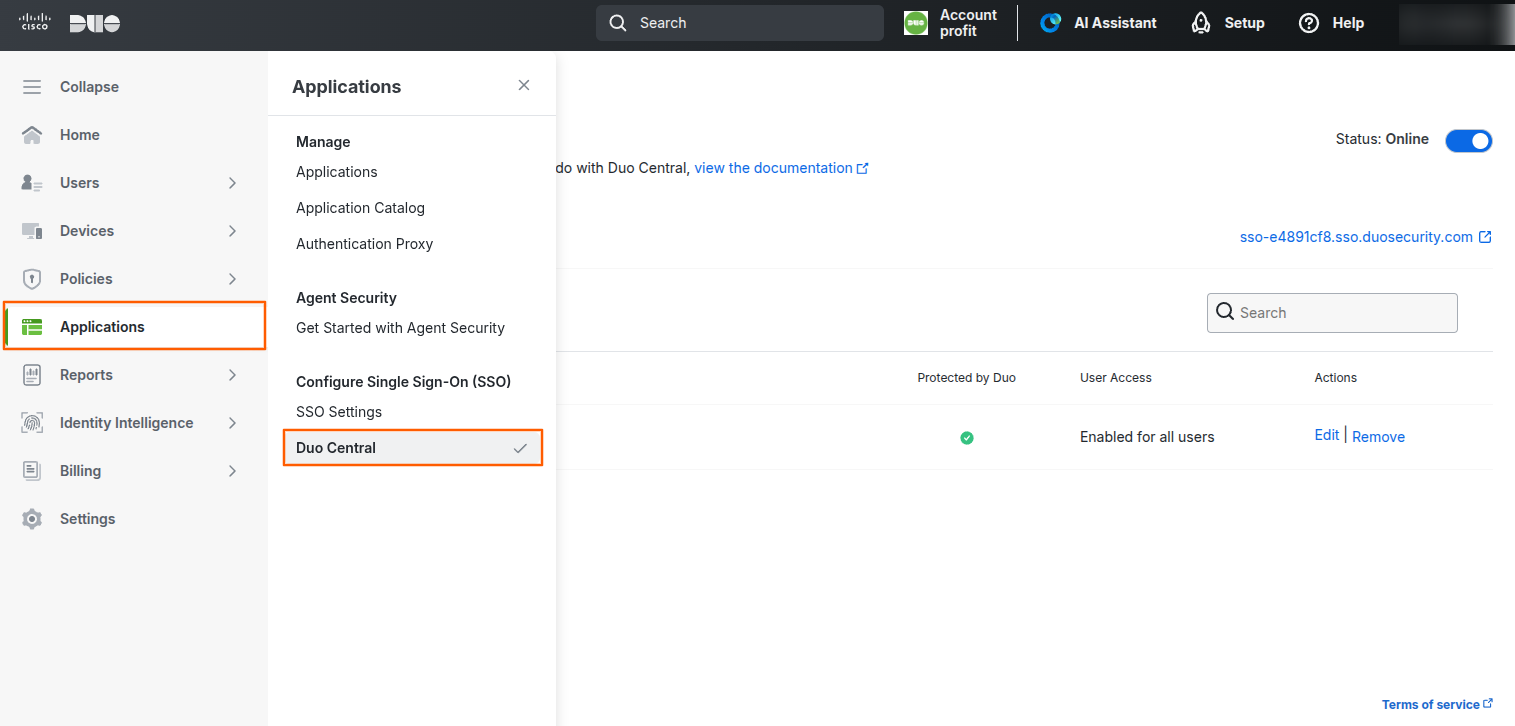
In the left navigation panel, go to Applications → Duo Central.
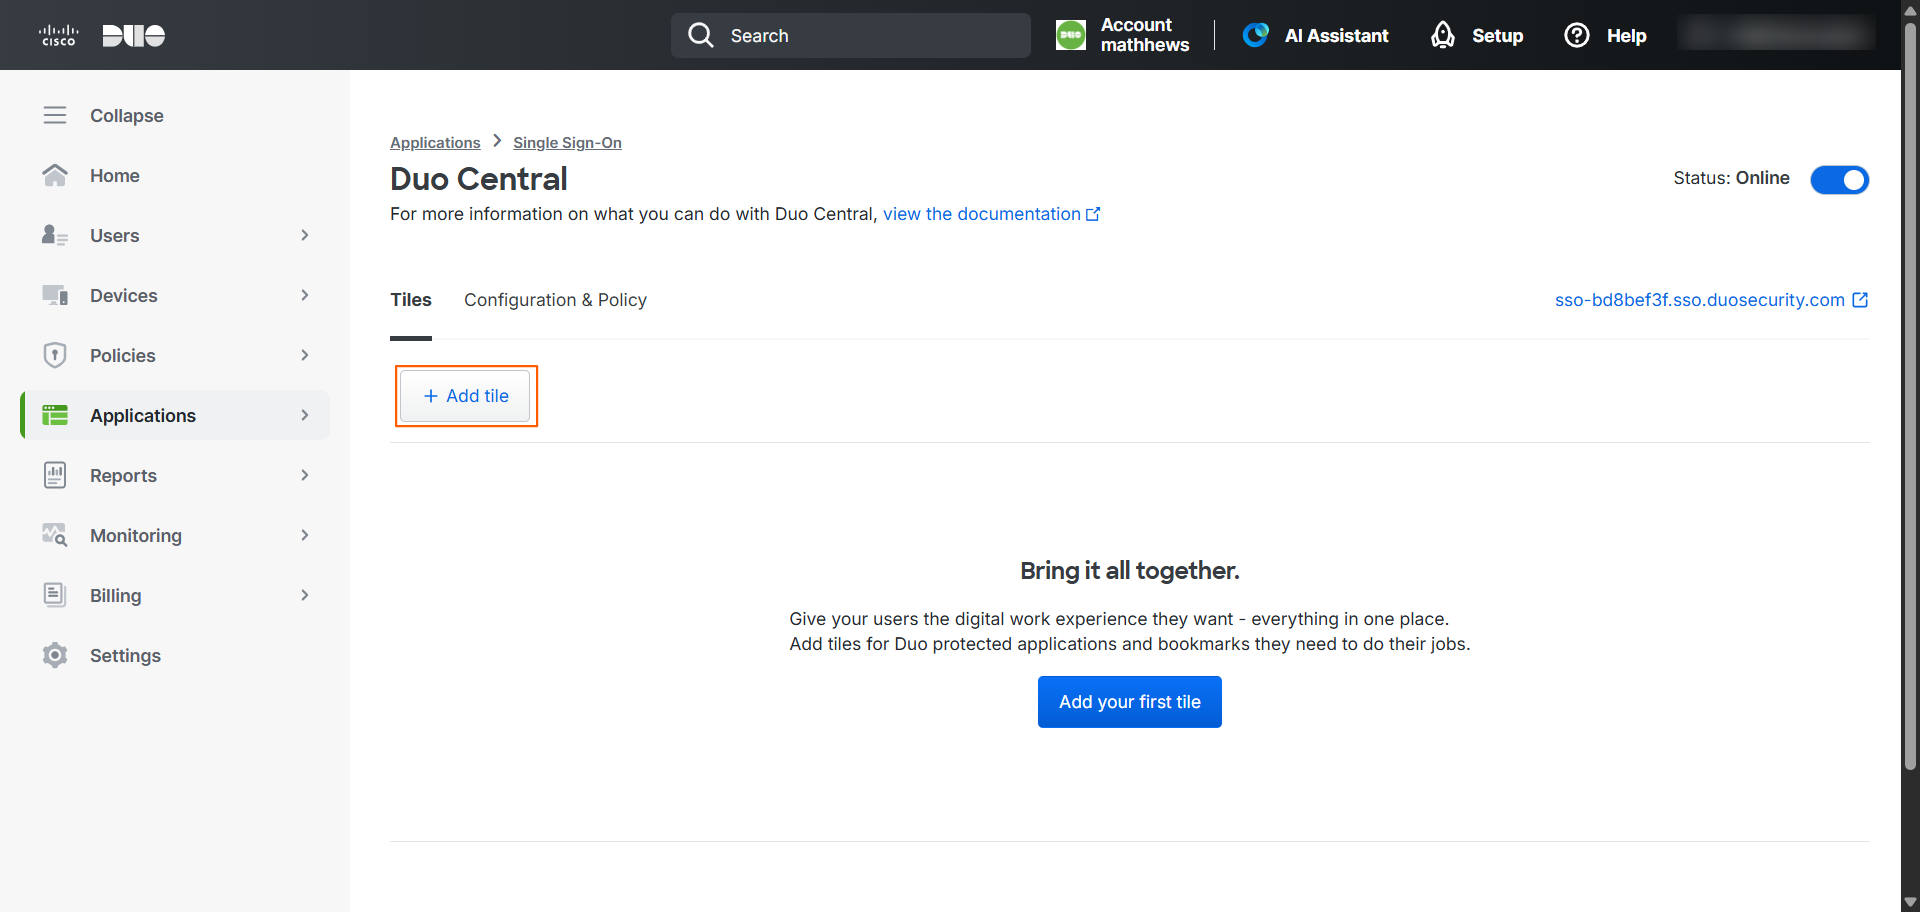
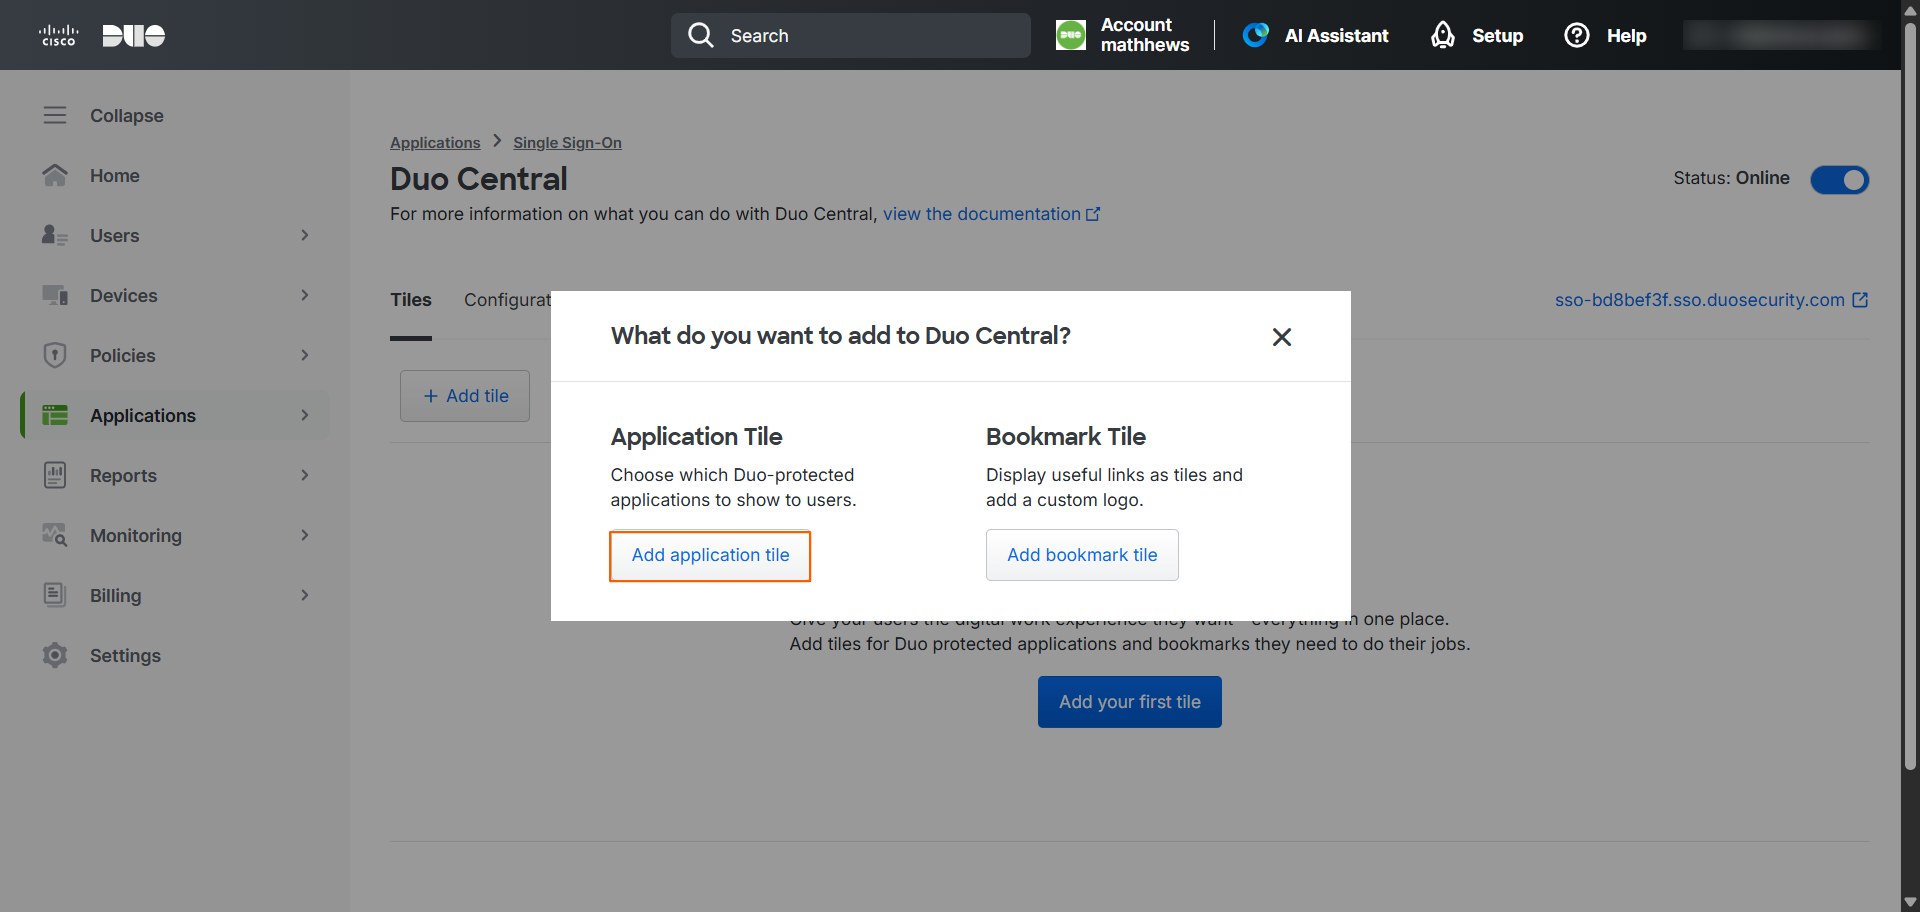
Click + Add tile to begin adding a Profit.co application tile.
Step 7:
On the Add Tile page, select Add Application Tile from the options presented.
Step 8:
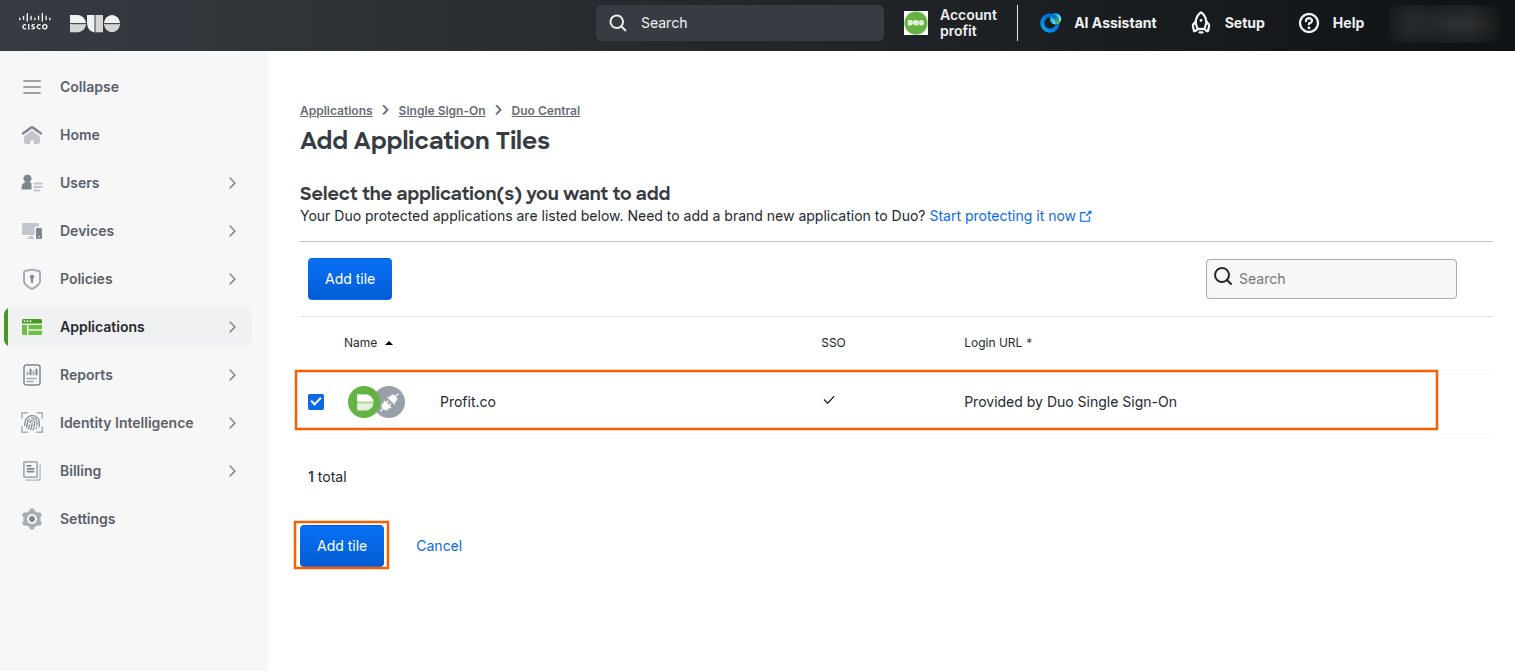
On the Add Application Tiles page, locate and select Profit.co.
Click Add Tile to confirm.
Step 9:
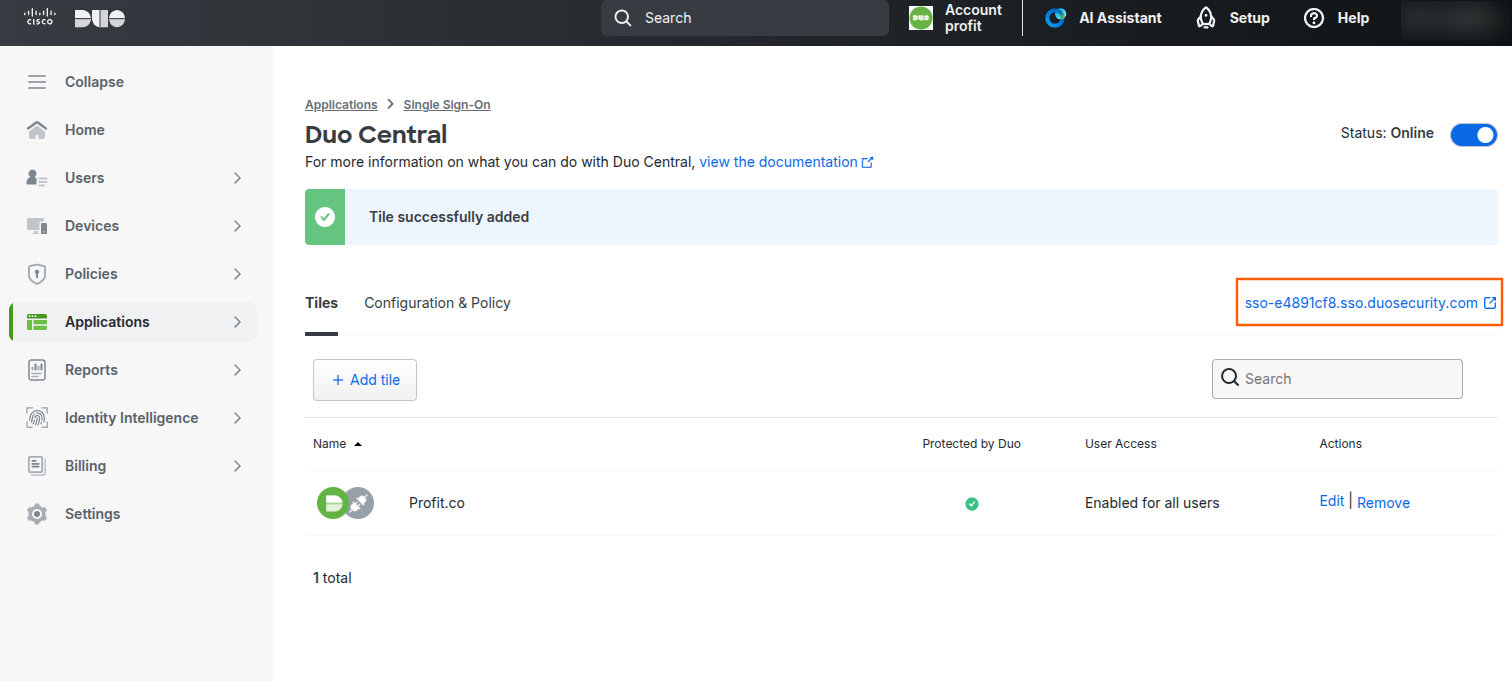
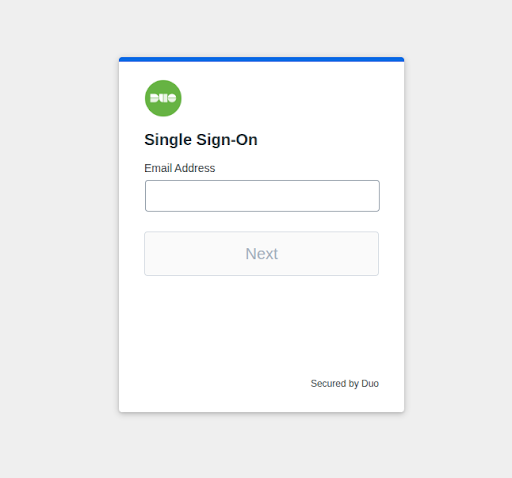
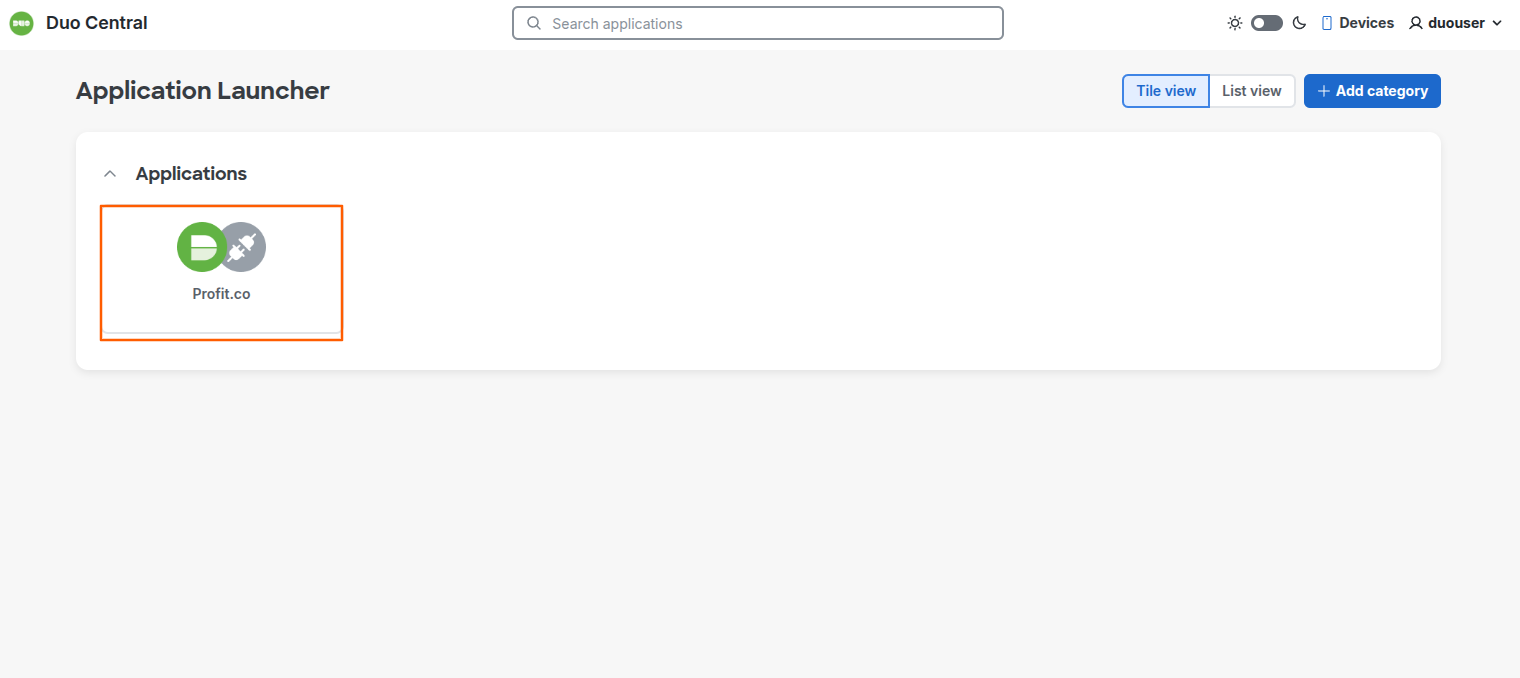
Click the Duo Central URL displayed in the top-right corner of the Duo Central page. You’ll be redirected to the SSO login page, where users can enter your email address to sign in.
Click the Profit.co link to access the Profit.co OKRs page.
Step 10:
Switch to Profit.co to complete the connection.
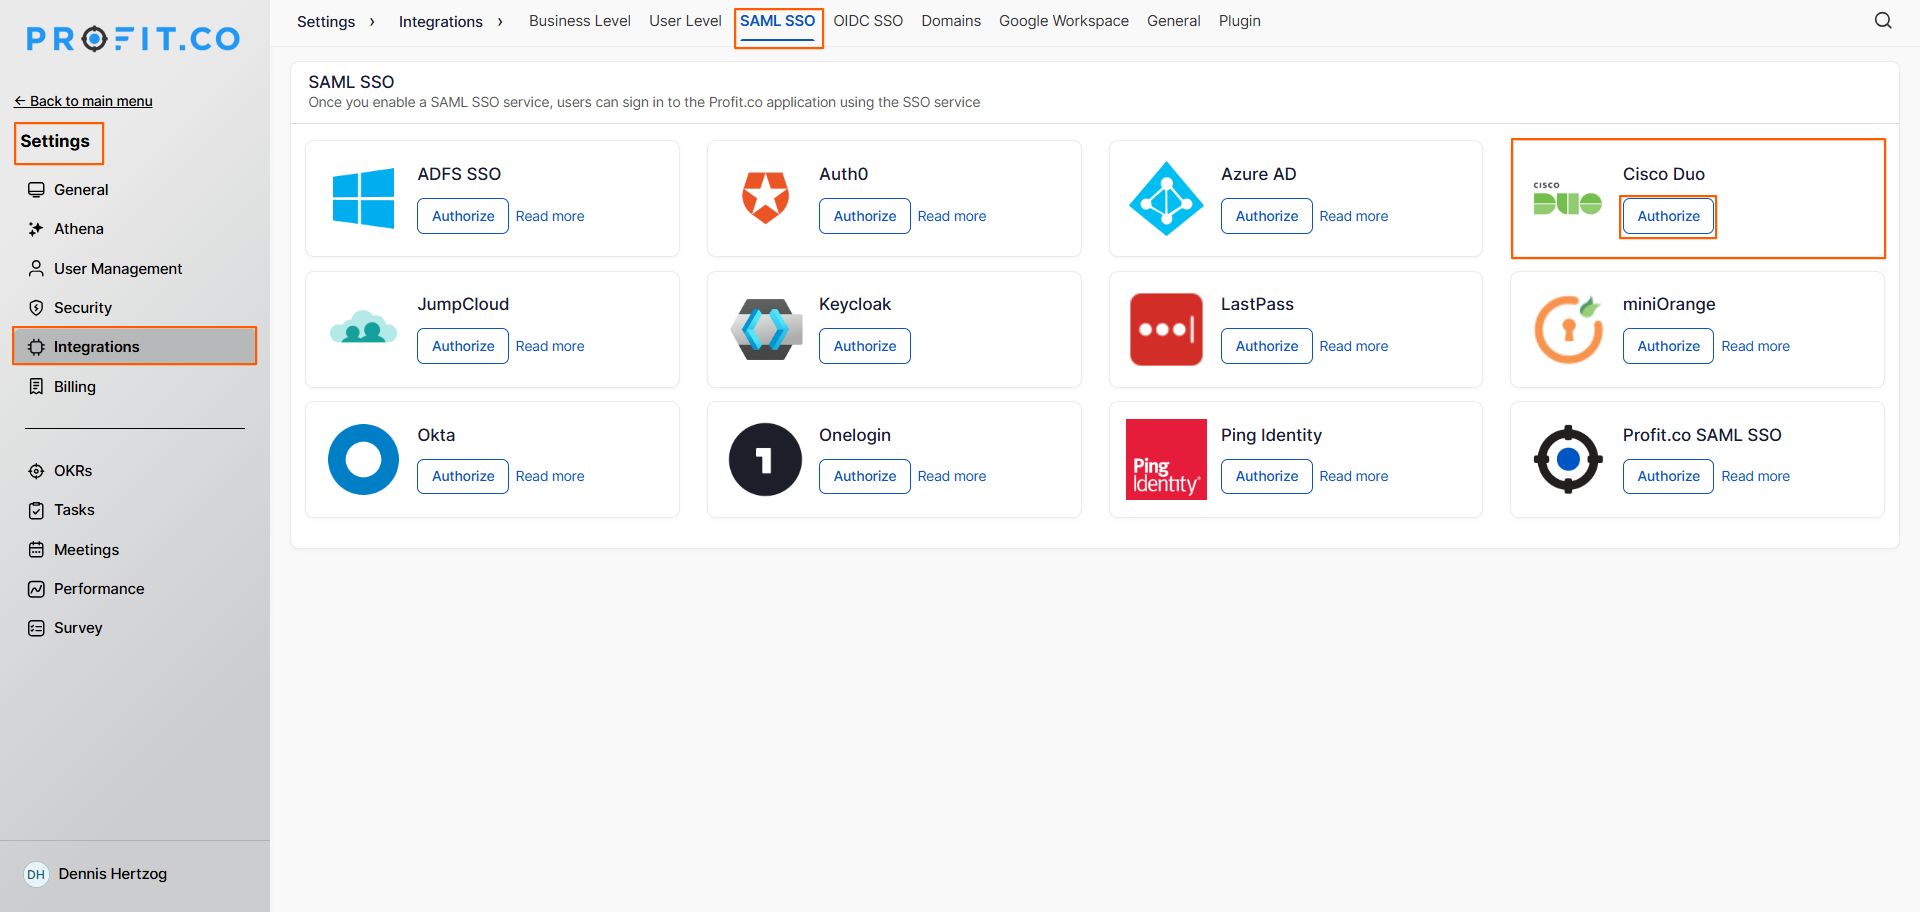
- Navigate to Settings from the left navigation panel.
- Click Integrations.
- On the Connectors page, switch to the SAML SSO tab.
- Locate Cisco Duo and click the Authorize button.
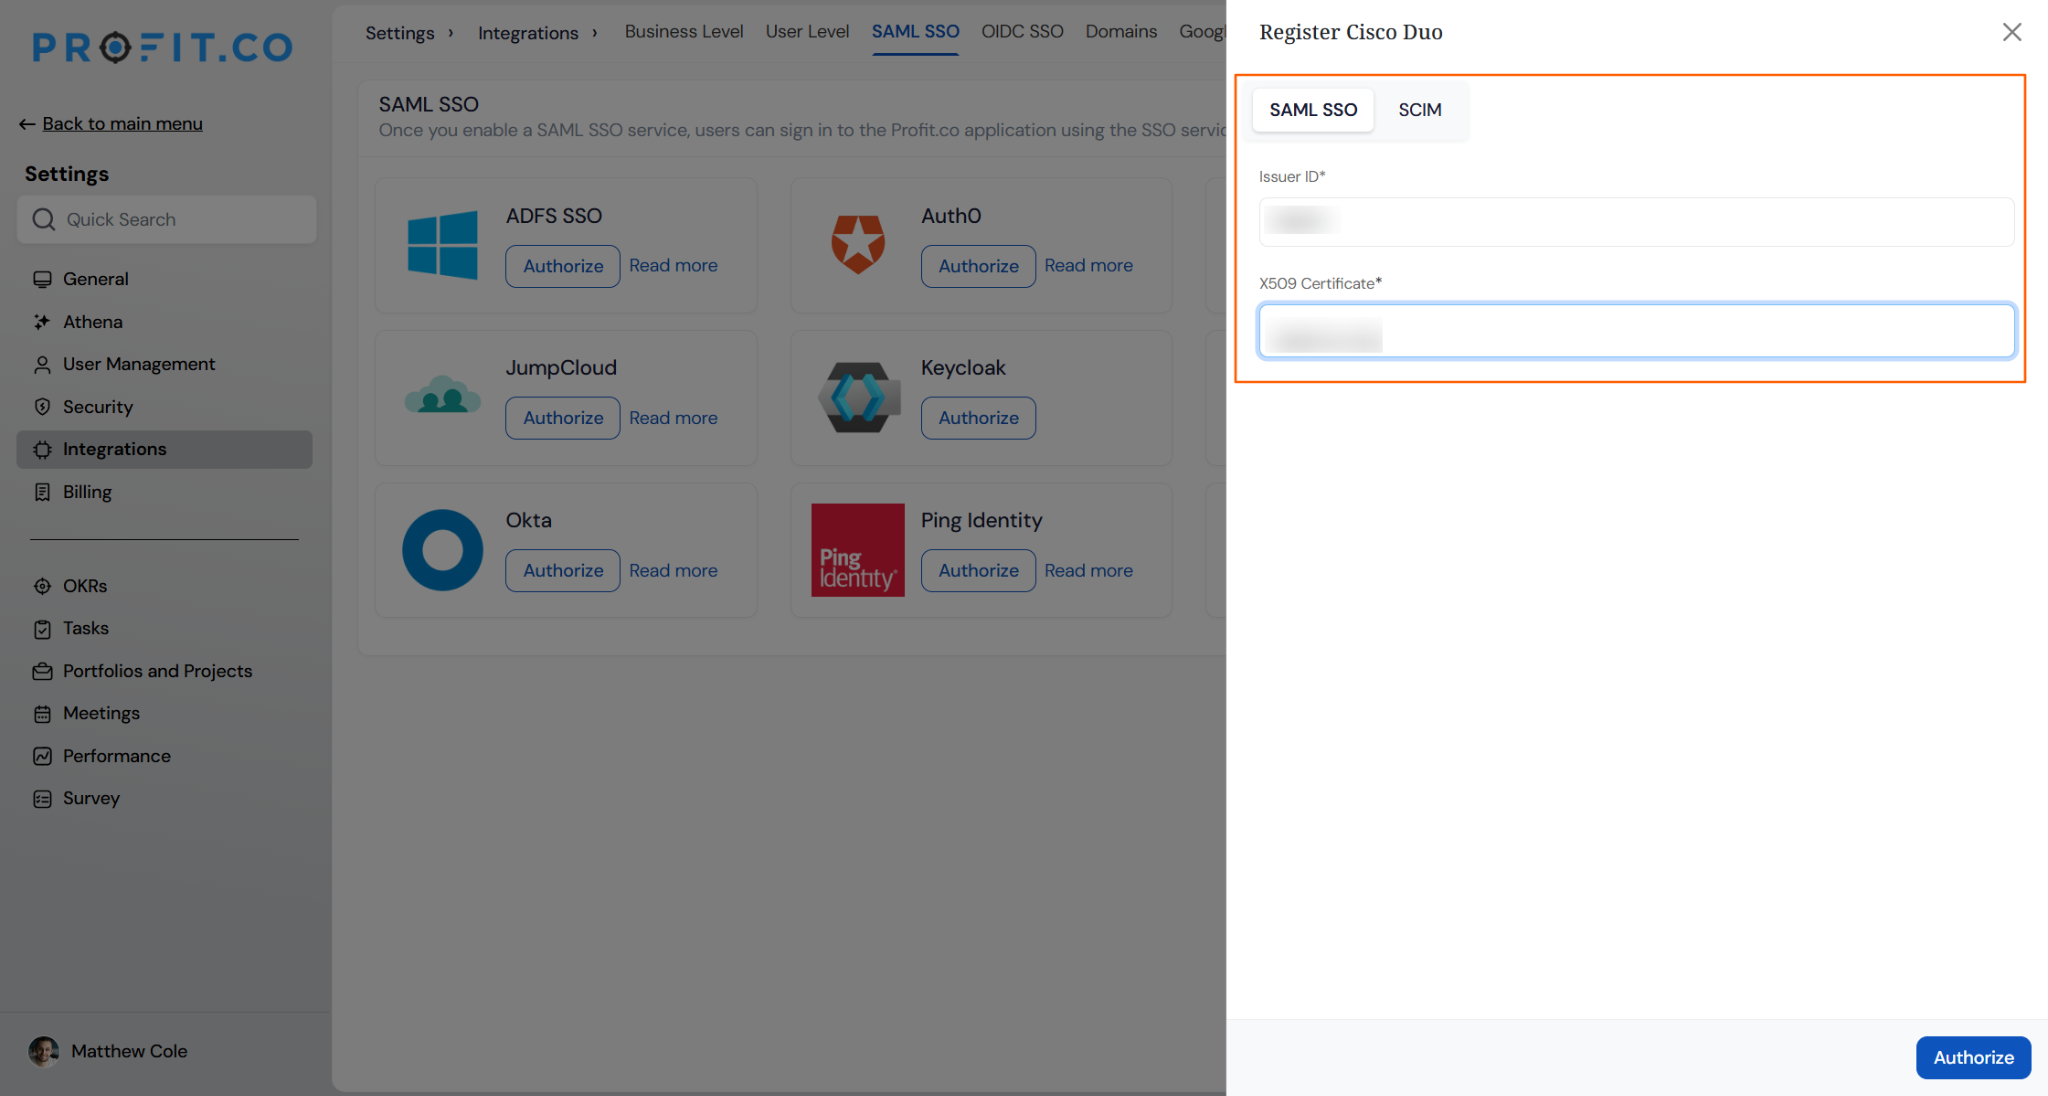
- In the Register Cisco Duo panel that opens, paste the entity ID and X509Certificate values obtained from the downloaded XML file.
- Click Authorize to save.
Configure Cisco Duo User Provisioning for Profit.co
SCIM-based provisioning keeps Profit.co users in sync with Cisco Duo. Users in the Duo you select for provisioning are automatically created as users in Profit.co User Management.
Attributes Mapping in Cisco Duo
Map Duo user attributes to Profit.co fields so user details sync correctly. You need Duo Admin Panel access as an administrator. Follow the steps in order.
1. Move suggested attributes to Primary attributes
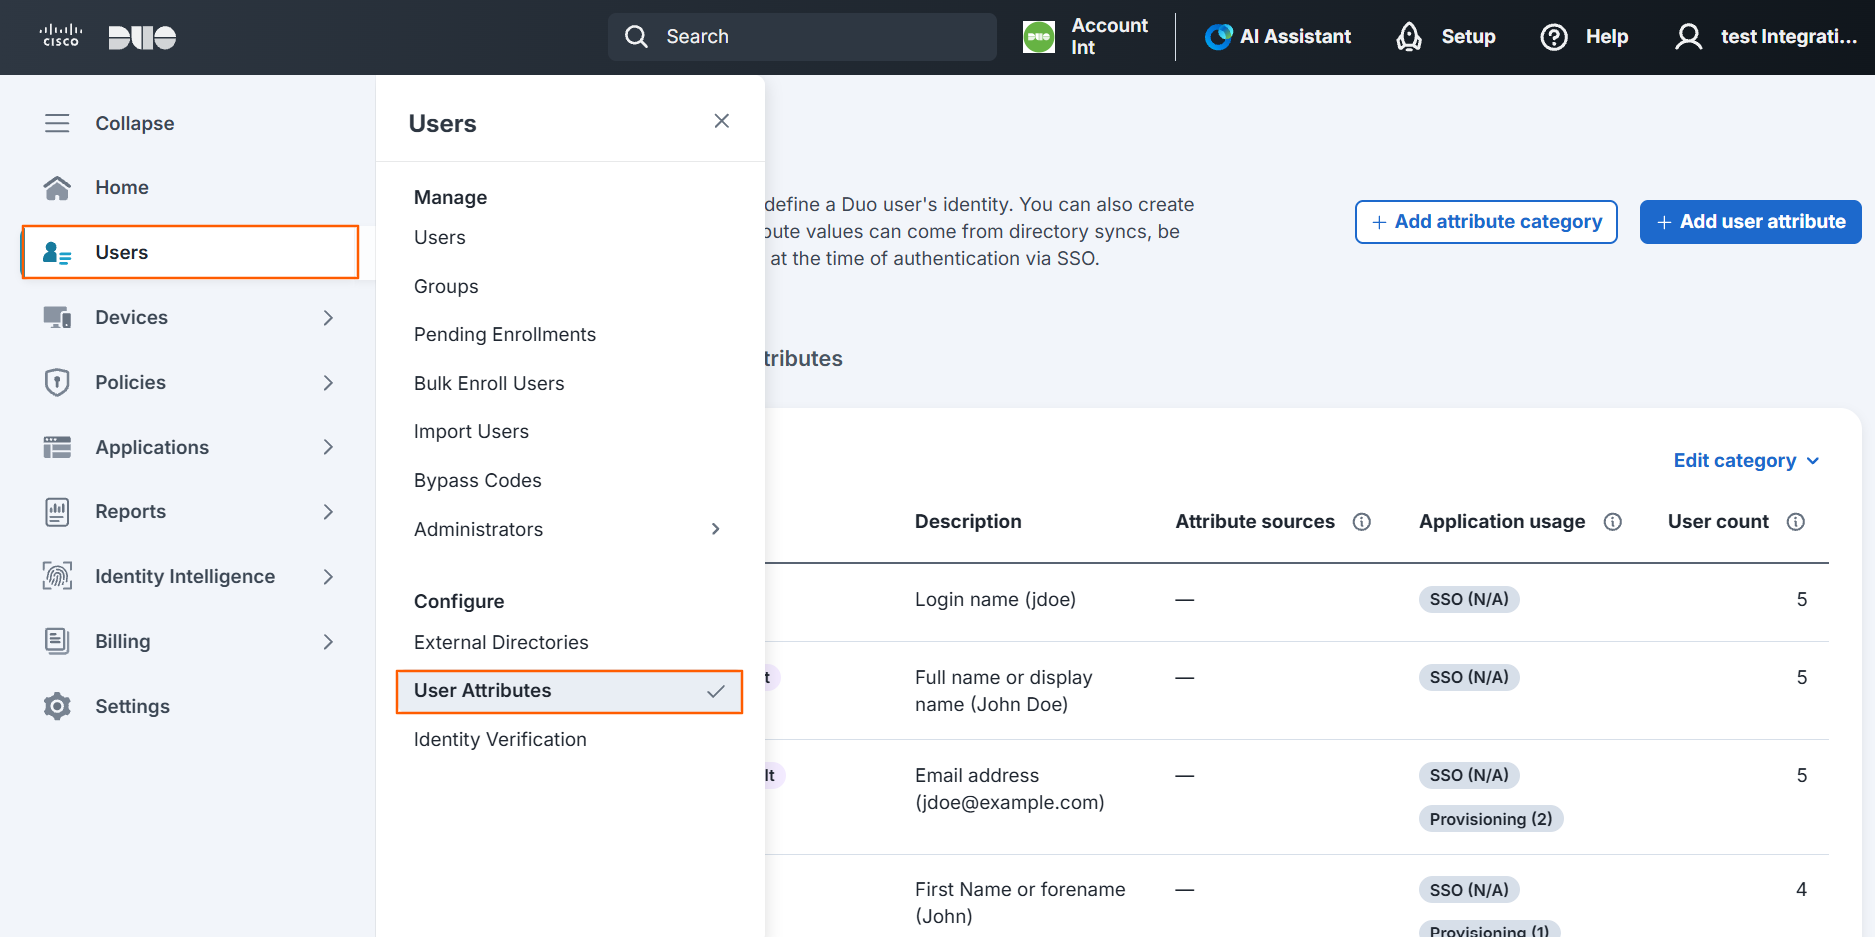
- Log in to the Duo Admin Panel.
- Go to Users → User Attributes.
- In the Suggested attributes list, select the attributes Profit.co needs, such as department,employeeNumber,managerValue and title.
- Move the selected attributes to Primary attributes.
- Click Save.
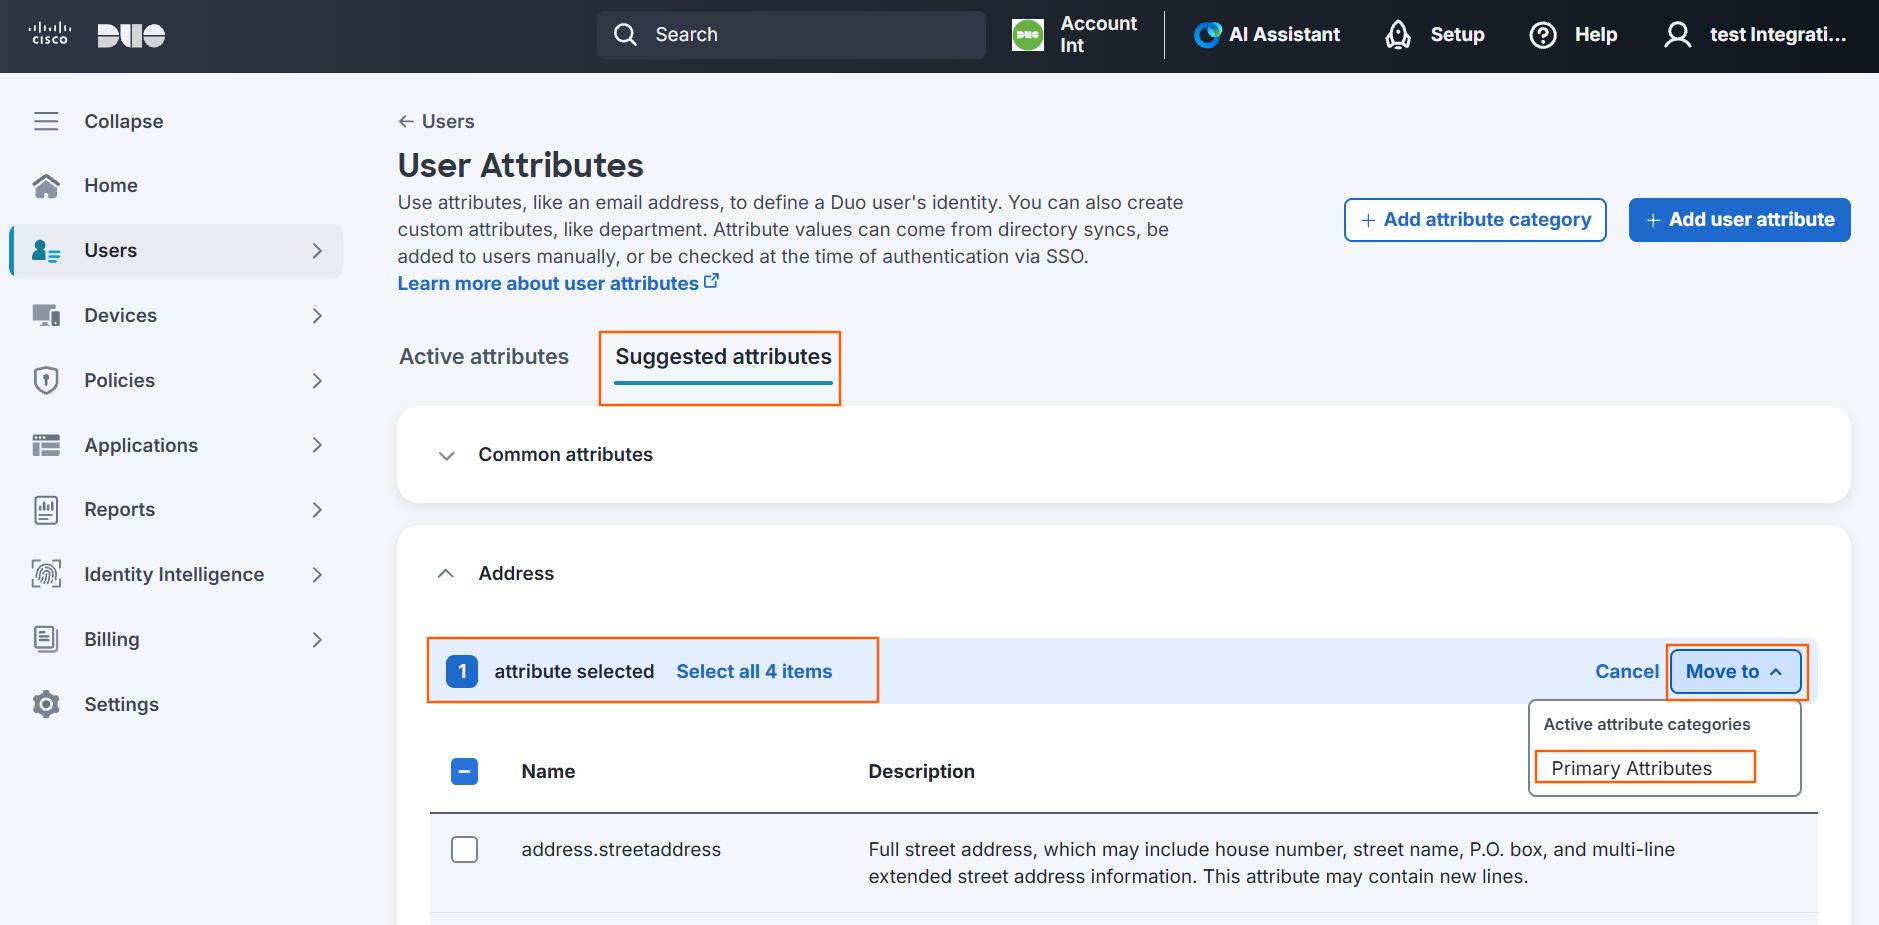
Note: Only primary attributes can be used in the mapping.
2. Create the custom attribute
You can create custom attributes in Duo to sync additional user details. Create a custom attribute named role, which Profit.co uses to assign roles to synced users.
- On Users → User Attributes, click + Add user attribute and create an attribute named Roles.
- Set its source to the directory field that holds the user’s role.
- Make sure role is in the Primary attributes list.
- Click Save.
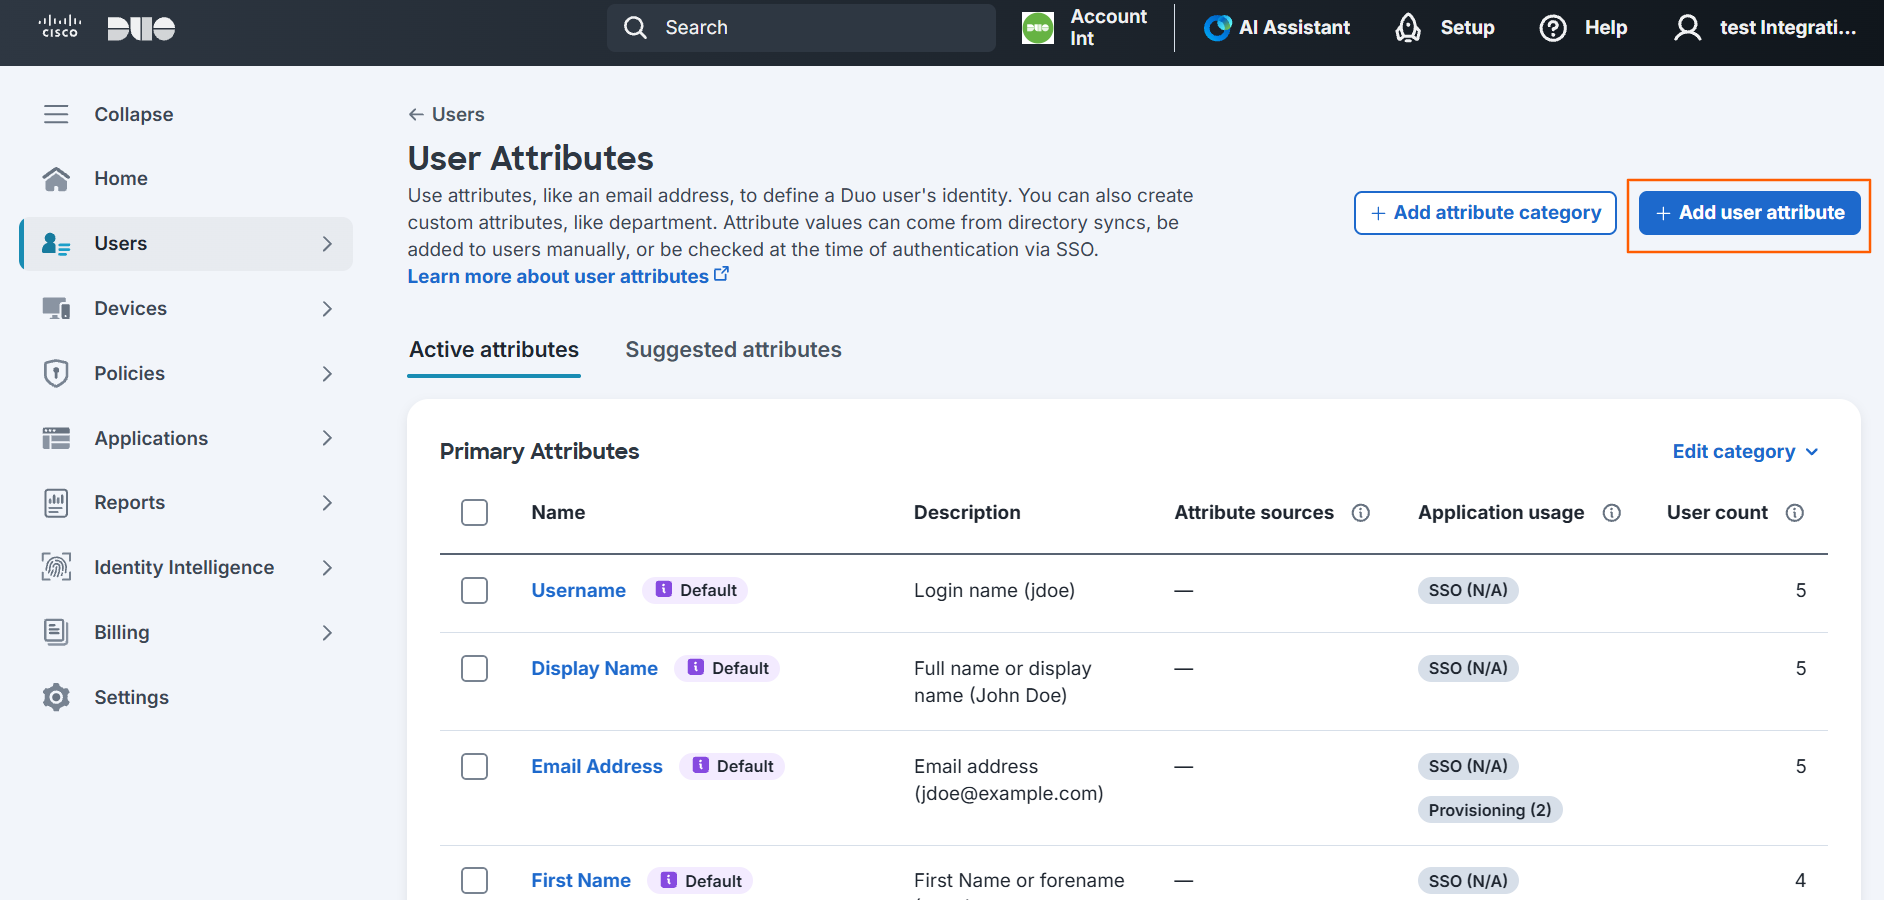
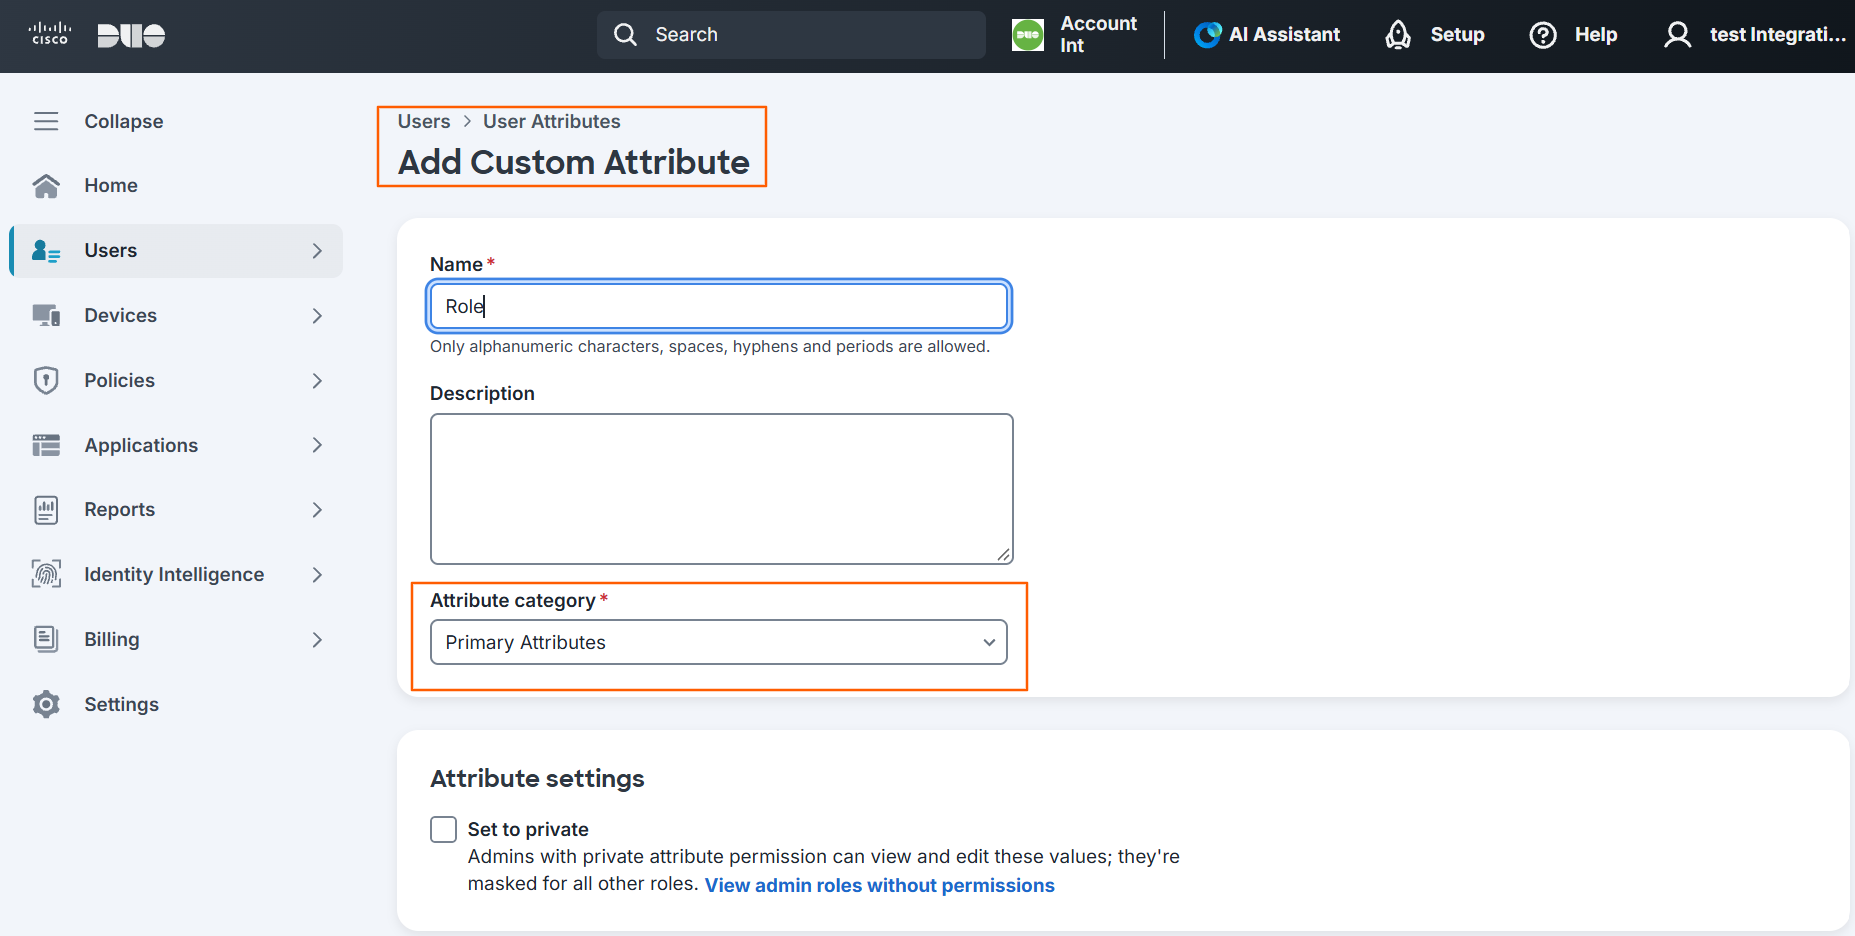
Note: Follow this order: create the attribute → add it to Primary attributes → sync → map.
Once the set up is done, navigate to Profit.co and follow the below steps.
Requirements
You need Admin access in Profit.co to retrieve the API Key and SCIM Key.
- Navigate to Settings → Security → API Access in Profit.co
- Copy your API Key and SCIM Key
- Form the token using the format: API_KEY:SCIM_KEY
Step 1
Connect Cisco Duo to Profit.co’s SCIM endpoint using your API credentials.
- In the Cisco Duo Admin Panel, go to Applications and open the Profit.co - Single Sign-On app.
- Click the Provisioning tab.
- Under Provisioning Mode, select Automatic.
- In the Authentication section, enter the following:
Field Value Authentication Mode Bearer Token
Base URL US region
https://app.profit.co/app/rest/platform/auth/scim/v2EU region
https://eu2-app.profit.co/app/rest/platform/auth/scim/v2ME region
https://me1-app.profit.co/app/rest/platform/auth/scim/v2SA region
https://sa1-app.profit.co/app/rest/platform/auth/scim/v2Token API_KEY:SCIM_KEY
- Click Connect to application to validate the connection.
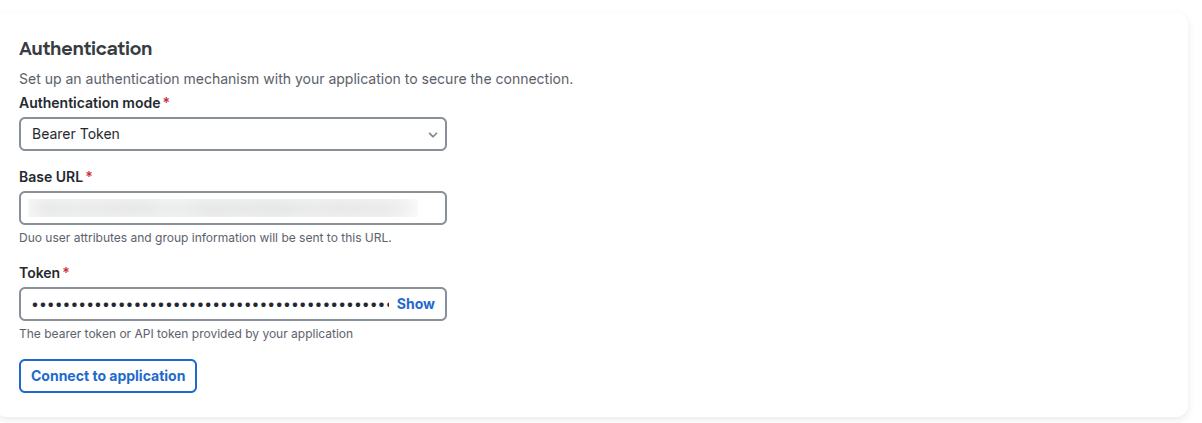
After the connection is done successfully, map attributes in the Provisioning section
- Click Edit mappings.
- Click Select all to include all available attributes.
- Click Save Mapping.
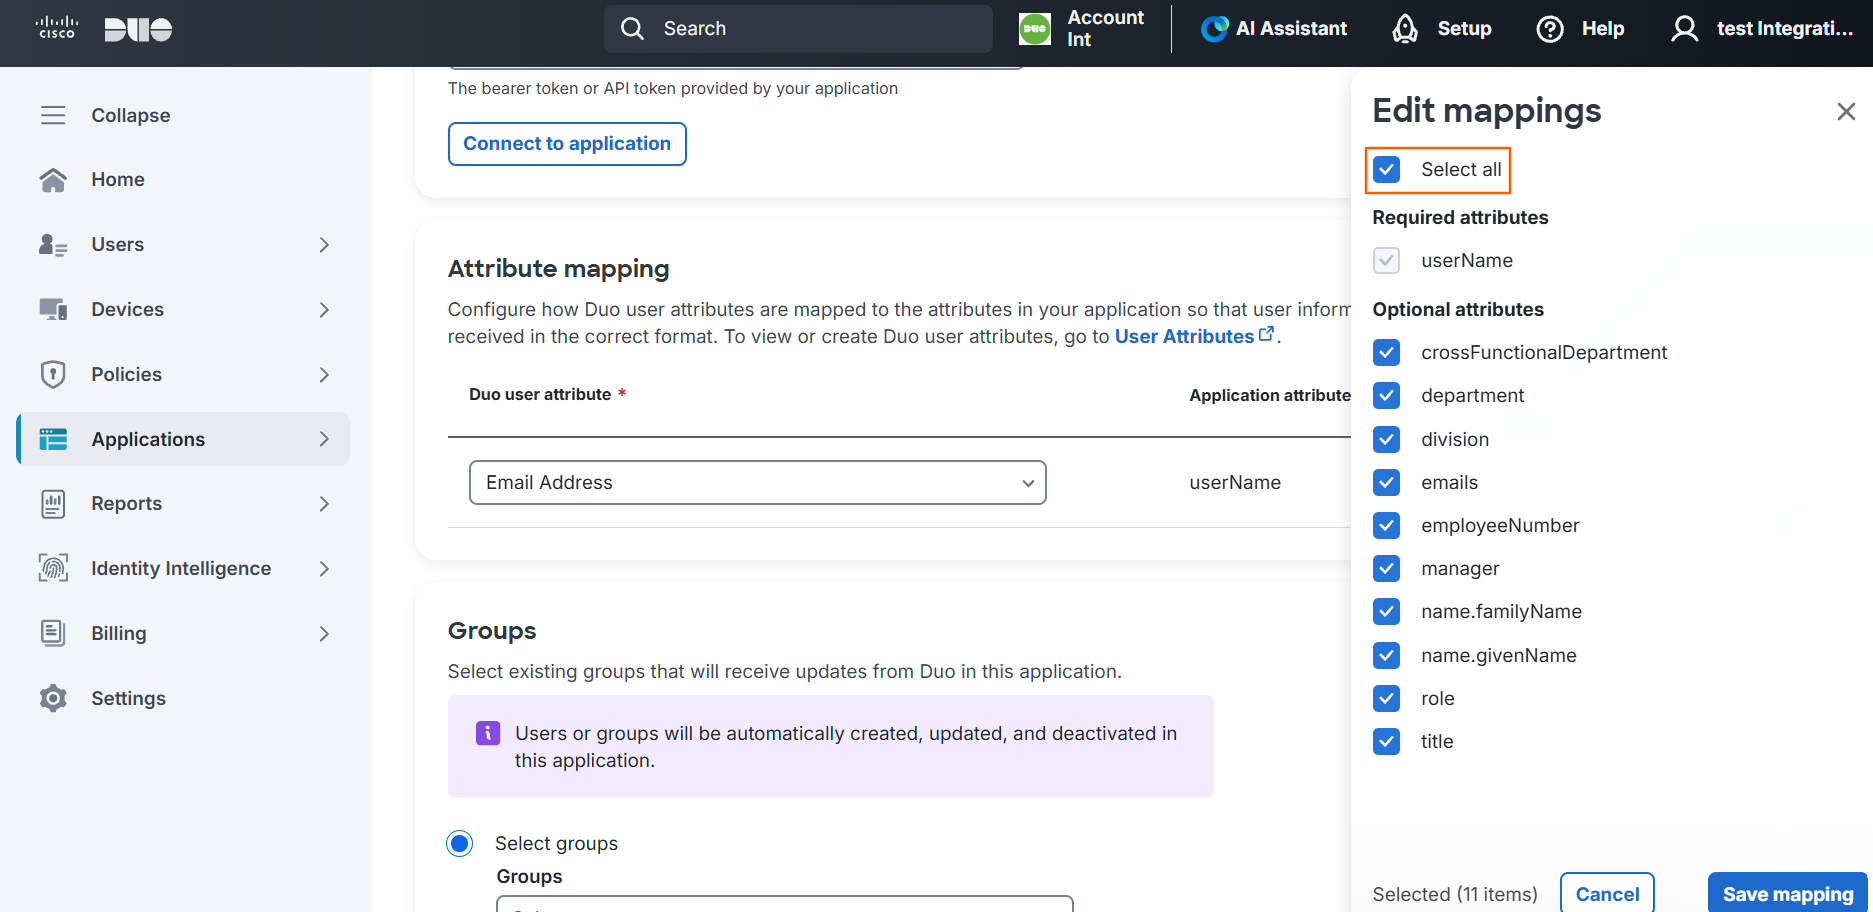
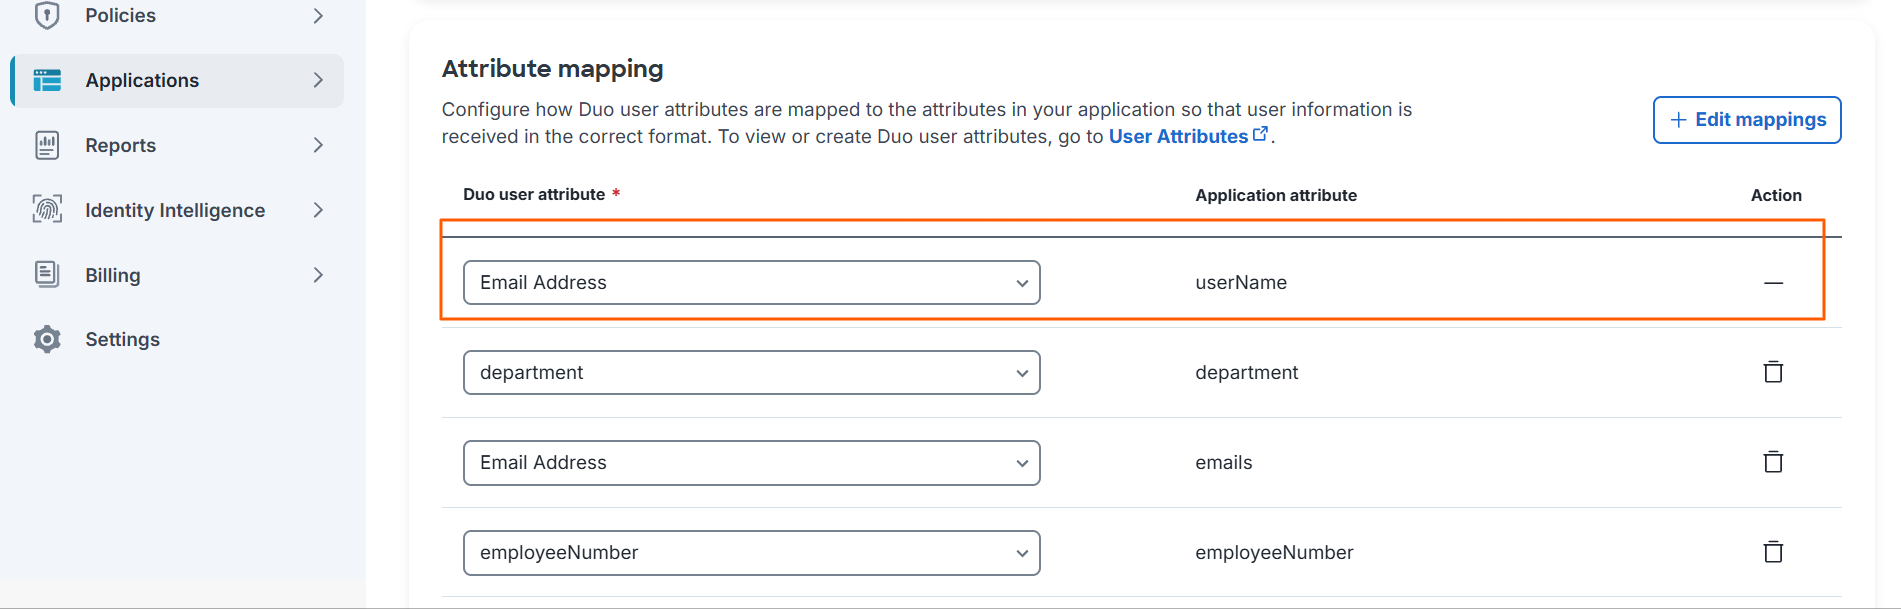
Map each Profit.co field to its Duo attribute and make sure every required field is mapped. The image below shows which Duo attribute to map to each Profit.co field.
Note: The userName attribute must always be mapped to Email Address in Duo.
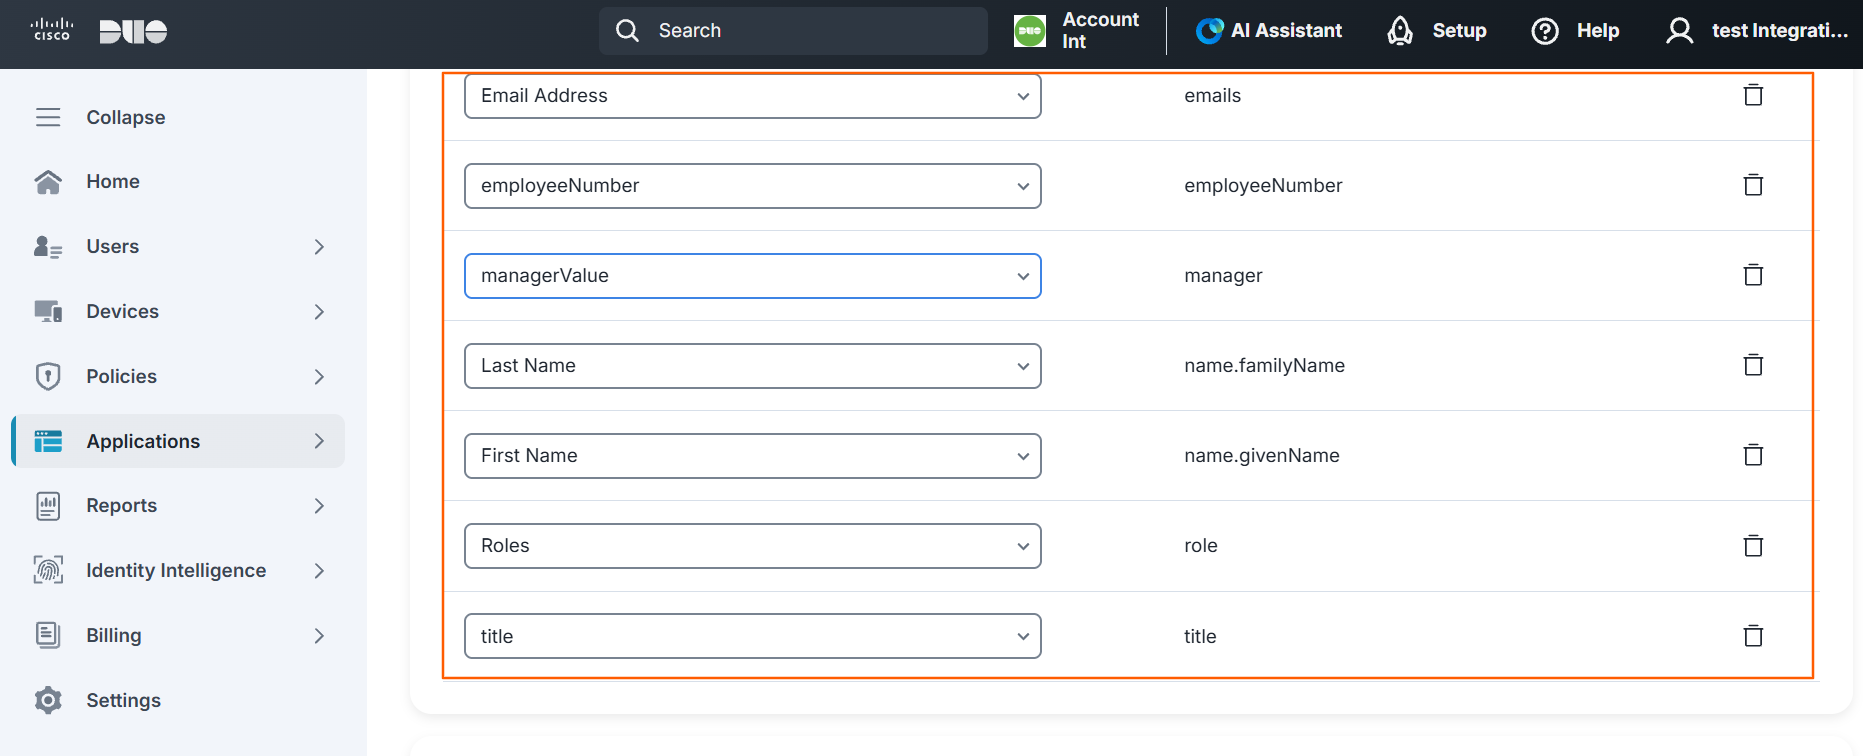
Note: Manager and department data do not sync. The Duo provisioning mapping doesn’t expose these fields, so under the current implementation they aren’t synced as part of provisioning.
Groups
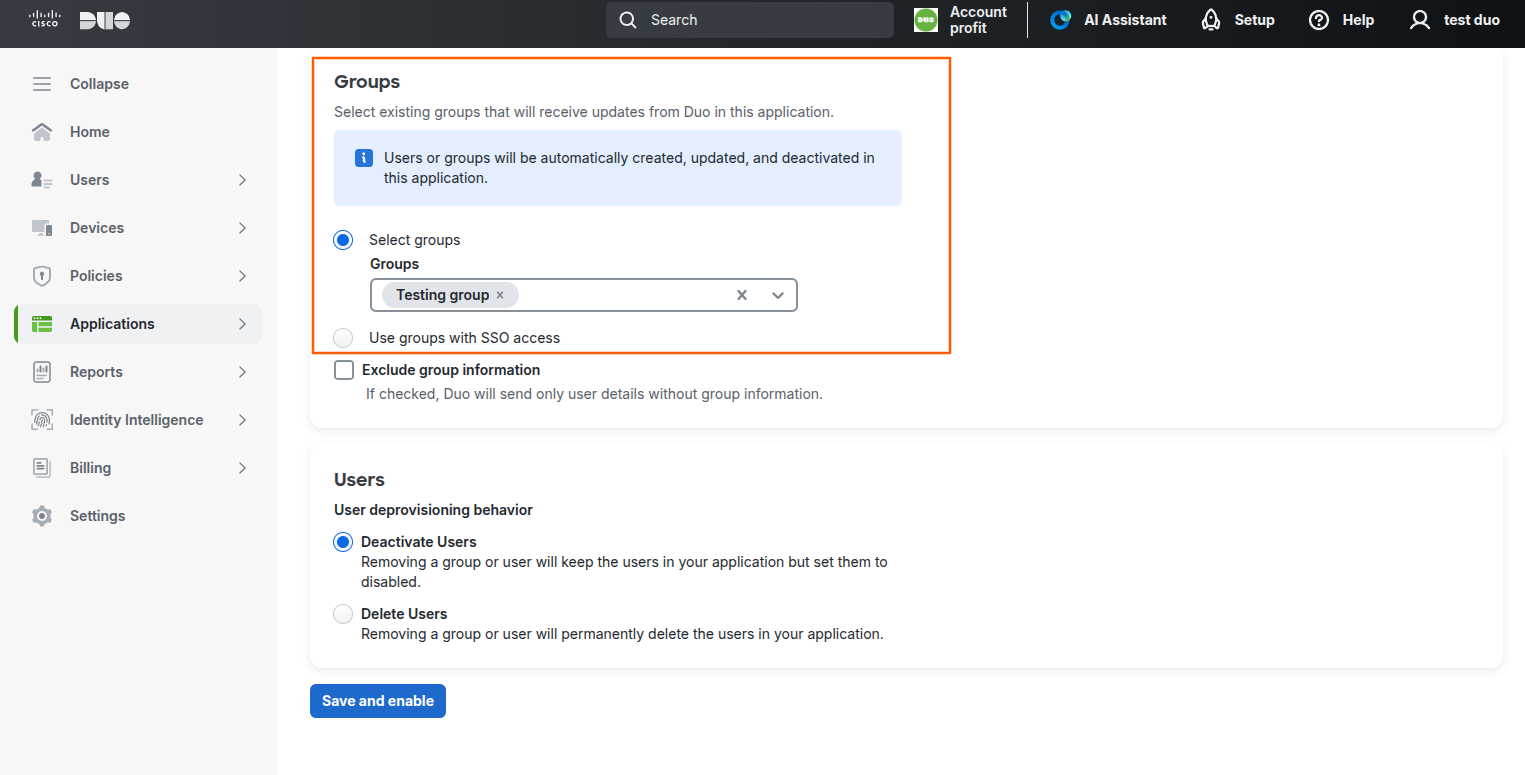
Under the Groups section, select Select groups and choose the group you created.
Under the Users section, choose the User deprovisioning behavior. This decides what happens in Profit.co when a user or group is removed in Duo:
- Deactivate Users: The user stays in Profit.co but is set to disabled. This is the default and keeps their data intact.
Click Save and enable.
Step 2
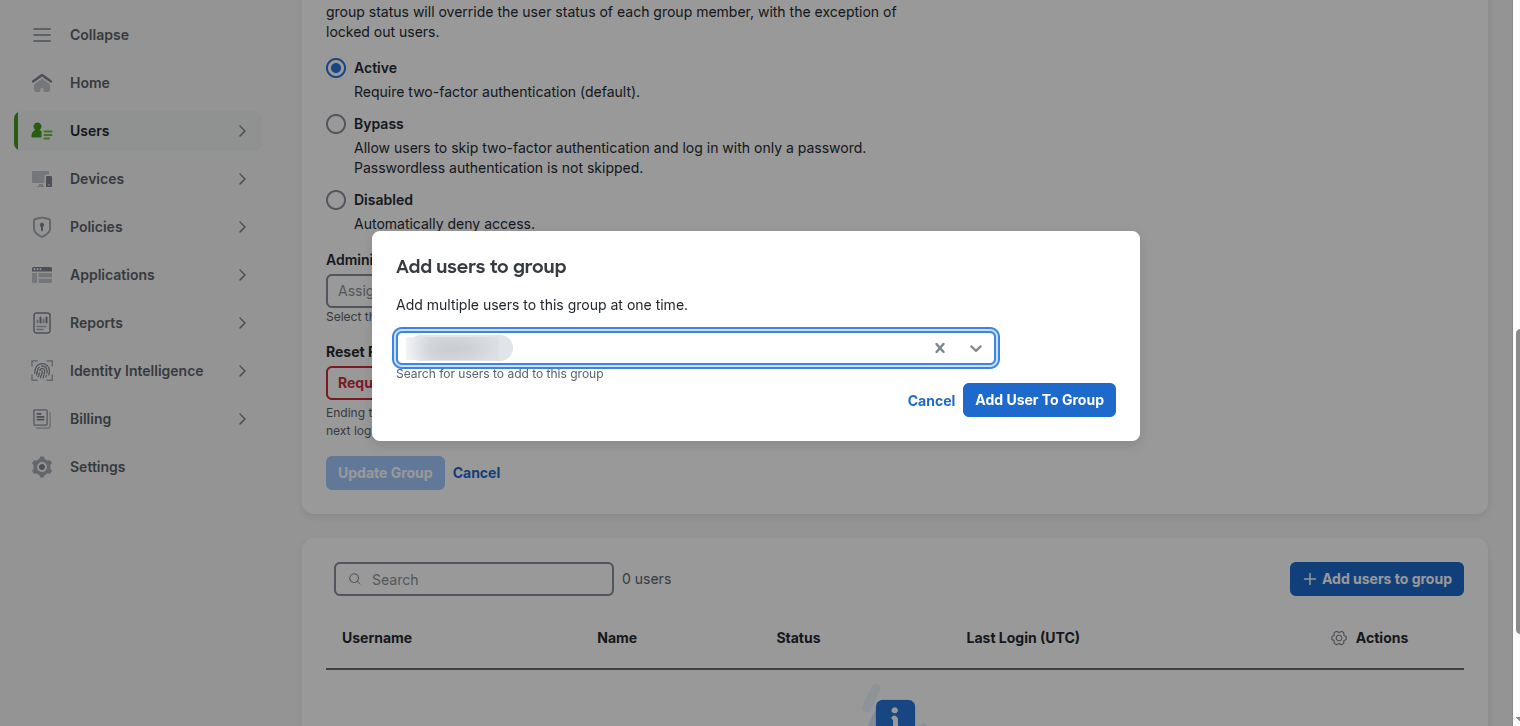
- Go to Users → Groups and open the group you created.
- Click + Add users to group, search for the user, and click Add User To Group.
- Once the user is added to the group, they will be automatically created in Profit.co.
Supported Attributes
The supported attributes are as follows,
- First name
- Last name
- Employee number
- Email address
- Job title
- Department
- Manager
- Roles
Department Sync
- Existing departments: If the department already exists in Profit.co, the user is assigned to it unless the department is disabled. No duplicate departments are created.
- New departments: If the department does not exist in Profit.co, it is created automatically and the user is assigned to it during provisioning.
Roles Sync
When any of the roles below are selected in Cisco Duo, the matching role is automatically applied in Profit.co.
SCIM Role Profit.co Role manager Profit Manager
user Profit User
read Only Profit Read Only
department Access Only Department Access Only
SCIM Default Role Selection
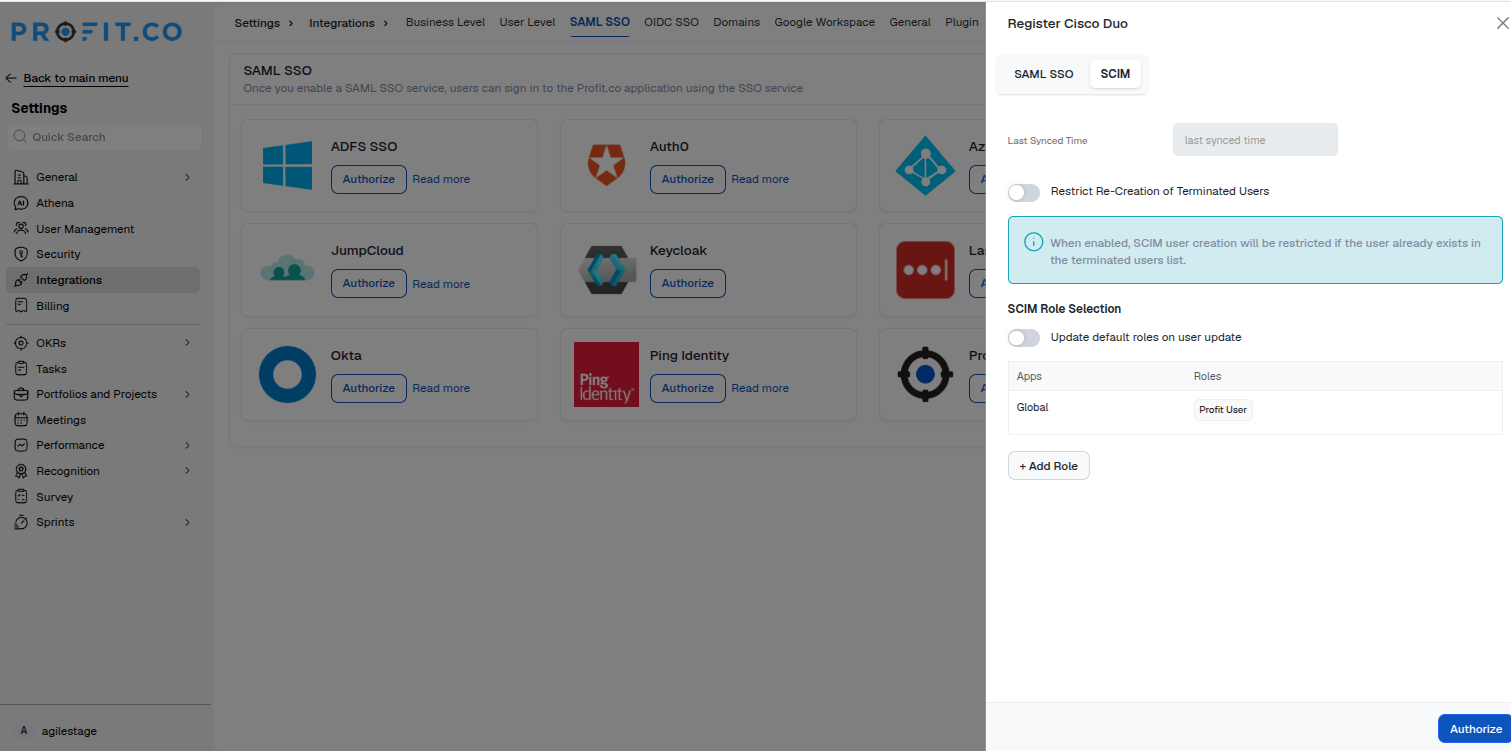
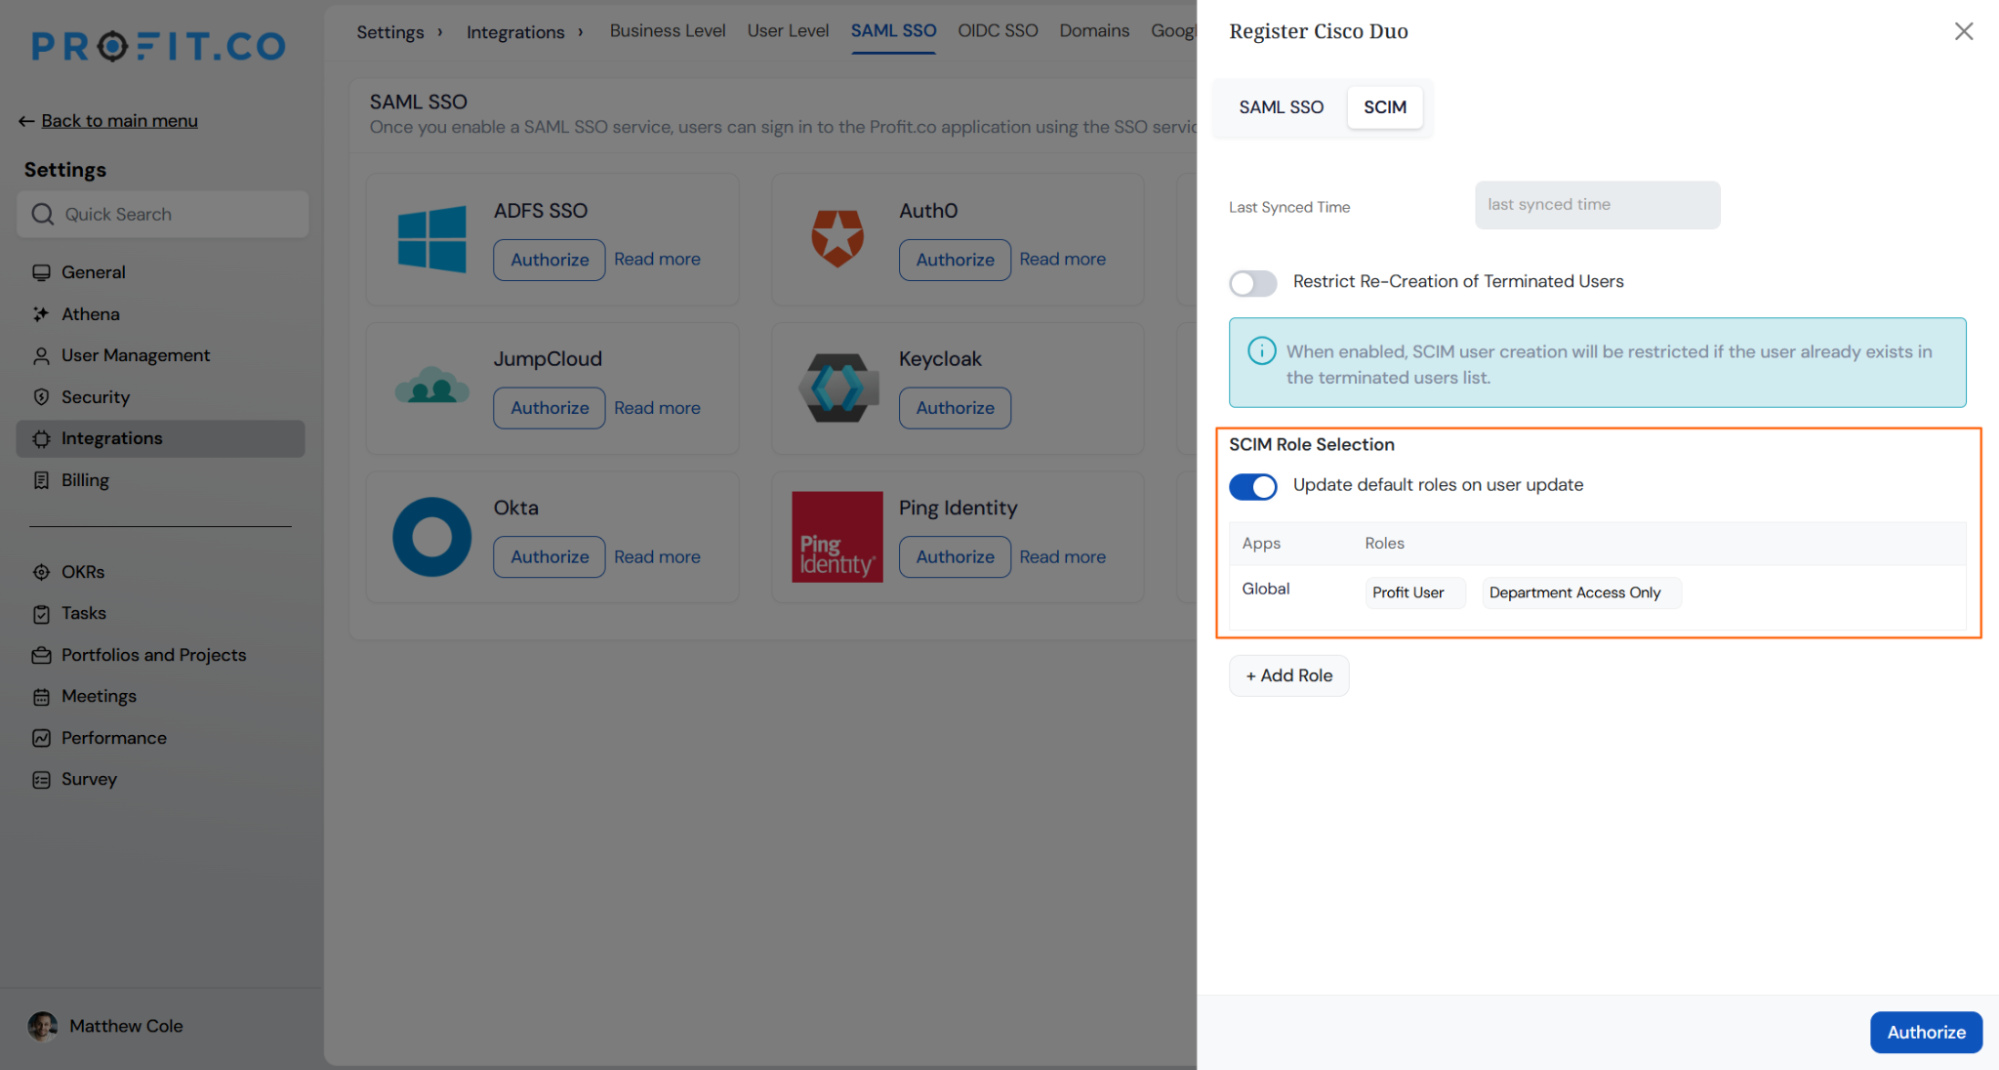
SCIM Role Selection lets administrators configure which roles are assigned in Profit.co when users are synchronized from Cisco Duo.
To open it, go to Settings → Integrations → SAML SSO, click Authorize on the Cisco Duo card, and switch to the SCIM tab in the Register Cisco Duo panel.
Sync Default Roles
By default, the Global app row lists Profit User. Every user synchronized from Cisco Duo through SCIM is automatically assigned this role in Profit.co.
Sync Selected Roles
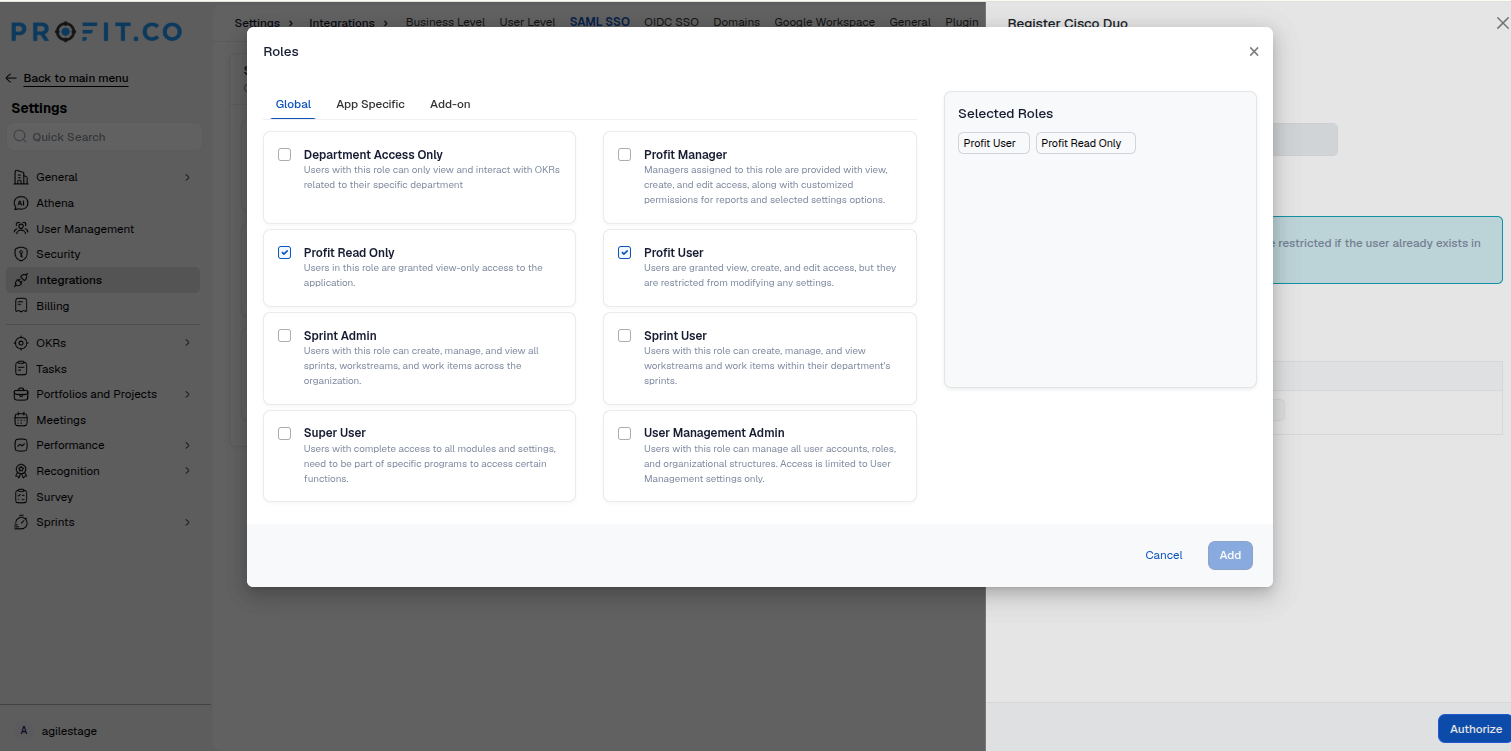
To assign other roles during synchronization:
- In the SCIM Role Selection section, click + Add Role.
- In the Roles dialog, choose roles from the Global, App Specific or Add-on tabs.
- Check each role you want. Your choices appear under Selected Roles on the right of the dialog.
- Click Add to apply the roles, then click Authorize to save the configuration.
Update Default Roles on User Update
When Update default roles on user update is enabled, a user’s existing role in Profit.co is preserved when their record is updated through SCIM.
When this option is disabled, SCIM updates will assign the user the role configured in Profit.co.
Group-Based Role Assignment
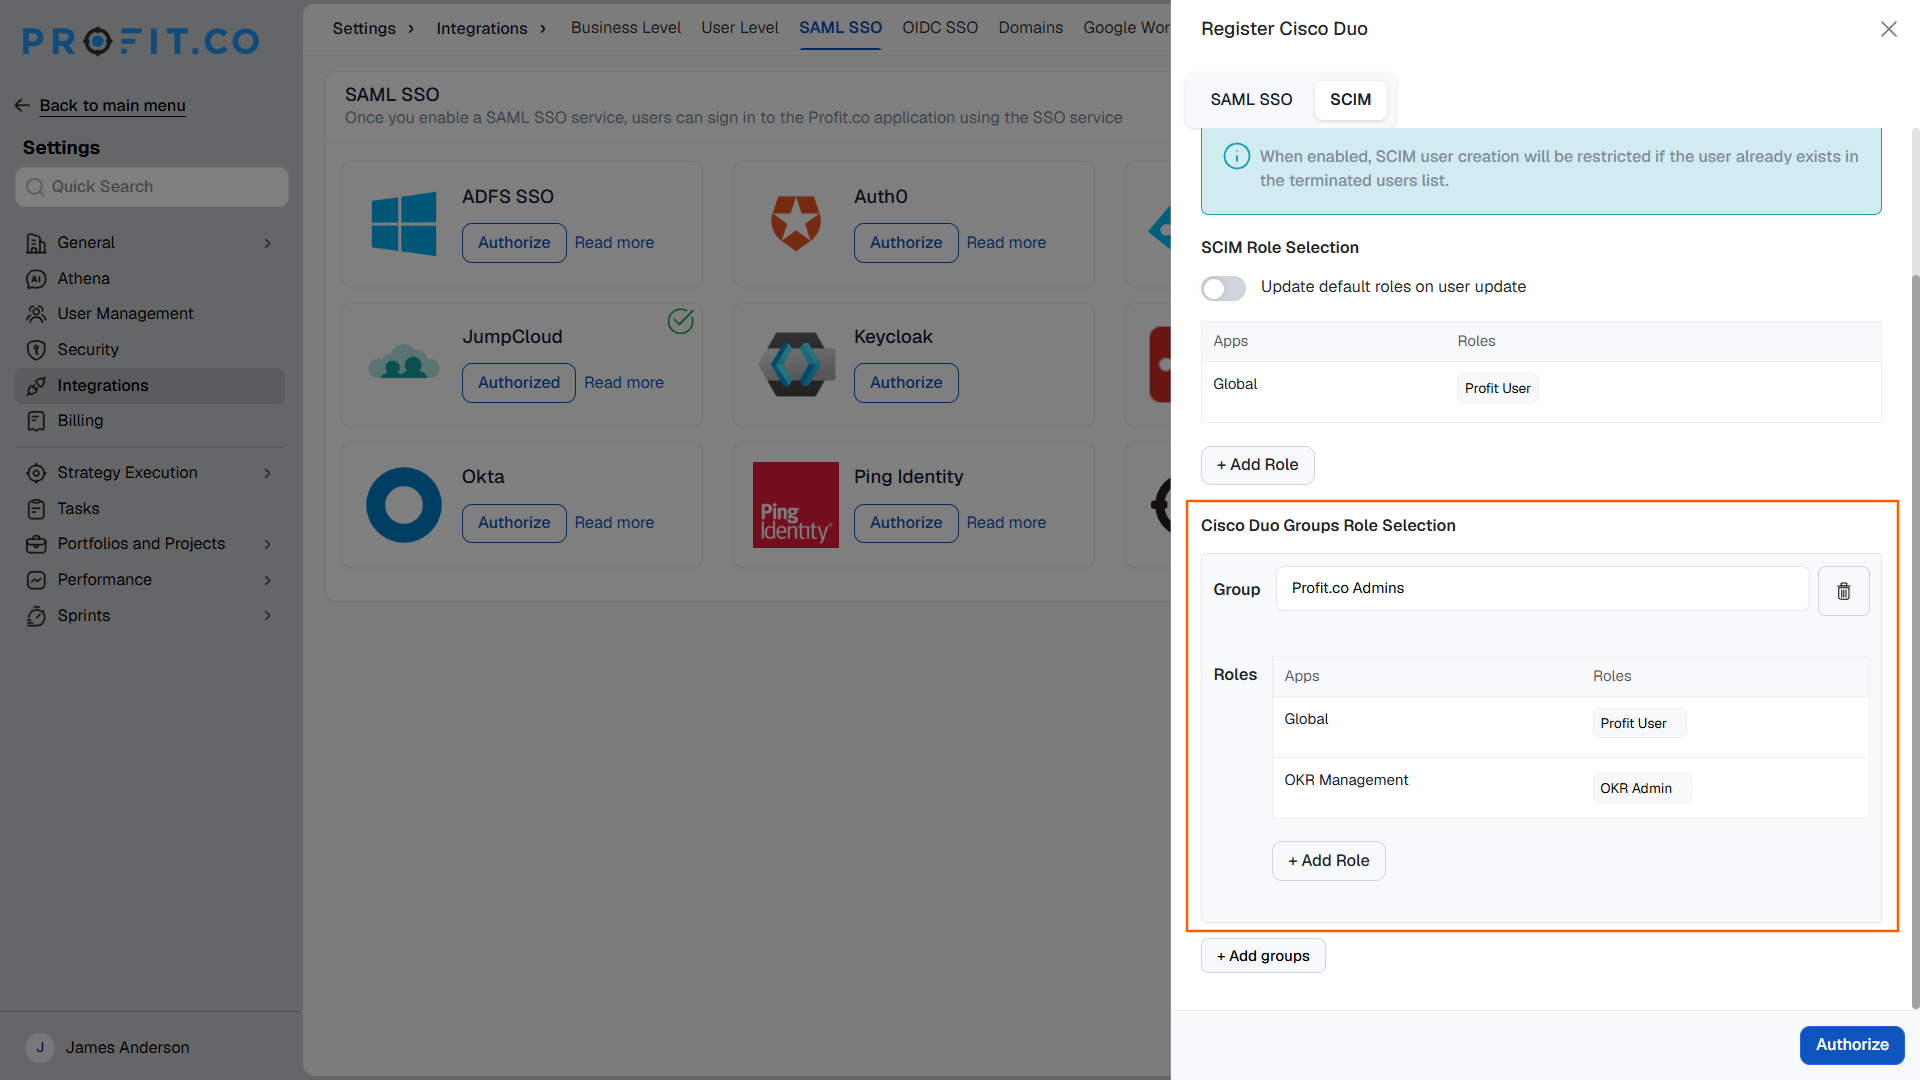
- Once a group is created in Cisco Duo and users are added to it, the same group name can be configured in Profit.co for role mapping.
- After this mapping is configured, whenever a user is added to that Cisco Duo group, Profit.co automatically assigns the predefined roles associated with the group.
Note: The group name in Profit.co must exactly match the group name in Cisco Duo for the role mapping to work.
Restrict Re-Creation of Terminated Users
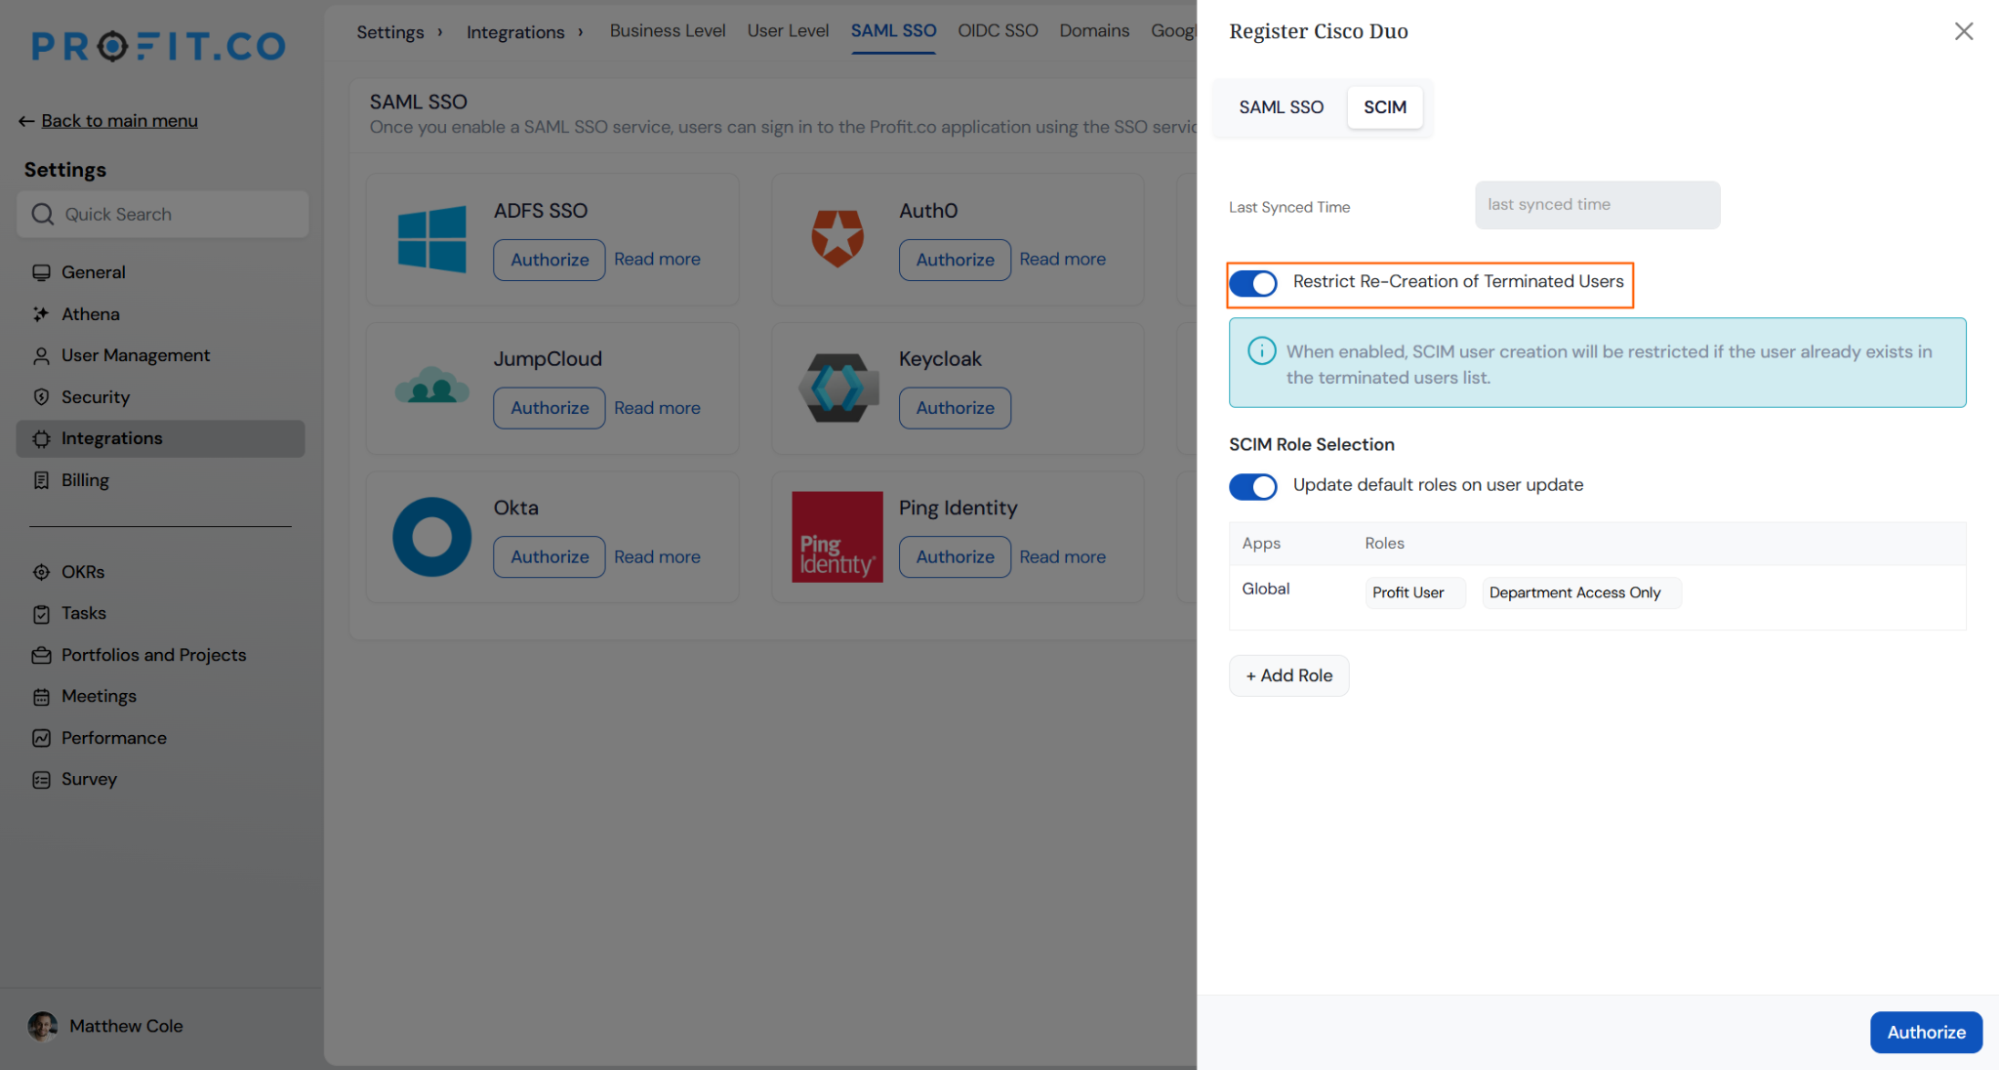
Profit.co provides a Restrict Re-Creation of Terminated Users option within the SCIM configuration.
When this toggle is enabled, users who have been terminated in Profit.co through SCIM provisioning cannot be automatically recreated, even if their account information is updated in Cisco Duo.
When this toggle is disabled, any subsequent update to a terminated user’s account in Cisco Duo may result in the user being recreated as a new user in Profit.co.
User Enrollment Flow
Once Cisco Duo SSO is configured, users must be enrolled in Duo before they can authenticate. The enrollment process can be initiated by the admin and completed by the user via an email invitation.
Step 1:
Log in to the Duo Admin Panel at https://admin.duosecurity.com/.
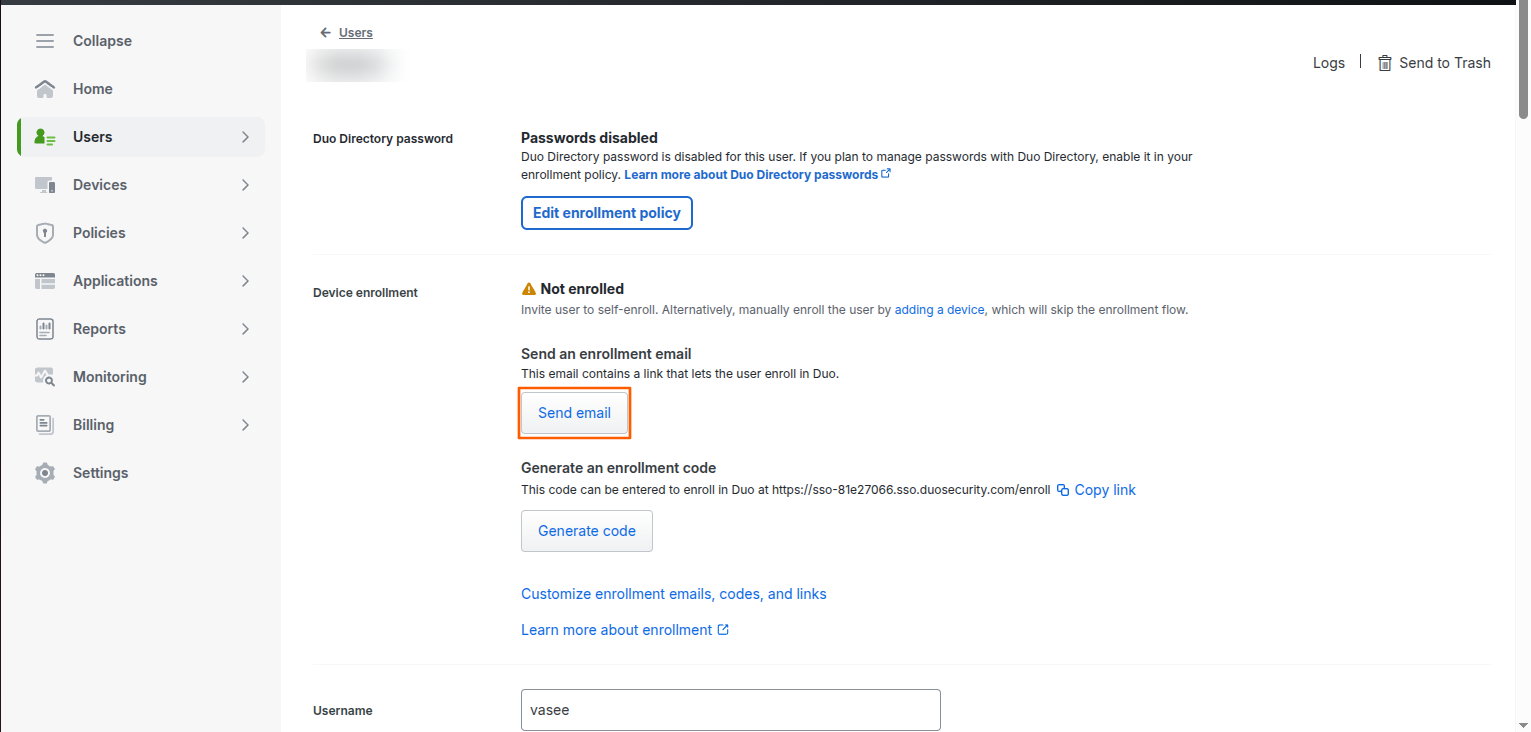
Navigate to Users in the left panel and click on the user you want to enroll.
For user enrollment-related queries, refer to the Duo enrollment guide.
Step 2:
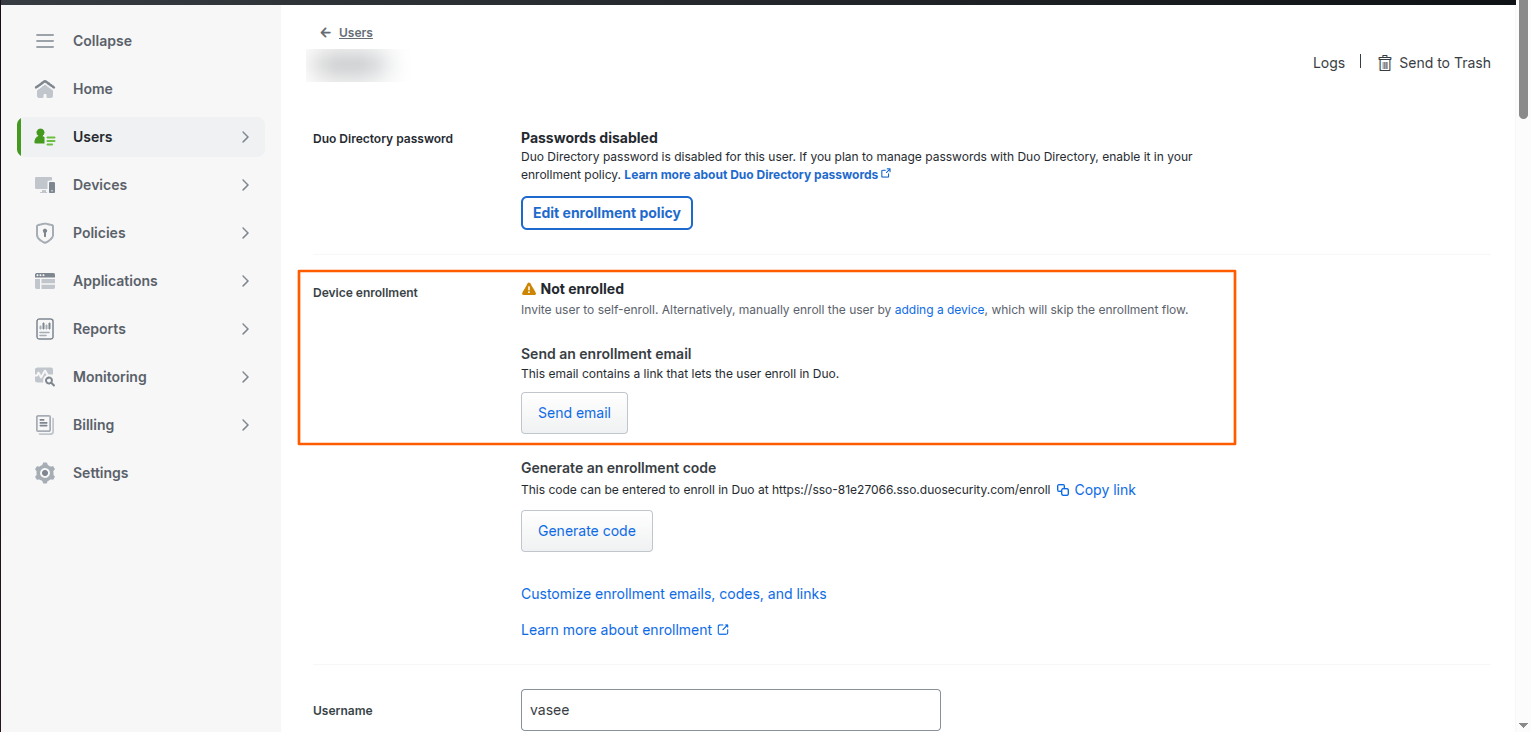
Under the Device enrollment section, click Send email. A confirmation banner will confirm the email was sent.
Note: You can also click Generate code to share an enrollment link manually.
Step 3:
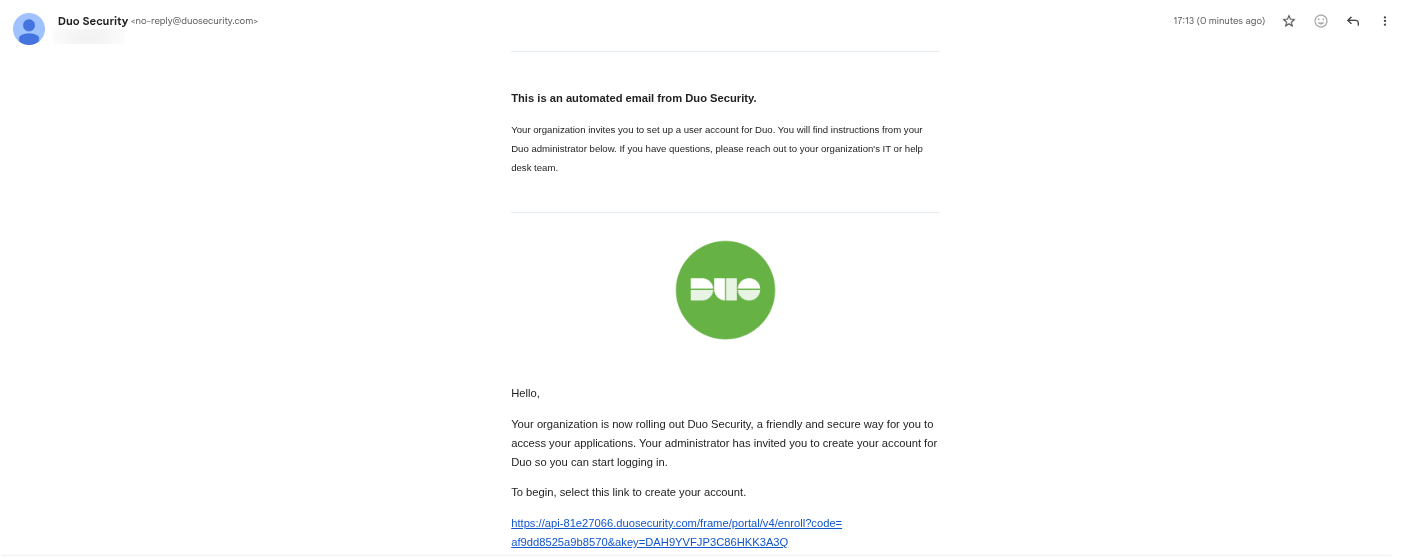
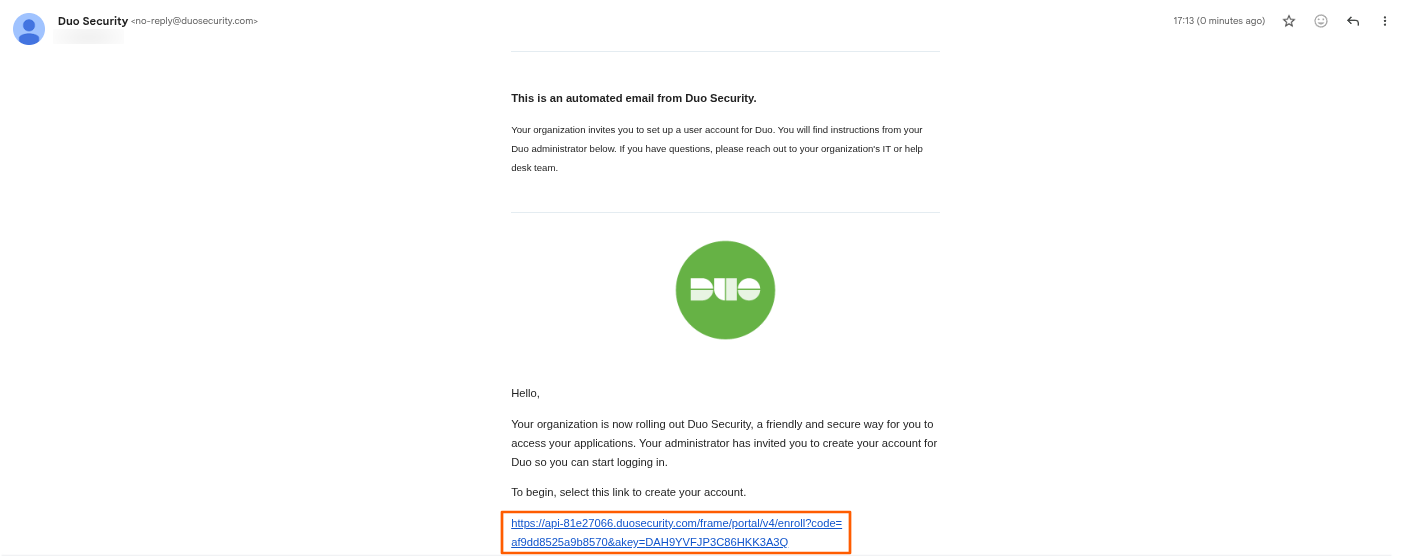
The user receives an email from Duo Security (no-reply@duosecurity.com) with a unique enrollment link. Click the link to begin enrollment.
Step 4:
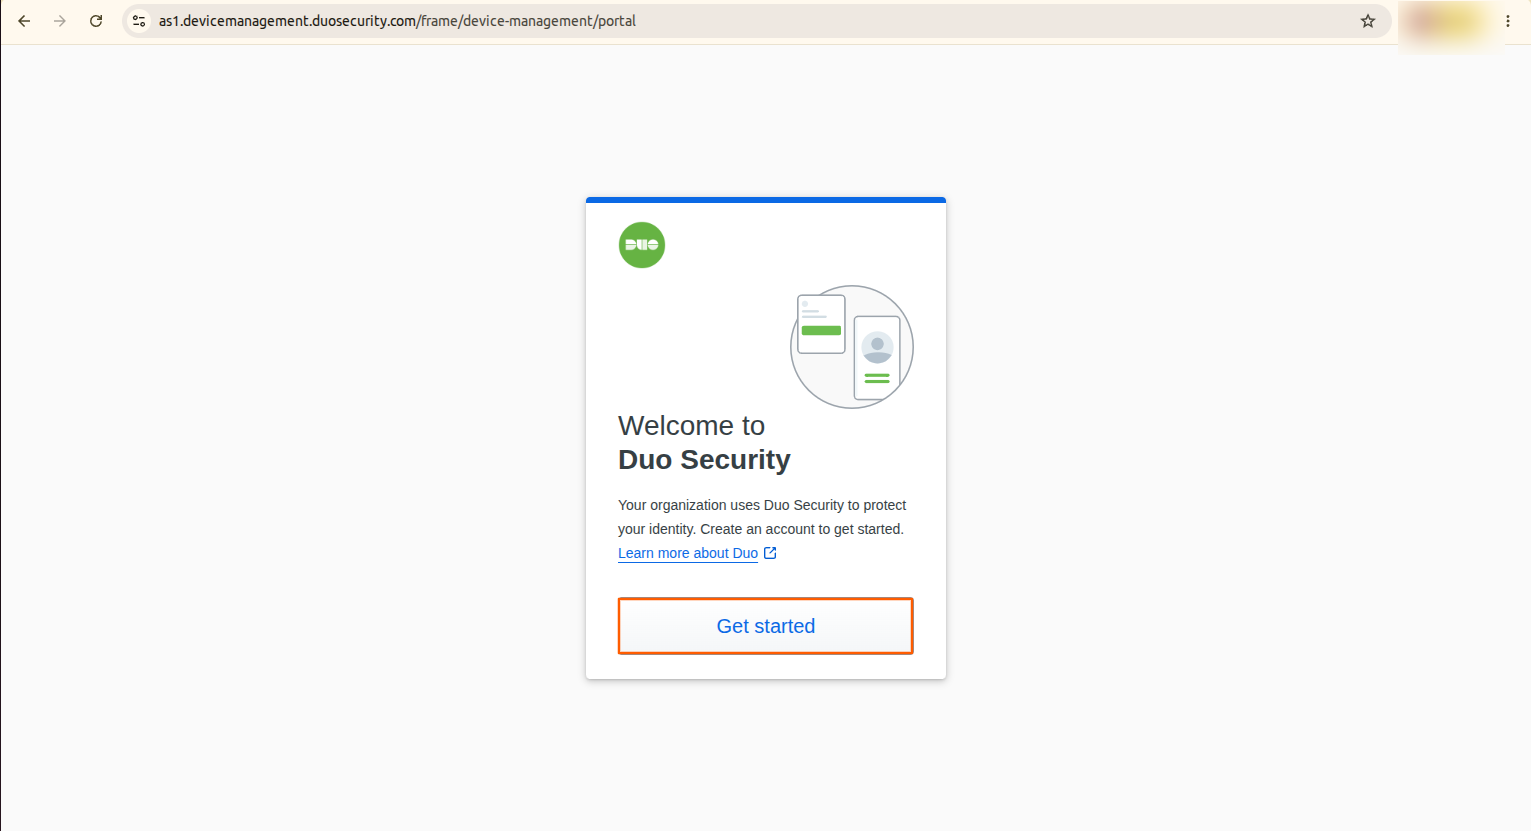
Clicking the enrollment link opens the Duo device management portal in the browser.
The user clicks Get started to proceed.
Step 5:
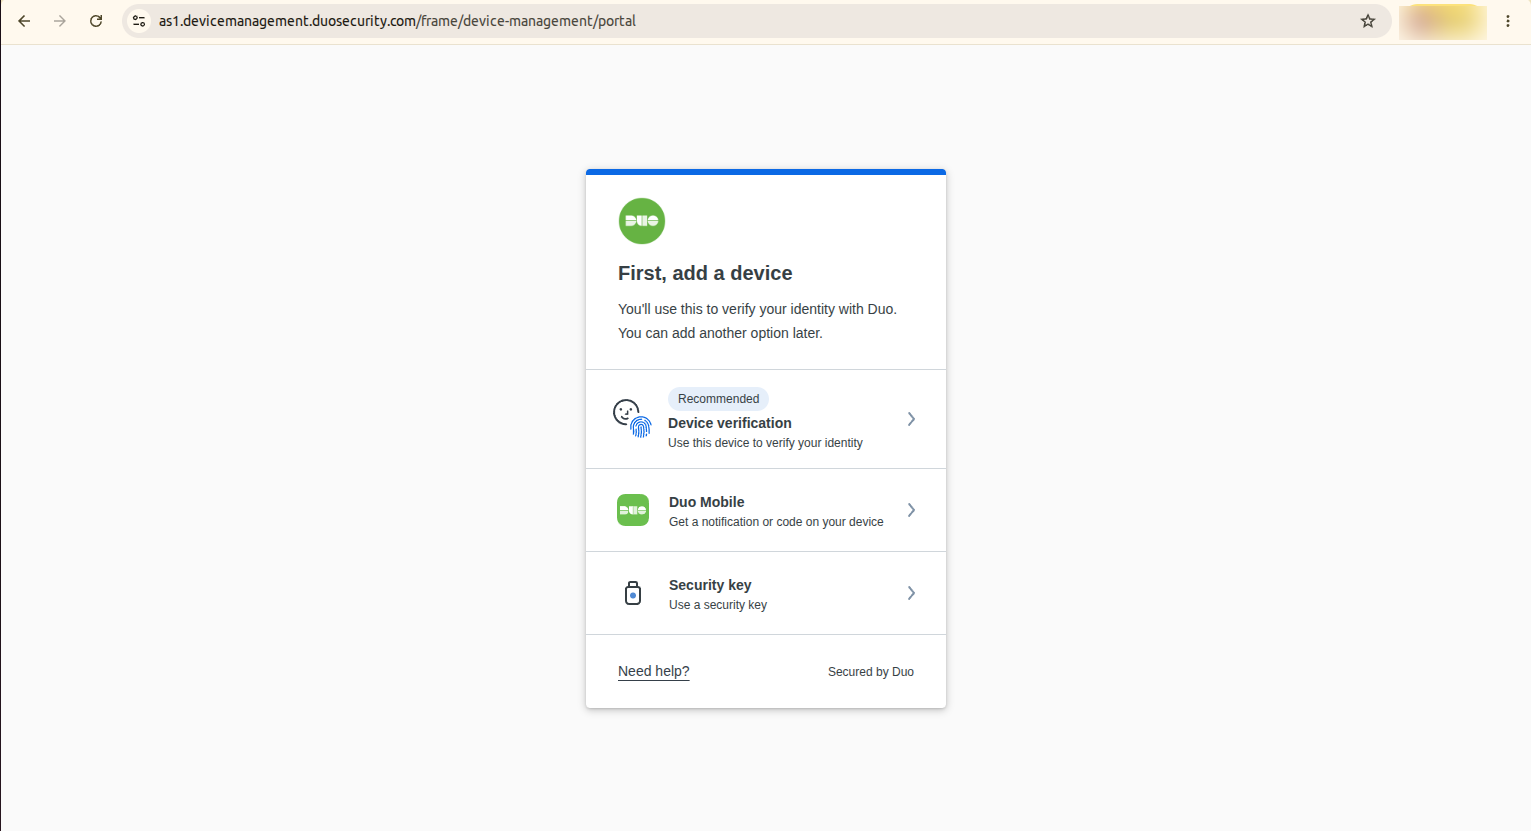
Select a device type for identity verification:
- Device verification(Recommended) — Uses the device’s biometrics or PIN.
- Duo Mobile — Receives a push notification or passcode on a mobile device.
- Security key — Uses a physical hardware security key.
For Duo Mobile, proceed with the steps below.
Step 6:
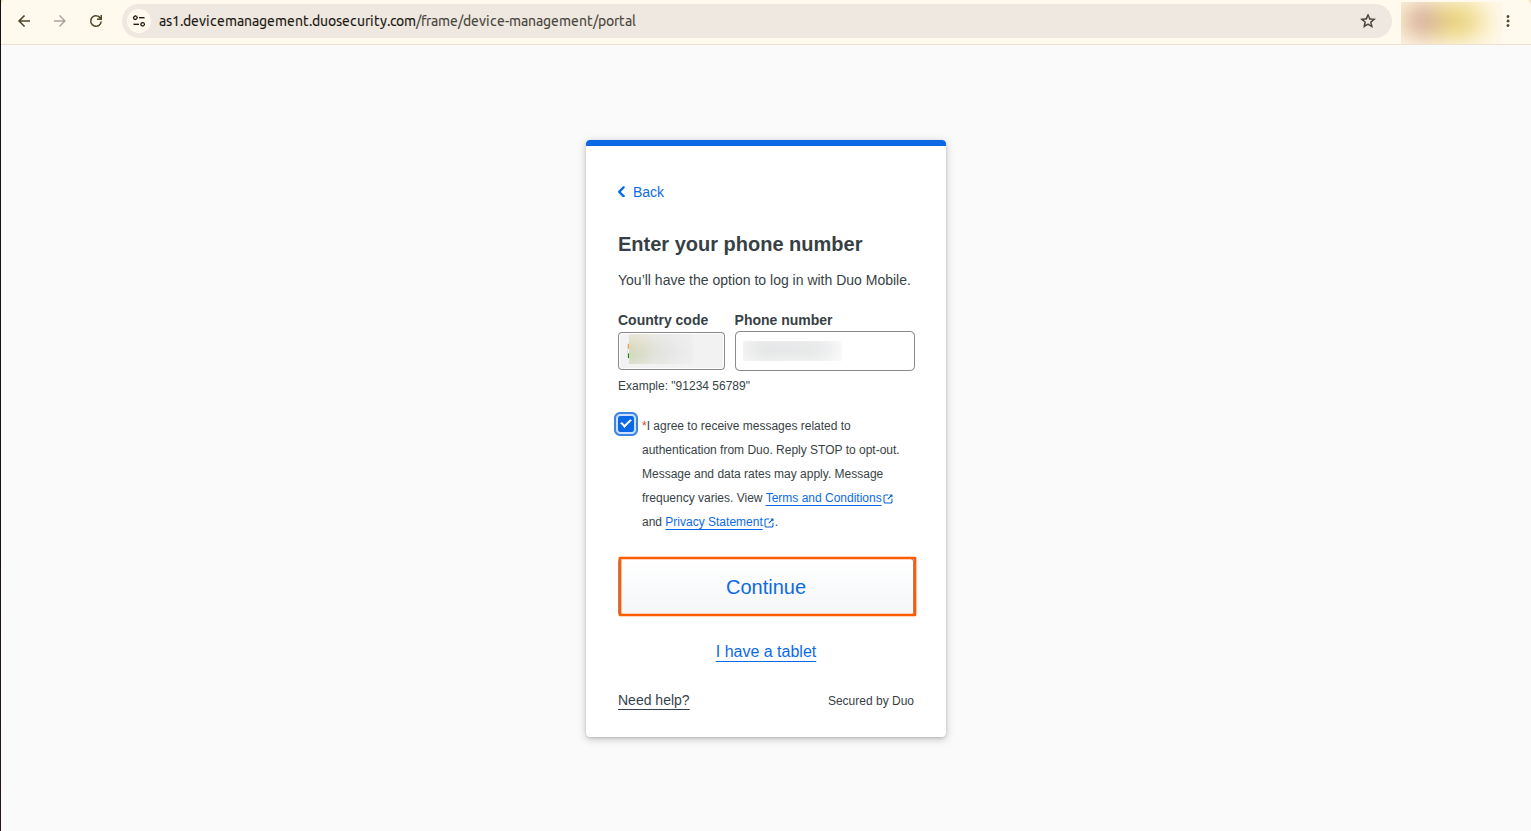
Select the country code, enter your phone number, check the consent checkbox, and click Continue.
Step 7:
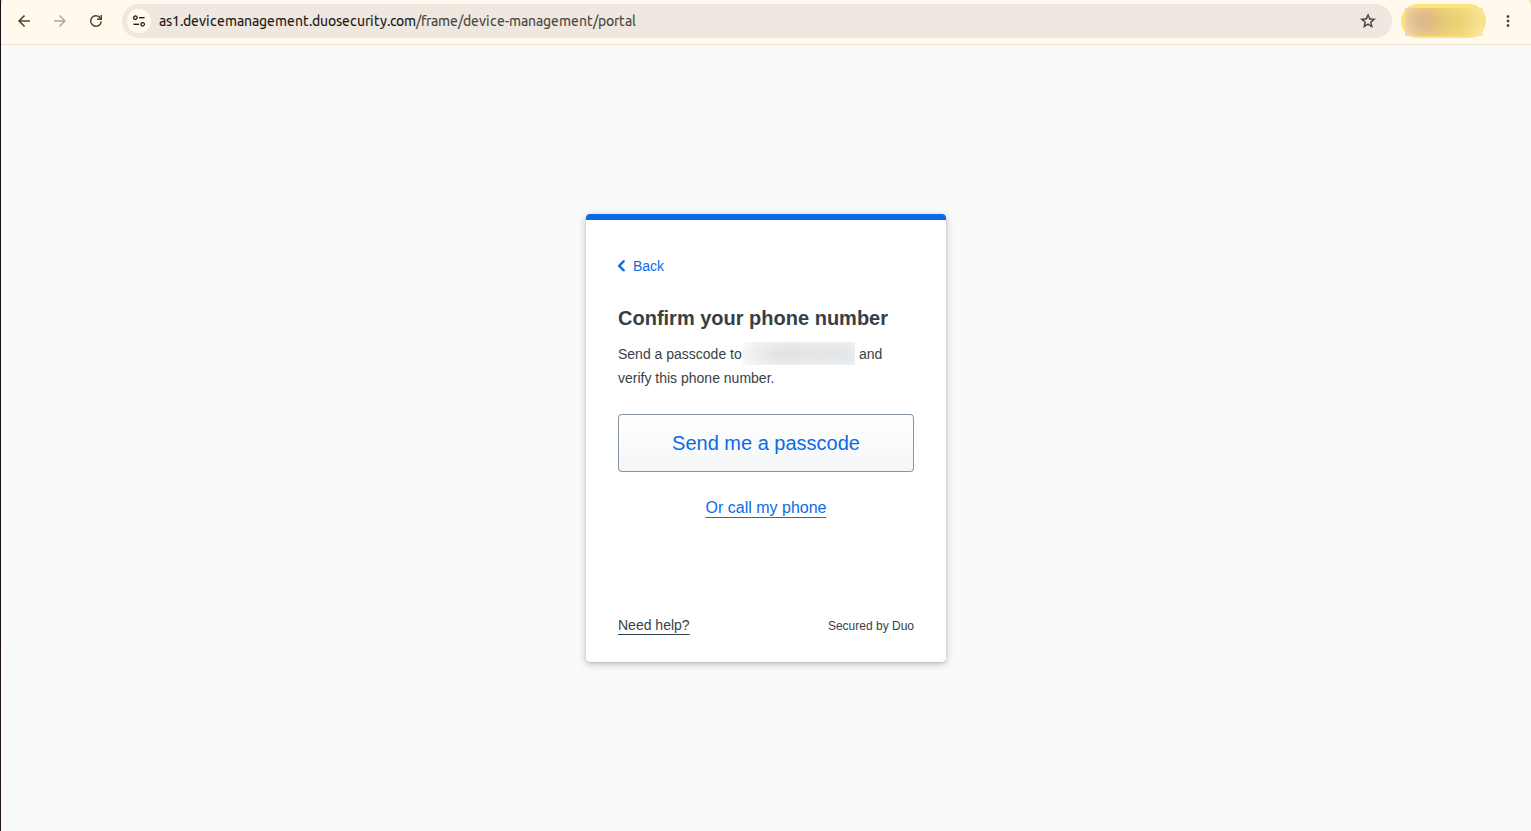
Click Send me a passcode to receive a verification code via SMS, or Or call my phone for a voice call.
Step 8:
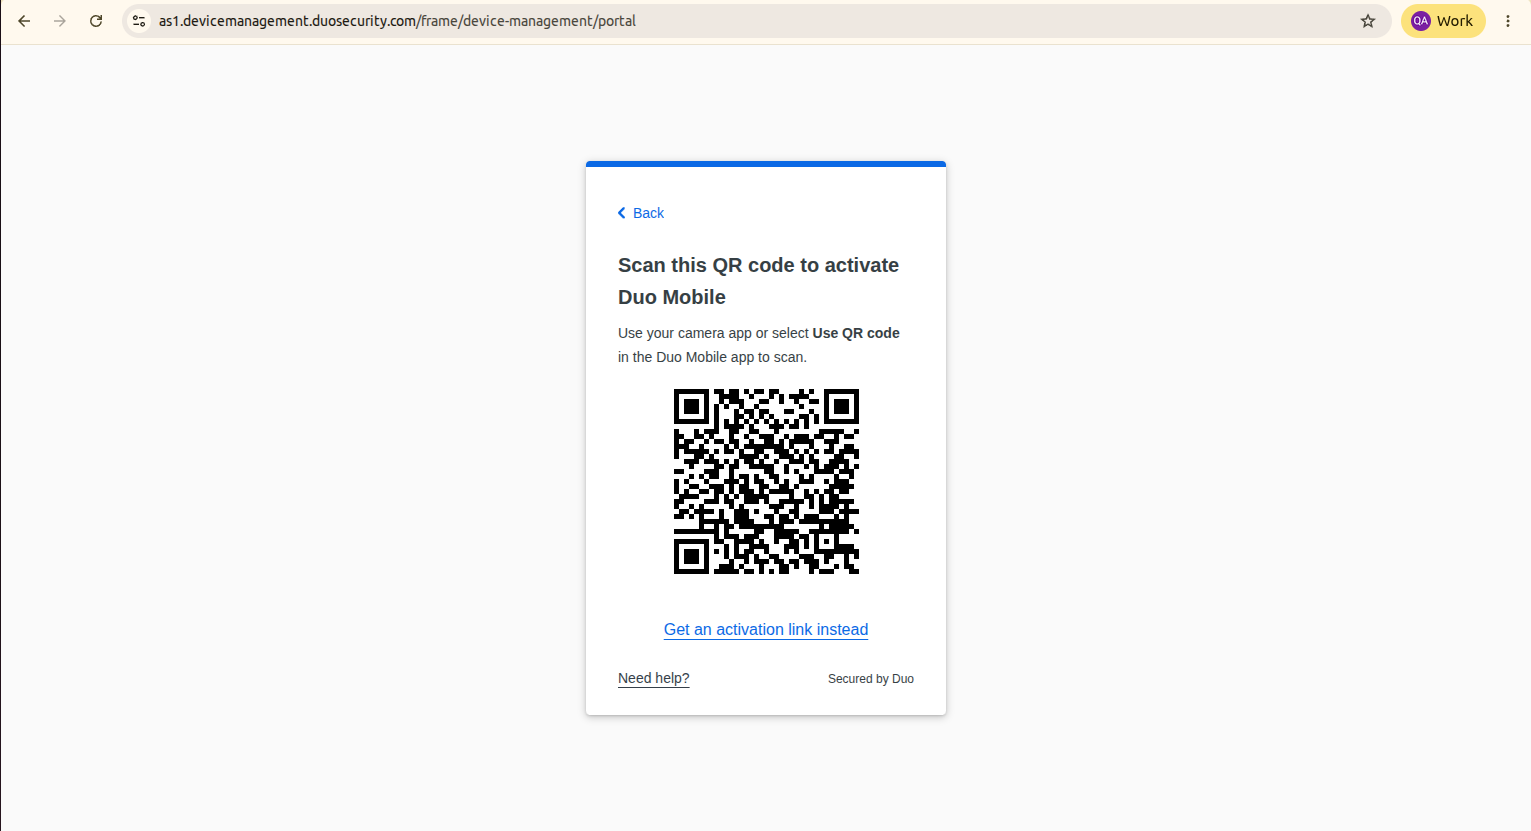
Scan the QR code using your camera app or the Use QR Code option in the Duo Mobile app to complete activation.
Step 9:
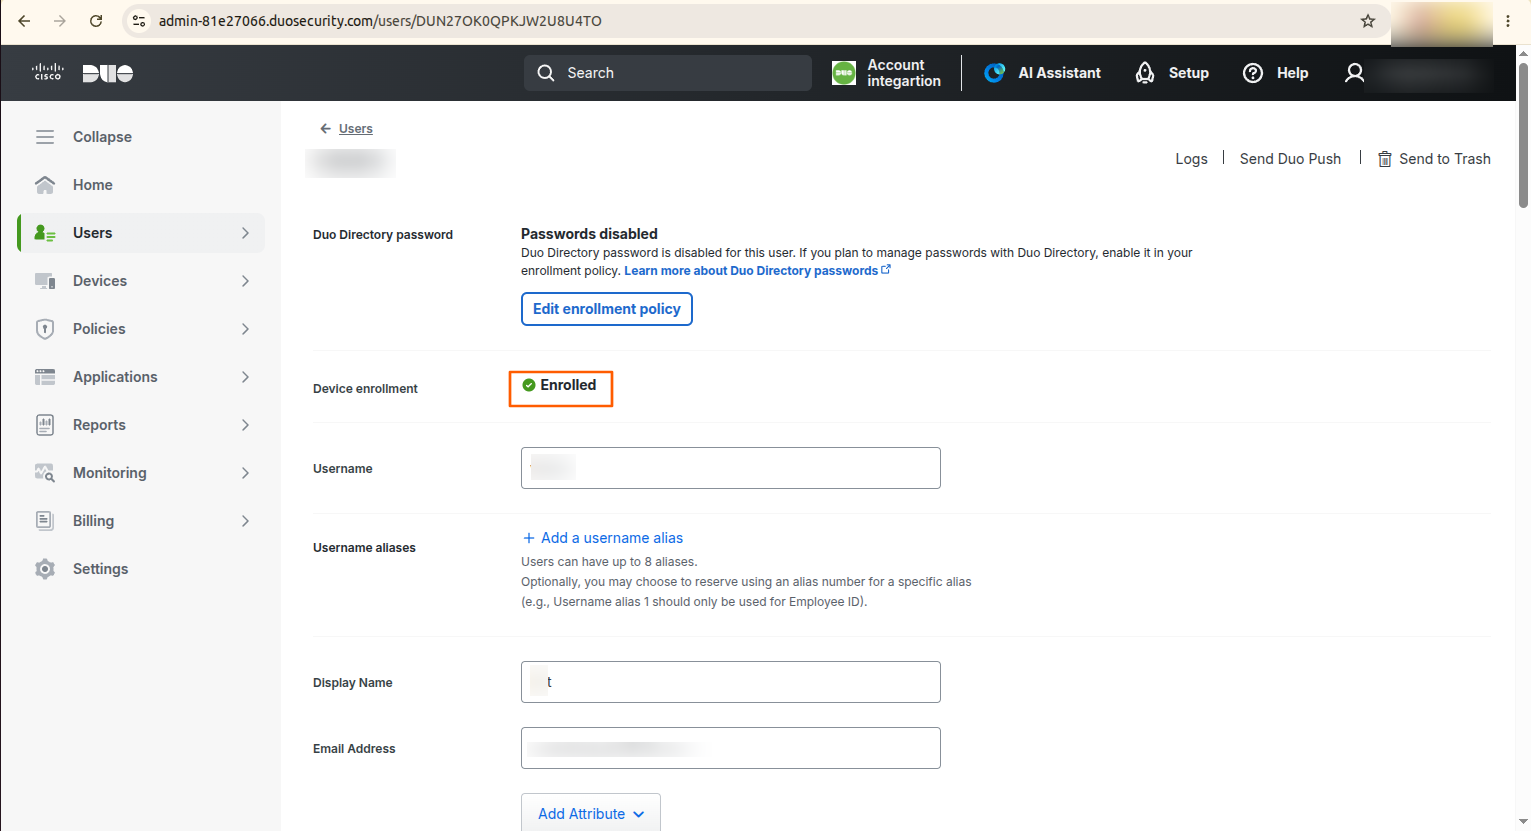
Once activation is complete, the Device enrollment field in the Duo Admin Panel updates to Enrolled. The user can now log in to Profit.co using Cisco Duo SSO.
Step 10:
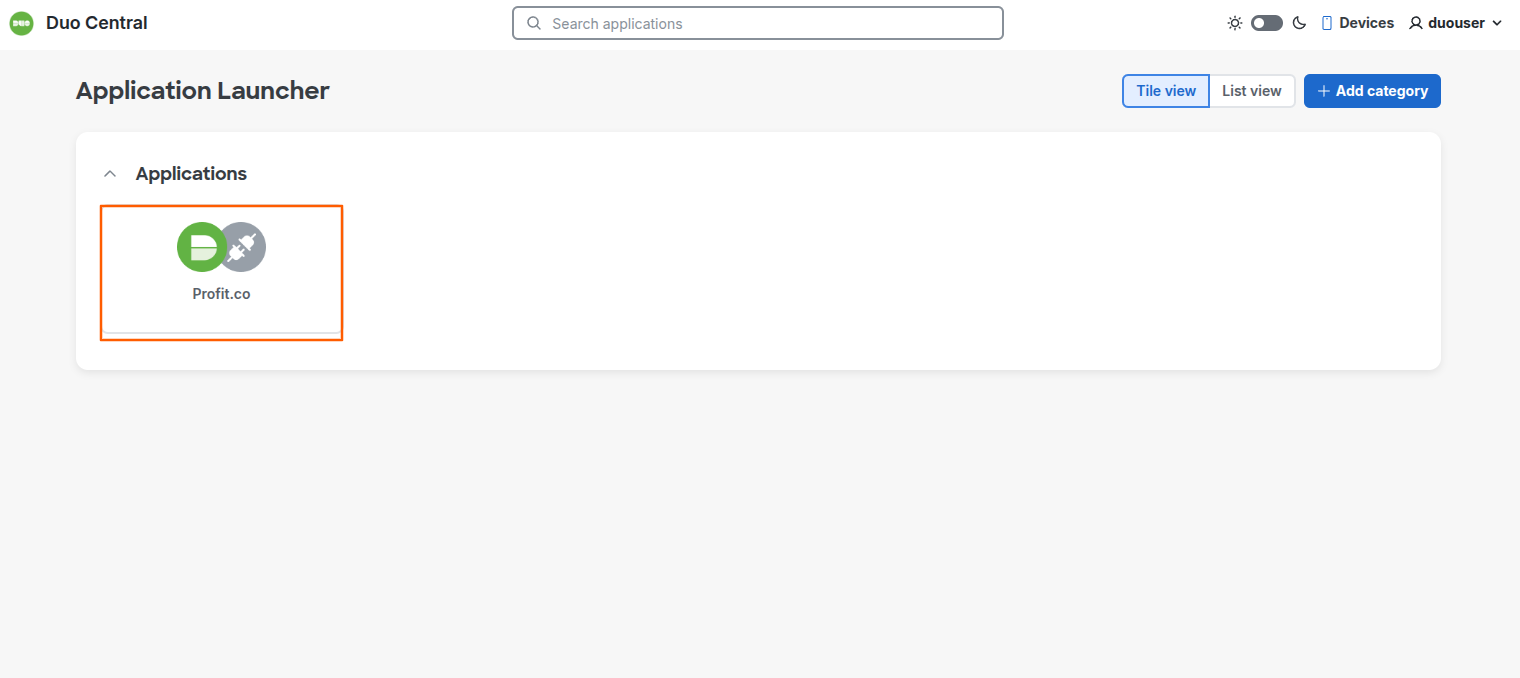
Click the Duo Central subdomain URL. You will be redirected to the Duo page.
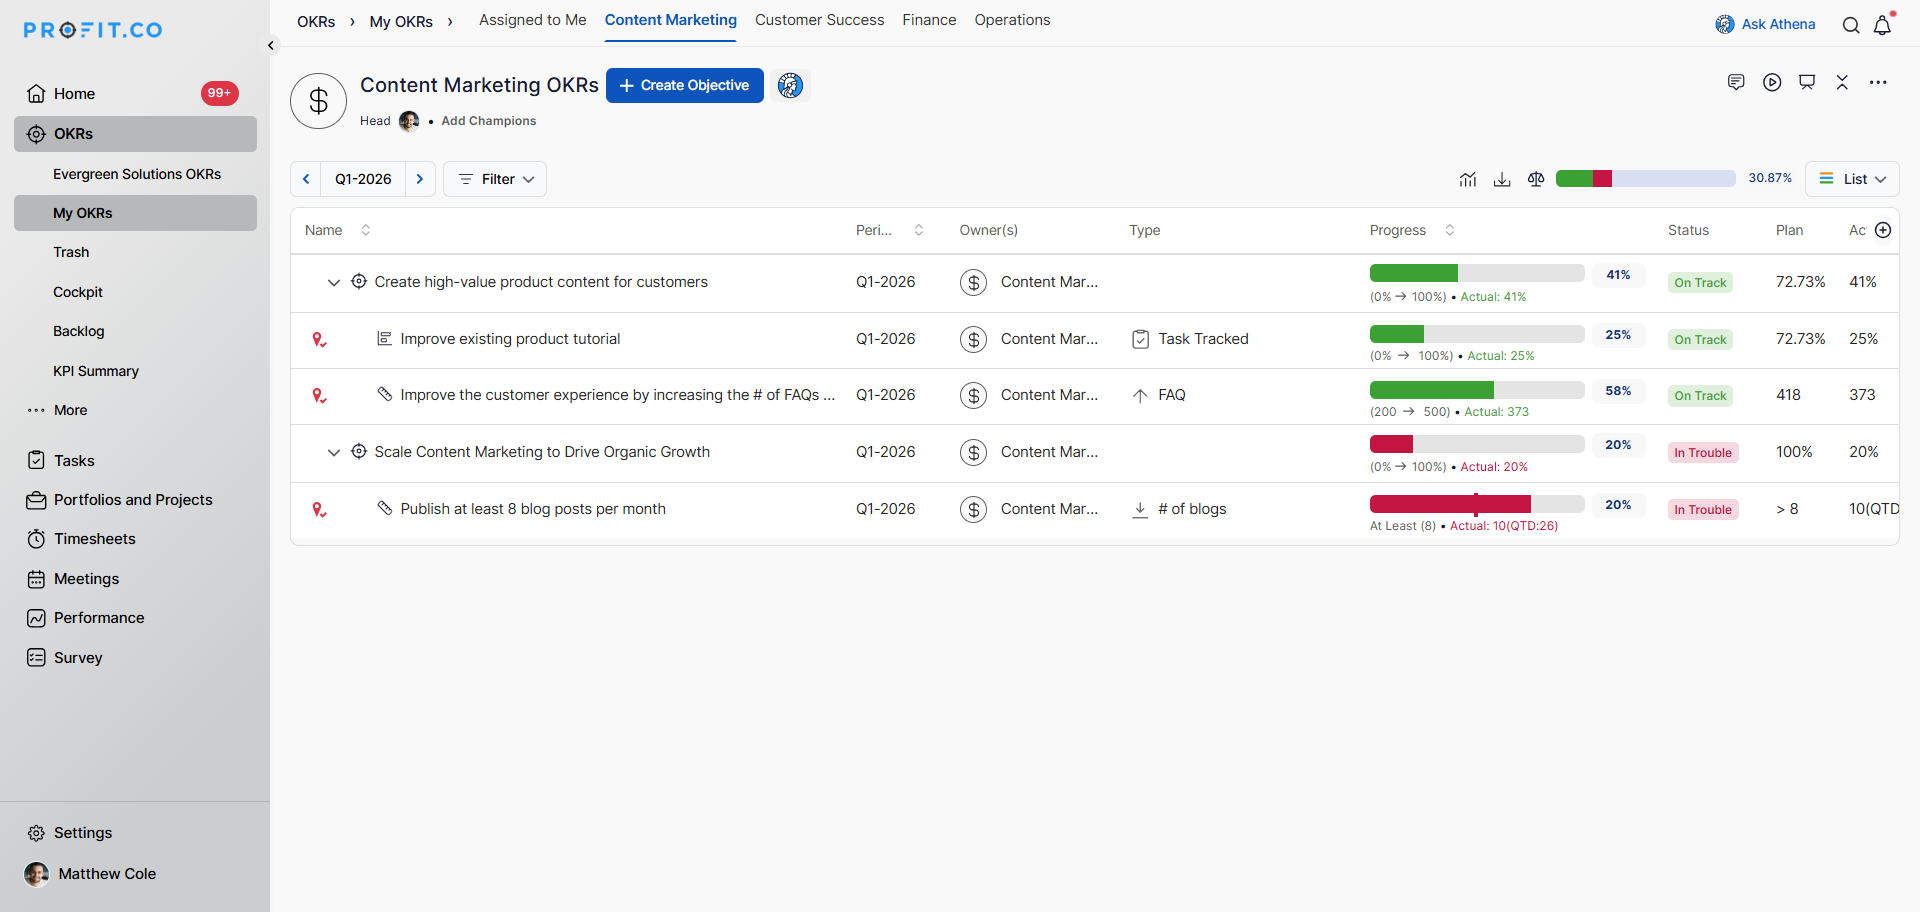
Click the Profit.co link to access the Profit.co OKRs page.
Summary
By configuring Cisco Duo as a SAML identity provider in Profit.co, enabling SCIM-based user provisioning, and completing the user enrollment process, organizations can enforce secure, centralized authentication with two-factor verification. Users provisioned through Duo groups are automatically created in Profit.co, and their access is managed throughout the user lifecycle — ensuring only enrolled, verified users gain access across all supported regions.